
Summary of Contents for SWH Solar Racking
- Page 1 Version 12.10.v2 SWH Solar Racking Installation Guide 9628 Valley Blvd. Rosemead, CA 91770 | Phone 626-579-3288 | info@esolarwarehouse.com...
-
Page 2: Table Of Contents
....... Part II. Procedure to Select Rail Span and Foot Spacing [2.1] Using Standard Beam Calculations, Structural Engineering Methodology .... Part III. Installing SWH Solar Racking System ............. [3.1] SWH Solar Racking Components ..................[3.2] Installing SWH with Top Mounting Clamps .............. -
Page 3: Installer's Responsibilities
SWH Solar Racking Installation Guide | Version 12.10.v2 i. Installer’s Responsibilities Please review this manual thoroughly before installing your SWH solar racking system. This manual provides (1) supporting documentation for building permit applications relating to SWH solar racking system, and (2) plan- ning and assembly instructions for SWH products. -
Page 4: [1.1] Using The Low Rise Buildings (Simplified) Method - Asce
ASCE 7-10, Minimum Design Loads for Buildings and Other Structures. Please refer to ASCE 7-10 if you have any questions about the definitions or procedures presented in this manual. SWH solar racking system uses Part 2, The Simplified Method, for low rise buildings to calculate the Design Wind Load for pressures on components and cladding in this document. - Page 5 SWH Solar Racking Installation Guide | Version 12.10.v2 [1.2.] Procedure to Calculate Total Design Wind Load per ASCE 7-10 Step 1. Determine risk category Buildings and other structures shall be classified, based on the risk to human life, health and welfare associated with their damage or failure by nature of their occupancy or use.
-
Page 6: [1.2] Procedure To Calculate Total Design Wind Load Per Asce
SWH Solar Racking Installation Guide | Version 12.10.v2 [1.2.] Procedure to Calculate Total Design Wind Load per ASCE 7-10 FIGURE 26.5-1A Basic Wind Speeds for Risk Category II Buildings and Other Structures Miles per hour (Meters per second) Notes: 1. Values are design 3-second gust wind speeds in miles per hour (m/s) at 33 ft (10m) above ground for Exposure C category. - Page 7 SWH Solar Racking Installation Guide | Version 12.10.v2 [1.2.] Procedure to Calculate Total Design Wind Load per ASCE 7-10 FIGURE 26.5-1A (Continued) Basic Wind Speeds for Risk Category II Buildings and Other Structures Miles per hour (Meters per second) Special Wind Region...
- Page 8 SWH Solar Racking Installation Guide | Version 12.10.v2 [1.2.] Procedure to Calculate Total Design Wind Load per ASCE 7-10 FIGURE 26.5-1B Basic Wind Speeds for Risk Category III and IV Buildings and Other Structures Miles per hour (Meters per second) Notes: 1.
- Page 9 SWH Solar Racking Installation Guide | Version 12.10.v2 [1.2.] Procedure to Calculate Total Design Wind Load per ASCE 7-10 FIGURE 26.5-1B (Continued) Basic Wind Speeds for Risk Category III and IV Buildings and Other Structures Miles per hour (Meters per second)
- Page 10 SWH Solar Racking Installation Guide | Version 12.10.v2 [1.2.] Procedure to Calculate Total Design Wind Load per ASCE 7-10 FIGURE 26.5-1C Basic Wind Speeds for Risk Category I Buildings and Other Structures Miles per hour (Meters per second) Notes: 1. Values are design 3-second gust wind speeds in miles per hour (m/s) at 33 ft (10m) above ground for Exposure C category.
- Page 11 SWH Solar Racking Installation Guide | Version 12.10.v2 [1.2.] Procedure to Calculate Total Design Wind Load per ASCE 7-10 FIGURE 26.5-1C (Continued) Basic Wind Speeds for Risk Category I Buildings and Other Structures Miles per hour (Meters per second) Special Wind Region...
- Page 12 SWH Solar Racking Installation Guide | Version 12.10.v2 [1.2.] Procedure to Calculate Total Design Wind Load per ASCE 7-10 Step 4. Determine Effective Wind Area Step 3. Determine Wind Load Parameters Determine the smallest area Step 3a: Determine the proper Exposure...
- Page 13 SWH Solar Racking Installation Guide | Version 12.10.v2 [1.2.] Procedure to Calculate Total Design Wind Load per ASCE 7-10 Figure 26.8-1 WIND LOADS: GENERAL REQUIREMENTS Topographic Factor, K Topographic Multipliers for Exposure C Multiplier Multiplier Multiplier Ridge Escarp. Axisym. Escarp.
- Page 14 SWH Solar Racking Installation Guide | Version 12.10.v2 [1.2.] Procedure to Calculate Total Design Wind Load per ASCE 7-10 Figure 26.8-1 WIND LOADS: GENERAL REQUIREMENTS (cont’d) Topographic Factor, K Equations: determined from table below μ γ Parameters for Speed-Up Over Hills and Escarpments...
- Page 15 SWH Solar Racking Installation Guide | Version 12.10.v2 [1.2.] Procedure to Calculate Total Design Wind Load per ASCE 7-10 Table 2. Determine Roof/Wall Zone dimension (a) according to building width and height a = 10 percent of the least horizontal dimension or 0.4h whichever is smaller, but not less than either 4% of the least horizontal dimension or 3 ft of the building.
- Page 16 SWH Solar Racking Installation Guide | Version 12.10.v2 [1.2.] Procedure to Calculate Total Design Wind Load per ASCE 7-10 Figure 3. Enclosed buildings, wall and roofs Hip Roof (7˚ < θ ≤ 27°) Flat Roof Gable Roof ( θ ≤ 7°) Gable Roof (7˚...
- Page 17 SWH Solar Racking Installation Guide | Version 12.10.v2 [1.2.] Procedure to Calculate Total Design Wind Load per ASCE 7-10 Table 3. p (psf) Roof and Wall net30 9628 Valley Blvd. Rosemead, CA 91770 | Phone 626-579-3288 | info@esolarwarehouse.com...
- Page 18 SWH Solar Racking Installation Guide | Version 12.10.v2 [1.2.] Procedure to Calculate Total Design Wind Load per ASCE 7-10 Roof Overhang Net Design Wind Pressure, P (psf) net30 (Exposure B at h=30 ft.) Basic Wind Speed V (mph) Zone Effective...
- Page 19 = net design wind pressure for Exposure B, at h = 30 ft (Step 6) net30 The adjusted wind pressures will be used to select the appropriate SWH rail, rail span and attachment spacing. Use both the positive (downforce) and the negative (uplift) results from this calculation.
-
Page 20: Part Ii. Procedure To Select Rail Span And Foot Spacing
If the Dead Load is greater than 5 psf, see your SWH distributor, a local structural engineer or contact SWH. The following procedure will guide you in selecting a SWH rail for a flush mount installation. It will also help determine the design loading imposed by the SWH PV Mounting Assembly that the building structure must be capable of supporting. - Page 21 Using the distributed load, w, from Part II, Step 2, look up the allowable spans, L in Table 7. The L-bracket SWH Series Rail Span Table uses a single L-bracket connection to the roof, wall or stand-off. Table 7 . L-Foot SWH Rail Span...
-
Page 22: [2.1] Using Standard Beam Calculations, Structural Engineering Methodology
SWH Solar Racking Installation Guide | Version 12.10.v2 [2.1.] Using Standard Beam Calculations, Structural Engineering Methodology ASCE 7-10 Step 4: Select Rail Type Step 5: Determine the Downforce Point Load, R (lbs), at each connection based on rail span Selecting a span and rail type affects the When designing the SWH Flush Mount Installation, you price of your installation. - Page 23 SWH Solar Racking Installation Guide | Version 12.10.v2 [2.1.] Using Standard Beam Calculations, Structural Engineering Methodology ASCE 7-10 Step 6: Determine the Uplift Point Load, R (lbs), at each connection based on rail span You must also consider the Uplift Point Load, R (lbs), to determine the required lag bolt attachment to the roof (building) structure.
-
Page 24: Part Iii. Installing Swh Solar Racking System
8 inches long, rails to grounding wires. predrilled. Aluminum extru- sion, anodized silver or black. SWH grounding clip and washer are inteded for SINGLE USE ONLY. Functionality may be compromised if reused. Self Grounding Splice - Aluminum anodized silver or black. -
Page 25: [3.2] Installing Swh With Top Mounting Clamps
[3.2] Installing SWH with top mounting clamps This section covers SWH racking assembly where the installer has elected to use top mounting clamps to secure modules to the rails. It details the procedure for flush mounting SWH systems to a pitched roof... - Page 26 SWH Solar Racking Installation Guide | Version 12.10.v2 [3.2.1] Planning your SWH installations The installation can be laid out with rails parallel to The width of the installation area equals the length the rafters or perpendicular to the rafters. Note of one module.
-
Page 27: [3.2.2] Laying Out L-Brackets
SWH Solar Racking Installation Guide | Version 12.10.v2 [3.2.2] Laying out L-Brackets L-Brackets can be used for attachment through existing roofing material, such as asphalt shingles or sheathing to the building structure. Use Figure 7 or 8 below to locate and mark the position of the L-bracket lag screw holes within the installation area. -
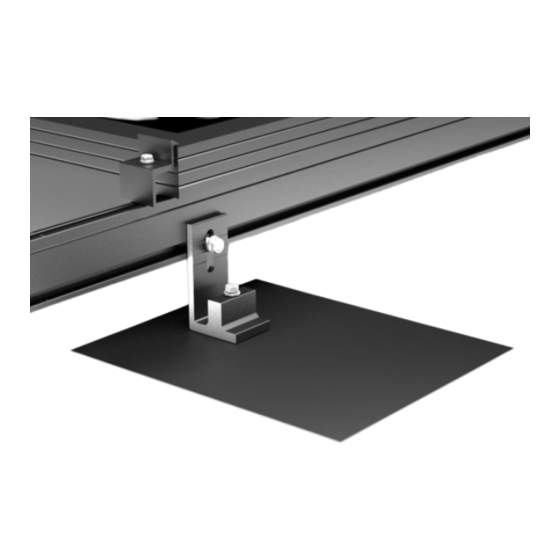
Page 28: [3.2.3] Laying Out Standoffs
SWH Solar Racking Installation Guide | Version 12.10.v2 [3.2.3] Laying out Standoffs Standoffs (Figure 9) are used to increase the height of the array above the surface of the roof. Pair each standoff with a flashing to seal the lag bolt penetrations to the roof. - Page 29 SWH Solar Racking Installation Guide | Version 12.10.v2 [3.2.4] Tile Strut Installation STEP 1: Select a tile above STEP 2: Remove the tile by STEP 3: Use an Electric stud Step 4: Drill several holes to roof rafter. pushing and pulling the tile, usu- finder to locate the rafter center.
- Page 30 SWH Solar Racking Installation Guide | Version 12.10.v2 [3.2.5] Flashed L-feet Installation REQUIRED INSTALLATION TOOLS: Tape measure, chalk line, stud finder, caulking gun, sealant compatible with roofing materials, drill with 1/4” long-style bit, socket wrench or impact gun with 5/16” deep socket...
- Page 31 SWH Solar Racking Installation Guide | Version 12.10.v2 [3.2.6] Roof Bar Installation STEP 1: Snap horizontal line with chalk STEP 2: Remove tile. STEP 3: Use studfinder and measuring line. tape to find rafters. 1.75” STEP 5: Line up pilot holes witht roof bar STEP 6: Insert lag bolts through 5/16”...
- Page 32 SWH Solar Racking Installation Guide | Version 12.10.v2 [3.2.7] Roof Hook Installation STEP 1: Snap horizontal line with chalk STEP 2: Remove tile. STEP 3: Use studfinder and measuring line. tape to find rafters STEP 5: Line up pilot hole with roof bar STEP 6: Insert lag bolt through 5/16”...
-
Page 33: [3.2.8] Installing Swh Rails And Splices
Bonding connections with splice used as a thermal break - option shown uses two SWH grounding bolt or SWH grounding lug and solid copper wire. Figure 15. Bonding expansion joint WARNING: Take care to prevent copper wires from directly contacting aluminum, as this will cause corrosion. -
Page 34: [3.2.9] Installing The Modules
You Must Use same height modules for mid clamps to properly Figure 18 secure modules (Fig. 21, 22 & 23). All SWH end and mid clamps are intended for MULTIPLE USES at same or different module frame locations. Range of Figure 20. - Page 35 SWH Solar Racking Installation Guide | Version 12.10.v2 SWH grounding clip and washer are inteded for SINGLE USE ONLY. Functionality may be compromised if reused. SWH TOP MOUNT GROUNDING CLIP SWH SIDE MOUNT GROUNDING BOLT MFG-PN: EA-SW-GC-01 MFG-PN: EA-SW-GB-01 1/4” FLANGE NUT...
- Page 36 SWH Solar Racking Installation Guide | Version 12.10.v2 [3.3] Installing SWH grounding clips, bolts and lugs SINGLE GROUND WIRE FOR ENTIRE ARRAY ALTERNATE WIRING FOR IN-LINE SPLICES Figure 27. Place grounding bolts or grounding lugs on both sides of splice with 6-10 AWG copper wire loop as shown.
-
Page 37: [3.4] Installer Warning And Notice
PV system. Failure to follow all instructions and conditions could possibly damage the product and above all, lead to serious injury or death. PV system and SWH Solar Rack- ing installations must comply with National Electrical Code and installer is solely responsible for code and safety compliances and their consequences. - Page 38 SWH Solar Racking Installation Guide | Version 12.10.v2 [3.4] Installer Warning and Notice When installing SWH Solar Racking Systems on roofs a falling hazard is present. Proper fall protection will limit this danger. Never work in wet or windy conditions. Secure tools and materials from falling, and insure personnel below exercise caution from work overhead.
- Page 39 MANUFACTURER’S LIMITED STRUCTURAL PERFORMANCE WARRANTY Solar Warehouse warrants to the buyer (“Buyer”) at the original installation site (“Site”) that any of the components (the “Product”) purchased from Solar Warehouse shall be free from structural defects in material, workmanship and performance, as referenced in the Solar Warehouse Product Information, for a period of ten (10) years, except for the anodized finish, in which the finish shall be free from visible peeling, cracking or chalking under normal atmospheric conditions for a period of five (5) years (“Finish Warranty”), from the earlier of 1) the date in which the installation of the...
Need help?
Do you have a question about the Solar Racking and is the answer not in the manual?
Questions and answers