Advertisement
Quick Links
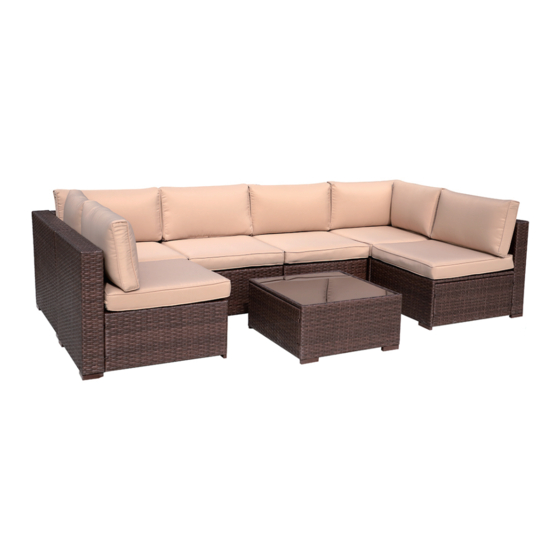
7-Piece Sofa Set
PA-02+03+04
1
Thank you for choosing Patiorama!
Our goal is to provide high quality outdoor furniture with
outstanding customer service-all at an affordable price.
Please let us know how we are doing!
Problems?
(Missing pieces, wrong pieces...)
We will fix it Immediately. Send us an email at
help@patiorama.store.
If you are not satisfied with our
customer service, pls send your comments to
complaint@patiorama.store.
Happy?
Please leave us a review!
You can make others happy too!
Advertisement

Related Manuals for Patiorama PA-02+03+04


Summary of Contents for Patiorama PA-02+03+04
- Page 1 7-Piece Sofa Set PA-02+03+04 Thank you for choosing Patiorama! Our goal is to provide high quality outdoor furniture with outstanding customer service-all at an affordable price. Please let us know how we are doing! Problems? (Missing pieces, wrong pieces...) We will fix it Immediately. Send us an email at help@patiorama.store.
- Page 2 IMPORTANT, RETAIN FOR FUTURE REFERENCE: READ CAREFULLY. Safety For domestic use only. Don't tighten all the bolts before the product is fully assembled. It would be useful to ask someone to help you assemble the product. ...
- Page 3 Tips for Cushions In order to compress the package, we put the cushions in the gap of some parts. So there may be crinkle on the fabric. Don’t worry. Just flap every corner of the cushion evenly and it will get back into its original shape soon. - 2 -...
-
Page 4: Assembly Parts List
Corner Sofa Corner chair is universal (used as a left or right) chair. If you rotate it 90 degrees, the left corner chair is the right corner chair. ASSEMBLY PARTS LIST (A)x1 Corner Panel (B)x1 Corner Panel (C)×1 Seat Base M6x35 Bolt/Washer 9pcs (L)×1 Hex Wrench - 3 -... -
Page 5: Assembly Steps
Important: Hand tighten all the bolts to line up all the pieces . Then tighten all the bolts down. ASSEMBLY STEPS Attach the corner panel (A) to the corner panel (B) with bolts (M6X35) and washers.Do this in 2 places. NOTE:DO NOT TIGHTEN THE SCREWS COMPLETELY. - Page 6 Attach the seat base (C) to the corner panel (A) and corner panel (B) with bolts (M6X35) and washers. Do this in 7 places. NOTE:DO NOT TIGHTEN THE SCREWS COMPLETELY. - 5 -...
- Page 7 Tighten all 9 Bolts into place with Allen Key (L). NOTE: IF ANY SCREW HOLES CANNOT BE ALIGNED, LOOSEN ALL THE SCREWS AND GO BACK STEP 1 AND RESTART ASSEMBLY. - 6 -...
- Page 8 Ottoman ASSEMBLY PARTS LIST (H)x1 Top Panel (M)x1 Side Panel (R)x1 Side Panel M6x35 Bolt/Washer 8pcs (L)×1 Hex Wrench - 7 -...
- Page 9 Important: Hand tighten all the bolts to line up all the pieces . Then tighten all the bolts down. ASSEMBLY STEPS Attach the top panel (H) to the side panel (R) with bolts (M6X35) and washers. Do this in 2 places. NOTE:DO NOT TIGHTEN THE SCREWS COMPLETELY.
- Page 10 Attach the top panel (H) to the side panel (R) with bolts (M6X35) and washers. Do this in 2 places. NOTE:DO NOT TIGHTEN THE SCREWS COMPLETELY. - 9 -...
- Page 11 Tighten all 8 Bolts into place with Allen Key (L). NOTE: IF ANY SCREW HOLES CANNOT BE ALIGNED, LOOSEN ALL THE SCREWS AND GO BACK STEP 1 AND RESTART ASSEMBLY. - 10 -...
- Page 12 Armless Sofa ASSEMBLY PARTS LIST (D)x1 Seat Back (E)x1 Seat Base (G)×1 Side Panel M6x35 Bolt/Washer 8pcs (L)×1 Hex Wrench - 11 -...
- Page 13 Important: Hand tighten all the bolts to line up all the pieces . Then tighten all the bolts down. ASSEMBLY STEPS Attach the seat back (D) to the seat base (E) with bolts (M6X35) and washers.Do this in 4 places. NOTE:DO NOT TIGHTEN THE SCREWS COMPLETELY.
- Page 14 Attach the side panel (G) to the seat back (D) and seat base (E) with bolts (M6X35) and washers. Do this in 4 places. NOTE:DO NOT TIGHTEN THE SCREWS COMPLETELY. - 13 -...
- Page 15 Tighten all 8 Bolts into place with Allen Key (L). NOTE: IF ANY SCREW HOLES CANNOT BE ALIGNED, LOOSEN ALL THE SCREWS AND GO BACK STEP 1 AND RESTART ASSEMBLY. - 14 -...
- Page 16 Table ASSEMBLY PARTS LIST (J)x1 Top Side (O)×1 Side Panel (P)×1 Side Panel M6x35 Bolt/Washer 8pcs (L)×1 Hex Wrench - 15 -...
- Page 17 Important: Hand tighten all the bolts to line up all the pieces . Then tighten all the bolts down. ASSEMBLY STEPS Attach the side panel (O) to the top side (J) with bolts (M6X35) and washers. Do this in 4 places. NOTE:DO NOT TIGHTEN THE SCREWS COMPLETELY.
- Page 18 Attach the side panel (P) to the side panel (O) and top side (J) with bolts (M6X35) and washers. Do this in 4 places. NOTE:DO NOT TIGHTEN THE SCREWS COMPLETELY. - 17 -...
- Page 19 Tighten all 8 Bolts into place with Allen Key (L). NOTE: IF ANY SCREW HOLES CANNOT BE ALIGNED, LOOSEN ALL THE SCREWS AND GO BACK STEP 1 AND RESTART ASSEMBLY. - 18 -...
- Page 20 SECTIONAL SOFA CONNECTOR MANUAL Sectional outdoor wicker patio sofa is very light weight in nature and subject to movement. These high quality fasteners prevents movement between modules to maintain the aesthetically good look of your modular patio furniture set. Two fasteners are recommended between Two adjoining module.