Advertisement
Advertisement
Table of Contents

Related Manuals for Open Technologies NeWay

Summary of Contents for Open Technologies NeWay
- Page 1 User Manual 201 7...
- Page 2 Neway Neway This wiki will describe both the settings available to the end user and the ones only accessible by inserting a password, known only by our dealers, that will enable some features normally hidden from the end users. The password is: CrE2u=eP To login as a dealer, launch the software, click on the OEM button in the welcome page and insert the password.
- Page 3 Neway 4. 4. Planmeca Planscan Importer Advanced Tech Support 1. 1. Profile Editor 2. 2. OpenToolBox 3. 3. Troubleshooting Maintenance 1. 1. Ordinary Maintenance 2. 2. Components Replacement EC CE WARNING: Article could not be rendered - ouputting plain text.
-
Page 4: Norm References
The features and design of this machine may be modified without any notice, for a constant improvement of the product. Open Technologies S.r.l. reserve all their rights on this manual, no whole or partial reproduction is allowed without their written authorization. -
Page 5: Technical Data
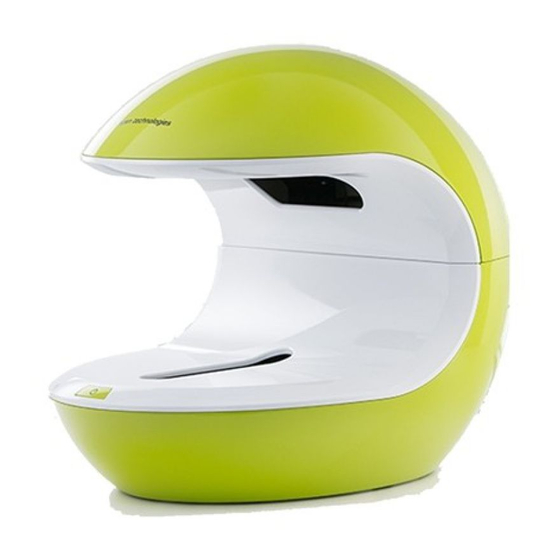
NeWay was specifically created to operate successfully in the dental field. The whole scanning phase is computerized and is performed with the aid of a rotating table that allows the acquisition of different views of the object. - Page 6 Presentation General Data Standard of Measurement Value Width Depth Height Weight (empty) kg Elettrical Supply Standard of Measurement Value Single phase voltage V 230 c.a. Control voltage 12 c.c. Power usage 58,5 Mains frequency Max amps 4,72 Phases 2P+T Precautions WARNING: Article could not be rendered - ouputting plain text.
- Page 7 The scanner is in a protective cover made of a foam polystyrene shell placed inside a cardboard box. When using the machine for the first time special attention must be paid to anything that might seem to have an irregular operation and, if the case, contact Open Technologies S.r.l. immediately, reporting the anomaly. Storage Conditions If the 3D scanner is not installed inside the buyer’s premises but it is stored:...
-
Page 8: Electrical System
The optical head lodges the opto-electronic components for the acquisition of the object surface. NeWay's optical head comprises two black-white video cameras and a DMD projector. The set up of these three components allows one single scanning field. -
Page 9: Operation
Operation Operation Loading The loading operation of the objects to scan includes: • • Placing the objects inside the 3D scanner by laying them on the chosen model support, consequently attaching the support to the magnetic joint at the base of the scanner's opening. •... -
Page 10: Scrapping Disposal
Fire-fighting equipment The parts of the machine, which can catch fire, are the electric components (electromotor, projector, cables, feeders). In all these cases, the best extinguisher is carbon dioxide (CO2) or the ABC powder, keeping in mind that by using the ABC powder you can permanently damage the electric and electronic components. - Page 11 Risk Risk RISKS DANGEROUS DANGEROUS SITUATION DEALING WITH RISKS AREA Mechanical hazards caused by: Crushing Machine's base. Transport and moving. Placing the Warnings are in the instruction manual. equipment on the work surface. Loss of stability/ toppling over of Work Station Collaps of the surface supporting limitation instructions in the instruction manual the machine...
-
Page 12: Minimum Requirements
NeWay scanning system can be connected to a Computer through only 2 cables: • 1 USB 3.0 Port that has to be directly connected to the Computer's motherboard. Only Intel C220 or Better and Rensas USB 3.0 are supported. -
Page 13: Before Installing
Before SW1 Before SW1 Before Installing The scanner's set up procedure is very straightforward. This paragraph describes the operations that need to be carried out before installing the software. They are enlisted in an ideal order and, even though it is not strictly necessary to follow such order, it is advisable to do so: 1. - Page 14 Before SW1 There are two ways one can update the NVIDIA drivers: the first is to download them directly from the NVIDIA website and the other is to use the GeForce Experience App. Update NVIDIA drivers downloading them from the NVIDIA website Go to the NVIDIA web site and look for the driver's download page (http:/ / www.
- Page 15 Before SW1 If the number of updates to install is not significant, it is possible to simply click on “Change Settings” in the left list and set the automatic updates, as in this picture: In this way, those few updates can be automatically installed when shutting down the system. However, if there were many updates to install, after setting the automatic updates it still would be necessary to...
- Page 16 /> Even though in compliance with all the laws regulating electromagnetic immunity and that Open Technologies have done everything in their power to immunize the unit from electromagnetic interference, the scanner is after all a precision electronic device therefore powerful radio...
-
Page 17: Connect The Scanner
Before SW1 Connect the Scanner As you can see in the following pictures, on the back of the scanner there are, from left to right, the USB port, the power switch, the power cable port and the HDMI port: The 3D scanner will be connected to a power supply with these specifications: •... - Page 18 Before SW1 The Usb cable must be connected directly to the Computer's Motherboard to a USB 3.0 port. The Usb ports are usually color-coded, and generally the Usb 3.0 ports are marked in blue. Once everything is connected it is possible to check if the computer recognised the components correctly by opening windows Device Manager.
- Page 19 Before SW1 Configure the screen resolution After connecting the scanner it is important to check that the screen resolution has configured in the correct way. This is necessary because sometimes Windows is not able to properly recognise the configuration of the projector. First of all it is very important that the projector is connected to the HDMI slot of the graphic card.
- Page 20 Before SW1...
- Page 21 Master License SW1 Software Instal SW1 The installation wizard of both ScanWay and Exocad are very easy to follow, this paragraph only clarifies a few steps that could be problematic. ScanWay From the Software Download Area can be downloaded two versions of ScanWay: ScanWay Full Setup The full setup is the complete installer.
- Page 22 Open Technologies provides an Exocad installer that automatically configures the integration between the two software and installs the Open Technologies implant library files. Should the automatic connection go wrong, the page Manual connection to Exocad will provide all necessary information to set the link manually.
- Page 23 Cad Data folder, in order to enable the software to recognise the projects that had been designed with the previous version. If the previous version was installed on the costumer's computer by Open Technologies or using Open Technologies' installer, the Exocad folders could be found either in C:\Program Files\Opt-Exocad-201..-... or in C:\Exocad201..-..
- Page 24 Software Instal SW1 Scanning Software configuration The user has to establish with which version of the scanning software Exocad has to be configured. The choice will enable a button in Exocad's DentalDB, connecting it to the scanner software.
Need help?
Do you have a question about the NeWay and is the answer not in the manual?
Questions and answers