Table of Contents
Advertisement
Quick Links
Advertisement
Table of Contents

Summary of Contents for E-TRAVELLER 120
- Page 2 INTRODUCTION Dear Users, Thank you for choosing the E-Traveller 120 for your mobility needs. Please ensure you read through this manual thoroughly before operating your E-Traveller so you can become familiar with its features as well as its limitations and safety information.
-
Page 3: Specifications
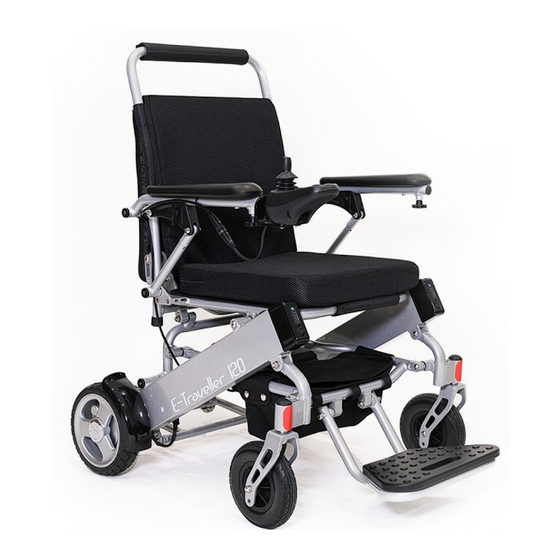
SPECIFICATIONS Model Material Aluminum alloy Unfold Size 980*660*950 mm Fold Size 260*610*770 mm Loading Capacity 120 kgs Motor 180W*2pcs brushless motors Battery 24V 10AH*2 pcs lithium battery (1.5kg each) Max Speed 6 KPH Driving Range 20 km Front Wheels 8" *2" (150mm x 38mm) PU solid wheels Rear Wheels 8"... -
Page 4: Safety & Operation
Tension Cords on the backrest and under the seat cushion. B. Take your time to learn how the E-Traveller works. We recommend doing this in an open space without any obstacles or other people using the space. Once you feel comfortable with the general operation of the E-Traveller, you can start using it in more confined spaces and around other people. - Page 5 1. Make sure to bring your E-Traveller to a complete stop. 2. Turn off the power to avoid accidentally knocking the joystick and moving the wheelchair. 3. Raise the armrest so that you can conveniently exit your E-Traveller. Ensuring you put your weight on the armrests, not the joystick.
-
Page 6: Changes And Adjustments
1. Batteries are special lithium batteries designed specifically for use in the E-Traveller 2. Read all battery instructions before attempting to change or charge batteries. 3. When you don' t use the E-Traveller for long periods of time, please charge the battery every month to avoid the battery being damaged. -
Page 7: Installation And Setup
Safe belt Battery direct charge transfer cable 3. To unfold your E-Traveller, hold the push bar and use your other hand to pull the bottom of the seat down towards the ground. Grasp push bar Hold down seat to expand 1. - Page 8 Slide Joystick Controller into armrest Secure joystick controller knob 2. Connect the controller wire harness to the CPU wire harness. Take care to line up the pins properly, follow the white error tips as a guide. Failing to follow this step carefully can lead to bending or breaking the connectors and will cause damage to your E- Traveller.
-
Page 9: Basic Operations
B. Stop often and check to make sure your path is clear of obstacles. BASIC OPERATIONS Before operating E-Traveller, be sure to read all safety information and precautions included in this manual. Operate only in the appropriate environment after you have... -
Page 10: Battery Charging
Charge both batteries at the same time via the charge port located on the underside of your controller. 1. Turn the power off. 2. Plug the charger into the charging socket. Please ensure the charger is plugged into the E-Traveller, before turning on the power or connecting it to a power source. - Page 11 You have the option of charging the batteries individually. This can be a great option if you don't have space for your chair or don't want to remove it from your car for charging. 1. Turn off your E-Traveller. 2. Flip open the charging port protector on the front of the battery.
- Page 12 More information 1. The E-Traveller comes with two semi-charged 24V 6AH lithium batteries. 2. Charging of the batteries will take 3-4 hours per battery. 3. Turn off your E-Traveller while charging. 4. Do not leave children unsupervised near the power wheelchair while it is charging.
-
Page 13: Free-Wheel Mode
We recommend that you turn off the power of the wheelchair when using Freewheel mode. 1. To put the E-Traveller in Free Wheel Mode, come to a full stop and turn OFF the power on the controller. -
Page 14: Troubleshooting
TROUBLESHOOTING The following represents the most common questions asked about the E-Traveller that may be encountered during everyday use. If you experience any problems check the below list, in the unlikely event that the problem can't be resolved, contact your local retailer for further information. - Page 15 Light flickers intermittently to provide diagnostic information. About the detail, please refer to the following table: There are some diagnosis functions, the diagnosis codes showed can reflect the property of problems. Diagnostic Diagnosis Description Recommended solving methods code Flicker one Hall malfunction of left Check the welding situation of connection device of the left time slowly...
-
Page 16: Warranty Period
For further information, refer to your dealers' warranty policy. Due to the design of the E-Traveller, most parts can be easily exchanged by the end-user without a professional service technician required. However, it is always recommended you seek professional help for maintenance and service, to make sure the work is done properly.
Need help?
Do you have a question about the 120 and is the answer not in the manual?
Questions and answers