Advertisement
Installation & Operation Instructions
PLEASE READ THE ENTIRE INSTRUCTIONS BEFORE BEGINNING YOUR INSTALLATION.
FOR BEST RESULTS, PLAN AND SKETCH YOUR ENTIRE SYSTEM BEFORE BEGINNING.
THIS WILL HELP TO AVOID WASTE AND REDUCE INSTALLATION TIME.
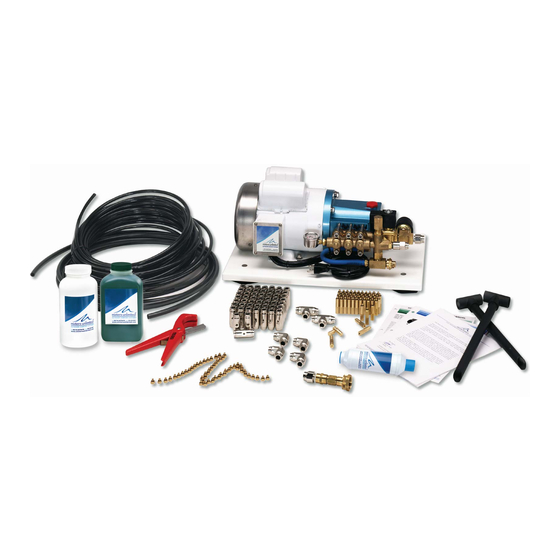
1. When the equipment is received, all items should be carefully checked
against the packing slip to ensure that the order is complete. Examine
carton(s) for shipping damage. If the unit is damaged, the carrier, if still
present, should make the proper notification on the receipt noting the
damage. Otherwise report the damage directly to the carrier.
2. The pump is the heart of our system and prior to installing there are a few
things to consider. Location, Location, Location. Keep in mind that the pump
needs to be supplied with power and water, plus the high pressure vinyl
tubing (mist line tubing) connects to the outlet of the pump and access to
the pump is necessary. A good location is one that accommodates all these
connections without difficulty.
•
Marine based application: For a typical marine installation, a good
place for the pump is in the engine room, machinery compartment,
lazarette, or even sometimes under the flybridge, all suit the needs.
Though the pump module enclosure is powder coated aluminum, we
still recommend that the unit be protected from salt water intrusion.
WARNING: Our pumps are not ignition protected and therefore should
not be placed in a bilge or hold that could contain flammable vapors
i.e. gasoline.
•
Residential and Commercial based applications: For a typical
residential or commercial installation, a good place for the pump is
next to other pumps, such as a pool filtration system or an air
conditioning unit. Rain will not affect our pumps, but we do
recommend a covered location if at all possible.
Once this location is decided upon, secure the pump to a firm surface
utilizing the mounting flange.
3. Prior to start up, situate and mount your Mister Pump in the Machinery
wherever water & power are most readily available.
recommended locations. Incorporated into your Mister Pump is a 1000psi
pressure gauge and an adjustable unloader valve to control the output
pressure. At any given time while operating, the operational pressure should
be between 600 -1000psi. Do not exceed 1000psi. When ready, ENSURE the
WATER IS ON BEFORE YOU TURN ON THE PUMP.
4. Connect the 1/2" blue water supply line to a standard 3/4" hose bibb, utilizing
the adapter fitting provided, or tee into an existing water line. The water
supply line should be seated into the 1/2" Quick Connect fitting on the pump
PM10 MISTER PUMP
1
See above for
Advertisement
Table of Contents

Summary of Contents for Misters Unlimited Mister PM10
- Page 1 PM10 MISTER PUMP Installation & Operation Instructions PLEASE READ THE ENTIRE INSTRUCTIONS BEFORE BEGINNING YOUR INSTALLATION. FOR BEST RESULTS, PLAN AND SKETCH YOUR ENTIRE SYSTEM BEFORE BEGINNING. THIS WILL HELP TO AVOID WASTE AND REDUCE INSTALLATION TIME. 1. When the equipment is received, all items should be carefully checked against the packing slip to ensure that the order is complete.
- Page 2 module labeled INLET. When ready, ENSURE THE WATER IS TURNED ON BEFORE YOU TURN ON THE PUMP. 5. From your pump location, map out the route for the mist line (high pressure tubing) and placement of the Mister Jet . Once you have determined the position of the jets and the path of the mist line to each of the jets, begin cutting the mist line tubing to the appropriate lengths, make sure the mist line tubing is cut straight and clean.
- Page 3 11. Ensure the water supply is ON and turn the pump ON. Make sure the pump pressurizes to the operating pressure, beginning at 600psi and working up to 1000psi. This will cause the tubing to expand in the fittings. Check for any leaks at this point.
Need help?
Do you have a question about the Mister PM10 and is the answer not in the manual?
Questions and answers