Advertisement
Quick Links
Advertisement

Summary of Contents for Grex Ultra-Dynamics MXF8
- Page 1 MXF8 manual version 1.0 January 2004. Copyright Grex Ultra Dynamics Ltd.
- Page 2 Later version of this manual will be automated to jump to pages in the PDF document...
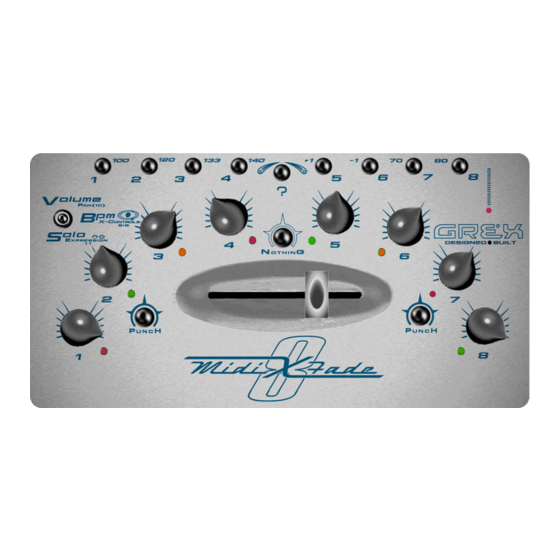
- Page 3 Comments and tips: Your MXF8 sends midi controller number 7 from the channel buttons in Volume Mode which is usually used for volume control as a default in many software and hard- ware midi devices. You might wish to experiment with setting synths and so on with midi learn to repond to these messages so that you can x-fade up to 8 parameters.
- Page 4 The Rotary Controls for each channel and the X-Fader itself perform the same basic function nearly all the time in all modes in the MXF8 to give you X-Fading power instantly and direct control over the channel volumes.
- Page 5 Releasing the punch button restores volumes with respect to the X-Fader position again. Pressing Punch on left of the MXF8 brings in channels 1 to 4 at rotary control position whilst sending zero volumes for channels 5 to 8.
- Page 6 Previous Main Next 1 of 2 “Nothing” Button in Volume Mode Pressing "Nothing" will give you Nothing! Silence from Volume mode. All channels are turned to zero Volume for the duration of the keypress. You can stab at the button to produce chop- ping effects on the audio as it rapidly turns up and down all 8 channels.
- Page 7 Previous Main Next 2 of 2 Locking “Nothing” Button A few more points about the Nothing Button follow... With the Mode Switch in BPM position ONLY the Nothing Button can be virtually locked down by pressing and holding down both the Nothing button and "?"...
- Page 8 Previous Main Next 1 of 1 ? Button in Volume Mode The "?" button in Volume Mode is a sort of shift key. It allows access to further functions from the buttons and rotary controls. Primary use is to access routing the channels 1-8 to X-Fader on and off.
- Page 9 No data is sent during rotation of the channel control if ? is released until Volume setting is restored. MXF8 is now ready to continue sending Volume messages from that channel. In Volume Mode only...Press ? button and hold it down Rotate chosen channel control(s)..Channel LED(s) start flashing...
- Page 10 To stop your external gear or the flow of BPM data from MXF8 press and hold down ? then momentarilly press Punch 2 (right hand Punch button). Follow detailed instructions to get going...to change BPM press and hold down ? then press any of the 1-8 buttons To select 100 BPM do the above keypress combination followed by channel button 1...for 80BPM do the same but press button 8...
- Page 11 1 of 1 Sending Controller 8 is very easy...Hold down a channel button and move the X-Fader. Controller 9 (NOT available if MXF8 is send- ing Midi Clocks!) involves Holding Down "?" the Channel Button AND moving the Fader. From this Mode the X-Fader sends a value of Zero from the far left and 127 from the far right with values in between.
- Page 12 The internal tempo that your MXF8 is running at determines the speed of the BeatGate. So, you can powerup witithout Midi Clock enabled, change the BPM that your MXF8 is running at internally- sorry no visual confirmation for this- and then use the Beatgate at a totally unrelated speed to the tempo of the work in progress.
- Page 13 Previous Main Midi Controller 12...(unmarked!) Next 1 of 1 We realised that we could squeeze in another rotary activated midi controller from the BPM mode- here it is! Activates and responds in a similar way to controllers 10 and 11 with the accompanying “flashing”...
- Page 14 Polyphonic keypress the entire Solo state is cancelled. Principal interesting behaviour of Solo on MXF8 is the emulation of analogue push but- ton selectors on old Hi-Fi’s... Soloing a channel by holding down the but- ton 1-8 Solos that channel at the current Rotary Control position with no reference to the X-Fader...
- Page 15 Remember, this just indicates that a Rotary controller is "out of position" with its previous volume setting. Slowly rotate a rotary control to find its previous setting then you won't get huge volume jumps once the MXF8 has internally switched back to using the rotary for volume control.
- Page 16 You have up to 8 switchable states from this arrangement. As there is no visual feedback from the MXF8 for these states be aware that leaving some- thing set On or Off might be causing mayhem with your sound when you don't want it! With Mode Switch in Solo position...Hold Down the "?"...
- Page 17 Instructions for Access and Use of the powerup states...
- Page 18 Previous Main Next 1 of 1 Hardware Test Routine This isn't a function. But it's useful for us when the machine is assembled...but in case you stumble into it on power up you can see the lights flash to prove everything is work- ing.
- Page 19 All LEDs will light Orange unless Midi lead is connected with incorrect data flowing which will cause an immediate ALL Red LED state... Full instructions to follow on release of Grex Utility Downloader for computer / midi interface to allow sys ex into MXF8...
- Page 20 All Off LED state for all channels will now be in force...all channels are muted and next press of channel button will turn its LED Red unless you Hold Down "?" for Green MXF8 stores the current Mute States for all Channels, but not the Rotary Control positions, whenever you change BPM All channels are muted and next press of channel button will turn its LED Red...
- Page 21 Previous Main Next 1 of 1 Re-Configure Punch Buttons If you want to reverse the way the Punch Buttons work, you can. The procedure will enable Punch 1 (on the left) and Punch 2 to do all the functions they perform across the modes but back to front.
- Page 22 Ideal suitable partners for the task include Ableton Live, which has time-stretching functionality, and Propellerheads Reason whose Dr:REX loop player module also fits the bill. Tempo control via MIDI Sync along with Start/Stop messages provided by the MXF8 make it easy to fully and remotely control MIDI applications.
- Page 23 Be aware that your MXF8 is only sending ONE NOTE ON per midi channel and triggering it at different times and velocities to create what you will hear. However, you have 8 sets of 8 midi Notes which can be sent to trigger up to 64 different clips. More about this later.
- Page 24 Channels 1 and 2 respectively, plus the external program selected to respond to Midi Clocks..AND assuming they are correct so far as looping seemlessly at the 1 bar point goes...note that any sample should be set to “gate” mode in a program like Ableton and have the Loop setting also turned OFF...the MXF8 takes care of retriggering the samples correctly..
- Page 25 Ratio Sequencer Parts 2 and 3 intro... If you haven't got Ratio Sequencer part 2 or 3 read this and weep..then check out our website for the download! This feature is an expansion on Part 1 of the RS and is accessed from Solo Mode plus a combination of the offsets in the BPM mode and a keypress of the Nothing button. The X-fader still comes into the equation to give a total set of extra manipulation which will expand your perception of what is rhymically possible and highlight how exhausted ordinary rhythmic conjunctions have become.
- Page 26 Previous Main Activating the Ratio Sequencer (part 1) Next 1 of 8 Ratio Sequencer can only be accessed from power up. As you turn on the power at the mains, or plug in the power supply adapter with the mains power on, hold down channel button 2.
- Page 27 BPMs make sure that the tempo you are triggering them at is consistent with them sounding properly...this is more for experienced loopists... If you have 8 midi channels set up in this way you are ready to use your MXF8 as the controlling trigger to find new conjunctions of sounds and loop offsets...
- Page 28 From BPM mode...The default set of 8 Note Numbers is 26. Can be re-selected by pressing button 1. Pressing button 2 selects note number 27 as the set of 8 note numbers (one per midi channel transmitted by the MXF8).
- Page 29 Previous Main Ratio Sequencer...Note On offsets Next 4 of 8 These Note On Offsets affect the timing of the start of the Note message which triggers your audio samples. You can “slide” the timings of audio samples against each other independently on a per channel basis.
- Page 30 Previous Main Ratio Sequencer Velocity Offsets... Next 5 of 8 Note On messages have an associated Velocity- this is how “loudly” the notional playing of the Note On is... This function allows you to alter the Velocity value between 1 and 127, in real-time. There is also a randomise value setting which sends out a random velocity of between 90 and 127.
- Page 31 Previous Main Ratio Sequencer X-Fader useage Next 6 of 8 The X-Fader offers a departure from its nor- mal behaviour when using the Ratio Sequencer...Only applies when in the BPM mode. It is divided into 8 “zones” through which you can change overall global loop lengths for the Note On triggers being sent out on each channel.
- Page 32 Previous Main Switching Ratio Seq. Parts 1-2-3 Next 7 of 8 The Ratio Sequencer has 3 modes. Unfortunately, displaying which of the 3 modes you are in isn't possible on this early version of the Ratio Sequncer software. But at least you can quickly “rotate” through the 3 choices by simply pressing the “Nothing”...
- Page 33 Previous Main Ratio Sequencer Next 8 of 8 Parts 2 and 3 The retriggered Note On messages generated by the Ratio Sequencer allow you to create interesting and complex rhythmic patterns. At first you may be baffled by the process and combinations of keypresses...but perse- verance will produce unusual and useable results!
-
Page 34: Midi Implementation Chart
Active Sense Messages Reset Notes Sys.Ex messages specific to MXF8 can be used to download extra features and functions. In this special condition the Midi Out is used as a Midi In and is enabled from power-up. o: Yes x: No...
Need help?
Do you have a question about the MXF8 and is the answer not in the manual?
Questions and answers