Table of Contents
Advertisement
Quick Links
RF-PRO Control Unit Instruction Manual
The Hispec RF-PRO Control Unit can link to and control
up to 19 alarms in the Hispec RF-PRO range, consisting
of smoke alarms, heat alarms, and Carbon Monoxide
(CO) alarms.
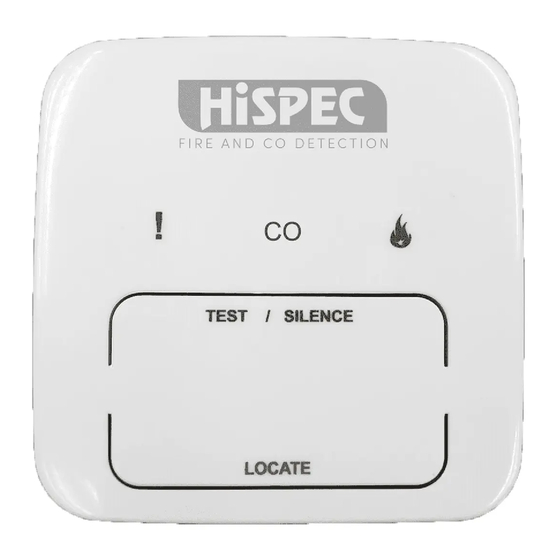
Control Unit
functionality
Function
Description
Test
All of the Alarms can be tested
from a centralised location
Locate
This will silence all the Alarms in the
system except the one sensing Fire
Silence
This will silence the Home Group
Indicates that a Fire Alarm has been
Fire Indicator
activated
Indicates that the Control Unit battery
Low Battery Indicator
has reached the end of its life
The memory feature allows the Control
Memory
Unit to stay connected with
Home Group
Home Grouping
Please read through all of the steps thoroughly before installation.
It is essential to "Home Group" the control switch to all of the alarms in
the system, to ensure they will not communicate with any other
nearby systems. Failure to "Home Group" the system will prevent it
from operating correctly.
**Do this BEFORE you install any of the devices!**
Setting up the Home Group
1.
Turn the power on with the switch on the back of the Control
Unit.
2.
Turn on all alarms to be installed in the system by sliding them
onto their baseplates until they click into place.
3. Press and hold the "Home Group" button (H CODE) on the
back of the Control Unit until the Red LED lights up on the front
as pictured below, then release. Now the Control Unit is in
"Home Grouping" mode.
Note: The "Home Grouping" mode on the controller will be active
for 2 minutes 30 seconds. After this period, it will
turn off automatically.
Use a screw driver
to press and hold
the H.Code at
the back of controller
Hispec
ed alarms
Red LEDs
light up
/ SILENCE
Technical Specification
Power Supply
Battery Capacity
RF Frequency
Operating Temperature
Humidity
Receiver Category
EMC Performance
Safety Testing
RF Power
Number of RF Alarms
Yellow LED
Red LED
Low Battery /
CO Warning
Fault Alarm
Test / Silence
CO
TEST / SILENCE
LOCATE
Test / Silence Button
Locate Button
Front View of Controller
4. "Home Group" all of the alarms in the system.
Mains powered alarms: press the small rectangular pairing button
on the side of the alarm baseplate TWICE. A red LED next to this
button will flash 5 times.
Battery smoke/heat: press the small black pairing button on the
back of the alarm TWICE. The red LED on the front will flash five
times.
Battery CO: press the TEST/SILENCE button slowly so red and
green LEDs flash once each time. The red LED will then flash 3
times.
This alarm is now in the Home Group.
5.Repeat Step 4 for each additional alarm. Ensure the Red LED
stays lit on the Control Unit throughout - if it goes off before you
have finished, repeat Step 3 and continue Step 4 with any alarms
not yet joined to the Home Group.
6.Now all of the devices are joined in the Home Group, they can be
installed.
7.For details on individual alarm devices, consult the instruction
manuals enclosed with them.
Note: The Control Unit and all of the connected Home Group
alarms have a memory function. When they are disconnected from
their power supply or turned off (i.e. for installation) they will remain
joined to the Home Group.
Range
All the RF-PRO Models have a maximum wireless connection
range of upto 80m in an open outdoor space and 30m indoors.
HSSA/CU/RF10-PRO
"Lifetime Power" Lithium battery (10 years)
1600 mAh
868Mhz
0
C to 40
C (Cat 3)
o
o
15% - 95% (Non Condensing)
Cat 2
EN 301 489-1, EN 301 489-3
EN 60065
+7dBm
20 per Home Group
inc. control unit
Home
Red LED
Group
Fire Warning
Button
Test / Silence
Power on and off switch
Rear View of Controller
Advertisement
Table of Contents

Summary of Contents for HiSpec RF-PRO
- Page 1 Cat 2 EMC Performance EN 301 489-1, EN 301 489-3 Safety Testing EN 60065 The Hispec RF-PRO Control Unit can link to and control RF Power +7dBm up to 19 alarms in the Hispec RF-PRO range, consisting Number of RF Alarms 20 per Home Group inc.
- Page 2 Guarantee If the FIRE indicator is flashing and there is no obvious fire, you can Hispec Electrical Products Ltd guarantee this Control Unit for 5 trace the source alarm to check. years from date of purchase, against any defects that are due to faulty materials or workmanship.
Need help?
Do you have a question about the RF-PRO and is the answer not in the manual?
Questions and answers