
Summary of Contents for Ascending Technologies Asctec Falcon 8
- Page 1 Ascending Technologies GmbH /// Konrad-Zuse-Bogen 4 /// 82152 Krailling /// Germany T + 49 (089) 89 55 60 79 0 /// F + 49 (089) 89 55 60 79 19 /// team@asctec.de /// www.asctec.de © Ascending Technologies GmbH...
- Page 2 The AscTec Falcon 8 is your well-tested reliable equipment. Enjoy full view due to our patented V-shape. For your project the AscTec Falcon 8 is a high-tech UAV – more efficient and effective than conventional methods could be. For instance many industrial companies rely on our technology since it is much cheaper than traditional inspections could be.
-
Page 3: Table Of Contents
Pre-flight checklist ........................6 Description of the system ....................... 7 The AscTec Falcon 8 ....................... 7 The Mobile Ground Station (MGS) ................... 9 Payloads – Camera options ....................12 ... - Page 4 Serial number / ID ........................49 Changing propellers ....................... 49 Exchanging motor rails ......................50 AscTec Falcon 8 – data sheet ....................... 51 Disclaimer ............................52 Validity ............................53 ...
-
Page 5: Safety Guidelines
These guidelines* must be read, understand, accepted and followed by any personnel who operate the system. 1. The pilot of an Ascending Technologies (AT) UAV should always act according to his/her best judgment, focusing on the safety of the people and the environment he/she is flying in. -
Page 6: Checklists
10. Is the 10-pin cable of the camera mount firmly attached to the central unit? B. PRE-FLIGHT CHECKLIST 1. Is the battery of the AscTec Falcon 8 correctly installed regarding “This side up” sticker and center of gravity? 2. Is the battery firmly plugged into the UAV? 3. -
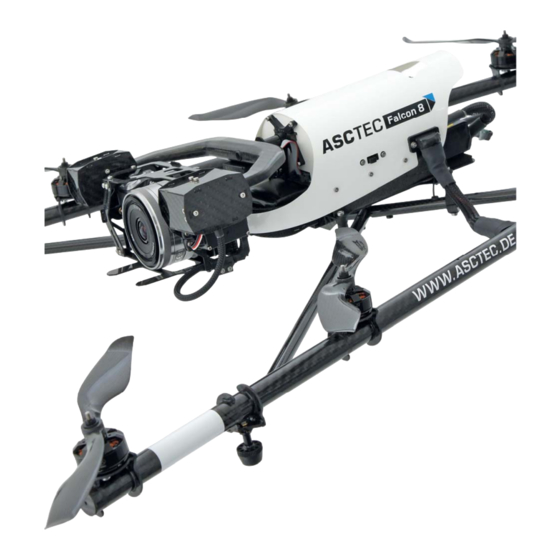
Page 7: Description Of The System
3. DESCRIPTION OF THE SYSTEM A. THE ASCTEC FALCON 8 The AscTec Falcon 8 consists of several subunits: Central unit. Actively stabilized mount option with related camera. Carbon cross. Motor rails. The data link antennas are attached to the carbon cross close to the motor rails. - Page 8 ACTIVELY STABILIZED CAMERA MOUNT The actively stabilized camera mount consists of: Breakout board with case. Pitch servo. Payload (e. g. Sony NEX-7). Extremely stiff and lightweight carbon fiber mechanical structure. Roll servo. MOTOR RAILS The motor rails consist of: The propellers are directly bolted on the motor shafts.
-
Page 9: The Mobile Ground Station (Mgs)
: Displays settings. Check the trim of the sticks from time to time. Only adjust them to zero when the AscTec Falcon 8 is switched off. Do not switch off the R/C and immediately switch it on again. Wait some seconds until the R/C has shut down completely (display will shut down completely). - Page 10 MGS. This separation guarantees maximum safety. The AscTec Falcon 8 is preset to a certain video channel and the diversity video receiver is set accordingly. If you use the MGS for multiple AscTec Falcon UAVs, you have to change the channel of the diversity video receiver.
- Page 11 GAMEPAD The Gamepad is optional. The plug for the Gamepad cable connector is located behind the LCD Video monitor. MAIN MENU ENT SETTINGS VIDEO OPTIONS GAMEPAD There are different default assignments depending on the mounted camera system. The stick assignment of the gamepad can be adjusted over Status Display.
-
Page 12: Payloads - Camera Options
AscTec Falcon 8 system, the compass has to be (factory) calibrated once. The AscTec Falcon 8 system will save the calibration with that exact payload and remember it the next time you use that payload. - Page 13 Sony Alpha 7: Fully integrated. Modified hardware for direct remote control and power supply. Actively stabilized camera mount. Sony Camcorder PJ780VE: Fully integrated. Modified hardware for direct remote control and power supply. Actively stabilized camera mount. PANASONIC LUMIX – CAMERA Panasonic Lumix DMC-LX5, Panasonic Lumix DMC-LX7 Panasonic Lumix DMC-TZ22, Panasonic Lumix DMC-TZ31, Panasonic Lumix DMC-TZ41 Panasonic Lumix DMC-TZ61...
-
Page 14: Chargers / Batteries
THERMAL CAMERAS & EXPERT CAMERAS Digital camera Sigma DP1 Merrill Infrared camera FLIR TAU 640 Inspection payload TZ61 Near-infrared camera Tetracam ADC Micro Thermal camera NEC F30 D. CHARGERS / BATTERIES ROBBE POWER PEAK C8 EQ-BID serves as charger for all flight system batteries and the battery of the diversity Robbe Power Peak video receiver, but not for the batteries of the Mobile Ground Station. -
Page 15: Transport Case & Asctec Backpack
Case with a precisely water jet cut inlay fitting the complete AscTec Falcon 8 system with all its accessories. For easy one-person transport, it has a retractable handle and wheels. The AscTec Backpack is not airfreight able, but very useful for missions in remote destinations, since it is light and tight, but safe. -
Page 16: The Asctec Trainer
To bind the AscTec Trainer, use the ASCTEC FALCON SCAN in the Status Display and select the ID which is written on the system. Please note, when the Comfort Package is not activated on your AscTec Falcon 8 system, the Status Display will not show the same features on both systems. -
Page 17: Operating The System
The pilot must be able to control the UAV not only in GPS MODE but also in HEIGHT MODE at all times! For most applications, the AscTec Falcon 8 is best to be flown in GPS MODE. Our systems are well- proven. However a valid GPS lock can never be guaranteed. - Page 18 When there is no input from the pilot, the system will: Keep its orientation in the air. Maintain its position within the limits of the GPS accuracy (approx. 2–5 m). Keep its height within the limits of the height controller (approx. 1–3m). Compensate for wind speeds up to 10 m/s.
-
Page 19: Automated Start-Up Checks
For safety reasons and to make it impossible to flip the system: Roll and pitch angles are limited to 52°. The system will neither keep its position and height nor will it compensate for wind. The position and height control has to be done manually. The MANUAL MODE is for experts only. -
Page 20: Choose Battery Type
The system is ready to take-off as soon as the calibration has successfully finished and the link to the MGS has been established. A GPS signal is not essential for flying the AscTec Falcon 8. However, we recommend any inexperienced pilots to take-off and land in GPS MODE. Good GPS reception (>... -
Page 21: Setting Up The Mobile Ground Station
If the MGS does not connect to the AscTec Falcon 8 automatically, you can press on the Status Display, select SCAN and search for your AscTec Falcon 8. All available systems are displayed with its serial number, which you find on the back of the central unit (five numerals; e. g. 30123). Choose your preferred system from the list and press ENT. -
Page 22: Starting And Stopping The Motors
You must have an open view to your application area and into the sky to enable the AscTec Falcon 8 to receive GPS signal of satellites. Launch at a safe distance from people only! Once you have lifted-off, do not let the system descend under a safe height of at least 3 meters, except you intend to land. -
Page 23: Landing
As airstrip we recommend a free space, where you have at least 10 square meters without obstacles around the UAV so that all rotors are able to spin freely. You must have an open view into the sky to enable the AscTec Falcon 8 to receive GPS signal of satellites. LANDING IN GPS MODE Landing in GPS MODE is recommended and you should use it if it is possible. -
Page 24: Visual And Acoustic Warnings
4. Stop the motors. For that keep the LEFT CONTROL STICK completely pulled DOWN (= DESCENDING) while pushing the START/STOP SWITCH for at least one second. 5. Mission completed. L. VISUAL AND ACOUSTIC WARNINGS Besides the visual warnings on the Status Display, the MGS contains an internal speaker to draw a pilot’s attention by acoustic warnings. -
Page 25: Good Advices
MOTOR FAILURE WARNING Regarding Acoustic Signal Explanation One of the motors, motor controllers or propellers is not working properly. You should start landing soon to find and Motors MOTOR FAILURE! LAND NOW! fix the problem. In most situations the redundant propulsion system will compensate one failing motor/rotor combination. -
Page 26: Operating In Extreme Situations
ORIENTATION OF THE ANTENNAS The 2.4 GHz data link antennas, as well as the 5.8 GHz video link antennas are dipole (rod) antennas. The strongest radiation of those antennas is 90° to the direction of the antennas. Accordingly the transmission is better, when data link antennas and video link antennas are parallel to each other as pictured. -
Page 27: Crash
Period and conditions of supply depend on your location. Q. OPERATIONAL LIMITATIONS The AscTec Falcon 8 system has the following operational limits: Operating temperature range from 0–35° C. Under 5° C battery capacity and flight time drop dramatically. -
Page 28: Payload Vs. Flight Time
R. PAYLOAD VS. FLIGHT TIME S. FINISH YOUR MISSION 1. Switch off the camera. 2. Switch off the UAV. 3. Switch off the diversity data link and the diversity video receiver of the MGS. 4. Unplug and remove the battery from the UAV. 5. -
Page 29: Status Display
Visual and acoustic warnings are described on p. 22. A. BASIC SETTINGS RIGHT BEFORE START There are 4 steps required before you can launch the AscTec Falcon 8 and start a mission: Connect the AscTec Falcon 8 with the MGS R... -
Page 30: Main Menu - Main Page & Orientation Page
B. MAIN MENU – MAIN PAGE & ORIENTATION PAGE In the MAIN MENU, which is displayed after connecting MGS and UAV, find MAIN PAGE and ORIENTATION PAGE, which can be toggled trough by the LEFT/RIGHT button. Several other Detail Pages appear in the same menu, when you activate the EXPERT MODE in the SETTINGS MENU. MAIN MENU: MAIN PAGE: Battery level. - Page 31 TYPE shows either a single waypoint mode or a path number. #WPS shows the full number of waypoints or only that of a selected path.Press SELECT to toggle between single waypoint mode and path mode. By clicking ADD WP, the current position, height and camera orientation of the flight system is saved as a waypoint.
- Page 32 To interrupt the POI function move the LEFT CONTROL STICK to LEFT/RIGHT or press STOP POI in the NAVIGATION MENU. CIRCLE OF INTEREST (COI) – PART OF THE OPTIONAL COMFORT PACKAGE The COI function lets the UAV automatically circle around a desired object in an adjustable radius and height and take pictures from predefined orientations.
- Page 33 Falcon Info flight) & installed firmware versions of current hardware components. Falcon Search Search for another AscTec Falcon 8 to connect. Only use this when operating with one single type of battery! Set the Fixed Bat. currently fixed battery type.
-
Page 34: Special Functions
LEFT CONTROL STICK as usual. Example: If you climb with 1 m/s when you press the TRIGGER BUTTON, the AscTec Falcon 8 will keep on climbing with 1 m/s as long as the TRIGGER BUTTON is pressed. As long as the TRIGGER BUTTON is pressed the LEFT CONTROL STICK is for controlling the pitch-angle of the camera (“looking up and down”). -
Page 35: Cablecam Mode
Hence please activate the Video Mode first. By pressing the LEFT or RIGHT buttons you need to switch to the “CABLE CAM” short cut. As soon as the AscTec Falcon 8 is pointing in your desired “forward direction”, press the and it will lock this orientation. -
Page 36: Waypoint Navigation
This function offers an automation which will help you to perform a complex mission in maximum quality and highly efficient. We recommend it to obtain image data of large areas. By planning matrix patterns the AscTec Falcon 8 will shoot automatically. Up to 500 waypoints/images per flight are storable. - Page 37 THE SOFTWARE INTERFACE The ASCTEC AUTOPILOT CONTROL is a versatile software including diverse tools to test and control all GPS based functions of your UAV. The communication protocol is open to transmit waypoints. You may also use custom software interfaces to interface with the UAV. The STATUS INFORMATION WINDOW regularly displays all flight information.
- Page 38 GENERATING A GEOREFERENCED IMAGE To use ASCTEC AUTOPILOT CONTROL for WAYPOINT NAVIGATION you need georeferenced images. You can create such georeferenced image in several ways. Here is one opportunity: 1. Export an image of a map from any GIS software (e. g. Google Earth) and save it as JPEG file (.jpg, .jpeg, .jpe) and give it a name (e.
- Page 39 Flying in high winds it makes sense to set 4 or even 5 meters. > TRIGGER CAMERA If this box is checked, the AscTec Falcon 8 will take a photo when the waypoint is considered reached, and half of the TIME @ WP has passed.
- Page 40 Especially useful when generating 3D models of buildings. © Ascending Technologies To perform a Point of Interest Circle (POI) follow these steps: 1. Define the center of the POI similar to the starting point of a matrix.
- Page 41 6. Set the CAMERA FOV. The (horizontal) field of view of the camera is displayed with light grey lines in the map afterwards. All objects that are inside that light grey lines are captured in every picture. Set CAMERA FOV to 0 to remove the grey lines. 7.
-
Page 42: Camera Control
D. CAMERA CONTROL This tool can be used for controlling the camera angles and trigger directly from the PC. -
Page 43: After The Mission
BLACK BOX DATA There is a BLACK BOX installed in the AscTec Falcon 8. It records all flight data of each flight every 100 ms. including camera log file and flight path and so on. Some data is redundant, because e. g. -
Page 44: Batteries
OPTION 1 - PROCESS LOGFILE ONLY This option can be used to process one single flight. © Click GO! to extract all data of the selected log file for viewing e. g. in Google Earth . A pose information file and a motor rpm log file can optionally be extracted as well. OPTION 2 –... -
Page 45: Transport
5° C. So keep the batteries warm when flying in cold conditions or even heat them up to approx. 30° C. TYPES OF BATTERIES All batteries used in the AscTec Falcon 8 system are Lithium-Polymer (LiPo) batteries: Type Amperage [mAh] Voltage [V] Standard... -
Page 46: Changing Payloads
AscTec Falcon 8 and MGS are not designed for continuous disassembly. For a safe transportation we recommend to use the transport case or the AscTec Backpack. E. CHANGING PAYLOADS For different payloads (cameras or sensors), it is necessary to exchange the complete camera mount with the integrated payload. -
Page 47: Updates/Upgrades
In case of a necessary update, we will provide you with the ASCTEC FALCON UPDATE TOOL that includes all firmware files. Save the files to your PC. Follow these steps carefully for updating: 1. Power up your AscTec Falcon 8 and your MGS. Make sure all batteries are charged and you have a solid signal connection. -
Page 48: Optional Software Features & Upgrades
To activate additional features, please follows these steps: 1. Power up your AscTec Falcon 8 and your MGS. Make sure all batteries are charged and you have a solid signal connection. 2. Plug in the mini USB cable into the link box behind the Status Display of your MGS, then plug in the cable into your computer. -
Page 49: Maintenance And Repairs
In case of troubles oder questions regarding your flight system you should have that ID prepared, so that we can help you effectively by having all relevant system information related. You find the ID of your AscTec Falcon 8 on the backside oft he flight system above the battery slot. -
Page 50: Exchanging Motor Rails
If you need to exchange propellers, re-mount them according to the following layout: Be aware that there are clockwise spinning propellers and counterclockwise spinning propellers. Always secure each screw with a thread locker! D. EXCHANGING MOTOR RAILS To ensure highest readiness of your system, we highly recommend having spare motor rails with you. In case of small damages to the motors or propellers, you can easily exchange the complete motor rail and be up again in minutes. -
Page 51: Asctec Falcon 8 - Data Sheet
10. ASCTEC FALCON 8 – DATA SHEET This document is required at the safety authorities responsible for flight permissions. It contains all basic facts, figures and safety features of the AscTec Falcon 8. Download link: http://www.asctec.de/downloads/public/AscTec-Falcon-8_Safetydatasheet.pdf Example:... -
Page 52: Disclaimer
Even though the AscTec Falcon 8 is very easy and intuitive to operate, there are always situations where the pilot has to react in the correct manner. For example: A sudden increase in wind speeds over 10 m/s. -
Page 53: Validity
12. VALIDITY This manual is valid for all AscTec Falcon 8 2012 and later. The description of soft- and hardware relates to the AscTec Falcon 8 2012 and the following and later versions of firmware: LowLevel: HighLevel: Diversity: Div. LCD: Earlier versions of firmware might have different features or properties. -
Page 54: Changelog
13. CHANGELOG 2013/08 Version 2.0: New features and functions added. 2012/07 2012 update of Status Display included. 2012/04 Publication of AscTec Falcon 8 manual. 2014/07 Adding new products and features. -
Page 55: Contact Information
14. CONTACT INFORMATION If you should have any questions concerning our UAVs, you can contact us at any time. Company name: Ascending Technologies GmbH Street: Konrad-Zuse-Bogen 4 Zip code, city: 82152 Krailling Country: Germany Telephone: +49 (089) 89 55 60 79 0...
Need help?
Do you have a question about the Asctec Falcon 8 and is the answer not in the manual?
Questions and answers