Table of Contents
Advertisement
Quick Links
Advertisement
Table of Contents

Summary of Contents for MAXIM PERIPHERALS PNP-5850
- Page 1 Thermal Panel Printer PNP-5850 MAXIM PERIPHERALS PVT. LTD. 101, Pradhan Bldg., Aarey Road (Near Subway), Goregaon (East), Mumbai 400 063. (India). Ph. : +91-22-29275039 Fax : +91-22-29275041 E-mail : support@maximppl.com Website : www.maximppl.com...
- Page 3 …2… …3…...
-
Page 4: Table Of Contents
Table of Contents Chapter 1 : Unpacking List ………………………………………………… Chapter 2 : Technical Specifications. …………………………………….. Chapter 3 : Products Illustration. …………………………………………… Chapter 4 : Instructions. ……………………………………………………... Cable Connection. …………………………………………… Control Panel. ………………………………………………… Install Paper Roll. ……………………………………………. Self-test and DUMP mode. ………………………………….. Interface Explanation. -
Page 5: Chapter 1 : Unpacking List
Chapter 1 : Unpacking After unpacking your printer package should contain the following components : Printer AC Power Cord Paper Roll. USB Interface Manual RS 232 Serial Interface/TTL Interface Driver Disk. Fixing Structure Actual products prevail and pictures are for reference only. …5…... -
Page 6: Chapter 2 : Technical Specifications
Chapter 2 : Technical Specifications Item Description Paper roll diameter maximum support 50mm Printing Method Thermal line printing. Printing Density 8 dots/mm Printing Speed 50mm/s (max) Valid Printing 48mm, 384 dots Width Printing Paper 57.5 ± 0.5 thermal paper scroll Type Character Size A : 12 x 24/24 x 24 (English/Chinese) -
Page 7: Chapter 3 : Products Illustration
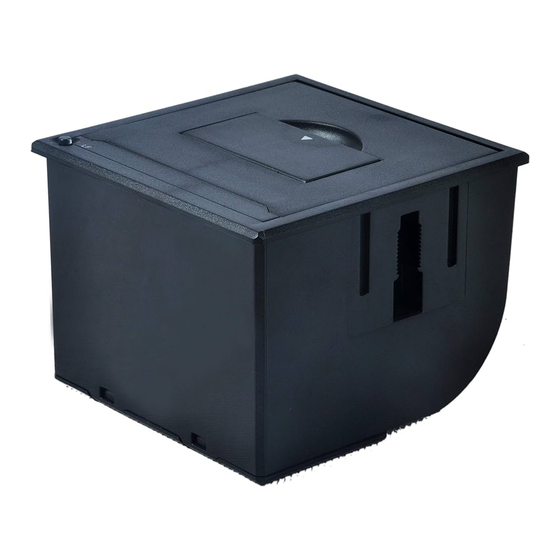
Chapter 3 : Product Illustration Paper roll diameter maximum support 50mm Roller Cover opening plate Main body case Upper cover of the paper box Indicator light and paper feeding button Fixing structure USB Interface Power Interface RS 232 Serial Interface / TTL Interface …7…... -
Page 8: Chapter 4 : Instructions
Chapter 4 : Instructions Cable Connection Control Panel FEED Button Press the FEED button once to feed paper one line. You also can hold down the FEED button to feed paper continuously. FEED LIGHT The light is red light. When the power is switched on, the long bright light, error out of paper or over temperature protection, the flashing lights. -
Page 9: Install Paper Roll
Install Paper Roll Pull off cover from the groove position on the cover of the fingers. Open cover, the upper cover up, into the paper, put the paper should pay attention to the direction, the paper direction in a paper, after installed, close the upper cover. -
Page 10: Interface Explanation
Interface Explanation 4.5.1 RS 232 serial interface/TTL interface The electrical level standards for the printer serial interface are divided into two kinds. TTL level and 232 level. When the level is set to 232, its serial interface is compatible with the standard RS-232 interface. Its interface are as follows : 232 level interface TTL level interface …10…... - Page 11 …11…...
-
Page 12: Usb Interface Definition
4.5.2 RS 232 serial interface/TTL interface USB interface pins’ definitions are shown as below : USB interface pins are defined as follows : USB Pins Signal Description Undefined Data - Data + Signal ground 4.5.3 RS 232 serial interface/TTL interface Power interface pins’... -
Page 13: Chapter 5 : The Guide Of Assemble
Chapter 5 : The guide of assemble Paper roll diameter maximum support 50mm Printer size The guide of assemble The step of assembling Step 1 : Put the printer insert the panel. Step 2 : Carry out the Transparent triangle fixtures from the printer, insert the printer to the user panel, then pinch the two plastic shrapnel of Transparent triangle fixtures, insert the fixtures to the printer’s slot, till to the top of slot for fixing the printer and user panel.
Need help?
Do you have a question about the PNP-5850 and is the answer not in the manual?
Questions and answers