
Summary of Contents for Fiber Mountain Sensus
- Page 1 Sensus FPA Installation Manual 150-00006.01.04 Fiber Mountain Sensus Patch Panel Installation Manual © Copyright 2018, Fiber Mountain, Inc. All Rights Reserved...
- Page 2 Sensus FPA Installation Manual 150-00006.01.04 Document History The Sensus FPA Installation manual provides detailed safety instructions, specifications and installation instructions. The document history table that follows is used to track changes to this document, providing an historical summary as the product evolves and matures.
- Page 3 Fiber Mountain, Inc. The information in this document is subject to change without notice. Fiber Mountain assumes no responsibility for any damages arising from the use of this document, including but not limited to, lost revenue, lost data, claims by third parties, or other damages.
-
Page 4: Table Of Contents
Installation of Sensus FPA ..................24 Installing the Modules into the Sensus Chassis ............24 Fiber Cable Support ....................25 Attaching Sensus Cable Fingers and Rack-Mounting the Sensus Chassis ....26 4.3.1 Installing the LC-to-LC extension ..............27 Powering the Sensus Device .................. 29 Front Panel LC Tx and Rx Port Legend ............... - Page 5 Table of Figures Figure 4-1: Sensus Cable Support Fingers ................25 Figure 4-2: Sensus with cable support fingers attached to rack mount ears ......26 Figure 4-3: Sensus Extended Rack Mount Ears ..............27 Figure 4-4: Installing LC-to-LC Extension Cover ..............28 Figure 5-1: 96xLC to 8xMPO-12 Port Mapping ..............
- Page 6 Sensus FPA Installation Manual 150-00006.01.04 Please Read This Entire Manual Important Please read this entire guide before you install or operate this product. Give particular attention to all safety statements. © Copyright 2018, Fiber Mountain, Inc. All Rights Reserved...
-
Page 7: Safety Instructions
• Connect this product only to the power source that is indicated on the rear panel of this product. • If this product does not have a mains power switch, the power cord serves this purpose. © Copyright 2018, Fiber Mountain, Inc. All Rights Reserved... - Page 8 The service personnel are expected to use their experience and technical skills to avoid possible injury to themselves and others due to hazards that exist in service and restricted access areas. © Copyright 2018, Fiber Mountain, Inc. All Rights Reserved...
- Page 9 15 of the FCC Rules. These limits are designed to provide reasonable protection against harmful interference when the equipment is operated in a commercial environment. This equipment generates, uses, and can radiate radio frequency energy and, if not installed and used © Copyright 2018, Fiber Mountain, Inc. All Rights Reserved...
- Page 10 Fiber Mountain has not approved any changes or modifications to this device by the user. Any changes or modifications could void the user’s authority to operate the equipment. See 47 CFR Sec.
- Page 11 Elevated Operating Ambient Temperature • Only install this equipment in a humidity- and temperature-controlled environment that meets the requirements given in this equipment's technical specifications. CAUTION: © Copyright 2018, Fiber Mountain, Inc. All Rights Reserved...
- Page 12 • If this equipment plugs into an outlet, the outlet must be near this equipment, and must be easily accessible. • Connect this equipment only to the power sources that are identified on the equipment- rating label normally located close to the power inlet connector(s). © Copyright 2018, Fiber Mountain, Inc. All Rights Reserved...
- Page 13 Refer all servicing to qualified service personnel only. • Moisture - Do not allow moisture to enter this equipment. • Cleaning - Use a damp cloth for cleaning. © Copyright 2018, Fiber Mountain, Inc. All Rights Reserved...
- Page 14 • Safety Checks - After service, assemble this equipment and perform safety checks to ensure it is safe to use before putting it back into operation. Accessories Use only attachments or accessories specified by Fiber Mountain Inc. Se il vous plaît lire ce manuel en entier Important Se il vous plaît lire l'intégralité...
-
Page 15: Consignes De Sécurité
• Connectez ce produit qu'à la source d'alimentation qui est indiqué sur le panneau arrière de ce produit. • Si ce produit ne possède pas d'interrupteur d'alimentation secteur, le cordon d'alimentation sert à cette fin. © Copyright 2018, Fiber Mountain, Inc. All Rights Reserved... - Page 16 Le personnel de service sont tenus d'utiliser leur expérience et leurs compétences techniques pour éviter les blessures à eux-mêmes et les autres en raison de risques qui existent dans le service et zones d'accès restreint. © Copyright 2018, Fiber Mountain, Inc. All Rights Reserved...
- Page 17 équipement où il pourrait être à risque de contact avec l'eau. Assurez-vous que cet équipement est utilisé dans un environnement qui répond aux exigences énoncées dans les spécifications techniques de cet équipement, qui peuvent être trouvés sur la fiche technique de cet équipement. © Copyright 2018, Fiber Mountain, Inc. All Rights Reserved...
- Page 18 Cet équipement a des ouvertures pour la ventilation pour protéger de la surchauffe. Pour assurer la fiabilité de l'équipement et un fonctionnement sûr, ne pas obstruer ou recouvrir l'une des ouvertures de ventilation. Installer le matériel conformément aux instructions du fabricant. © Copyright 2018, Fiber Mountain, Inc. All Rights Reserved...
- Page 19 Éviter les blessures et les dommages à cet équipement! Déplacez tout équipement et chariot avec soin. Des arrêts brusques, une force excessive et des surfaces inégales peuvent causer cet équipement et le chariot. © Copyright 2018, Fiber Mountain, Inc. All Rights Reserved...
- Page 20 équipement note normalement situé près du connecteur (s) d'entrée de puissance. • Si cet équipement dispose de deux sources d'alimentation veillez à débrancher toutes les sources d'alimentation avant de travailler sur cet appareil. © Copyright 2018, Fiber Mountain, Inc. All Rights Reserved...
- Page 21 • Nettoyage - Utilisez un chiffon humide pour le nettoyage. • Vérifications de sécurité - Après le service, assembler ce matériel et effectuer des vérifications de sécurité pour se assurer qu'il est sécuritaire d'utiliser avant de le remettre en service. © Copyright 2018, Fiber Mountain, Inc. All Rights Reserved...
- Page 22 Sensus FPA Installation Manual 150-00006.01.04 Accessoires Utilisez uniquement des accessoires recommandés Fiber Mountain Inc. © Copyright 2018, Fiber Mountain, Inc. All Rights Reserved...
-
Page 23: Sensus Specifications
3.23” x 4.31” x 8.77” (8.20 cm x 10.95 cm x 22.28 cm) Weight 3.20 lbs. 3.3 Sensus Patching Modules Specifications Parameter Specification Remarks Mechanical Dimensions (H/W/D) 3.23” x 6.35” x 8.87” (8.20 cm x 16.13 cm x 22.53 cm) Weight 3.10 lbs. © Copyright 2018, Fiber Mountain, Inc. All Rights Reserved... -
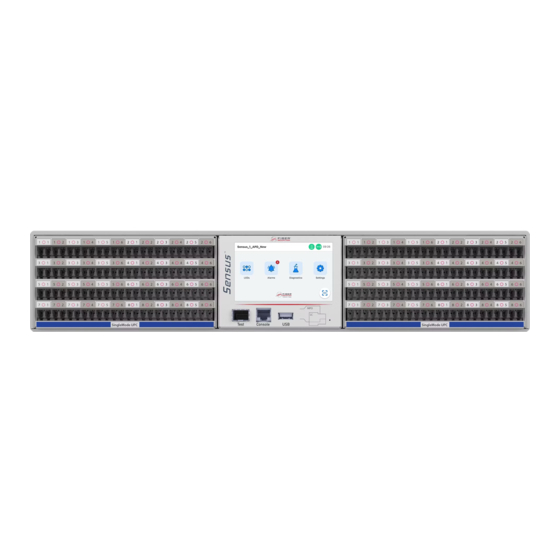
Page 24: Installation Of Sensus Fpa
Patching modules should also make complete contact with the backplane Sensus patching modules are hot-swappable. To remove a patching module, simply pull it out of the chassis. Figure 4-1 Sensus Module Slots... -
Page 25: Fiber Cable Support
150-00006.01.04 4.2 Fiber Cable Support The Sensus cable support fingers are used on the front of the device to maintain the proper bend tension to prevent damage to cabling. The stylus for the management screen is also hung from the cable support fingers by the included tether. These fingers secure to the front of the rack mount ears as well as to the rack itself, and must be installed when the chassis is mounted to the rack (see Section 0 for instructions on cable support finger installation). -
Page 26: Attaching Sensus Cable Fingers And Rack-Mounting The Sensus Chassis
¼ inch to avoid damage. The Sensus cable fingers are used to maintain the proper bend tension to prevent damage to cabling. These fingers secure to the rack mount ears as well as to the rack itself, and must be installed when the chassis is mounted to the rack. -
Page 27: Installing The Lc-To-Lc Extension
(see Section 0 for details on this procedure) 5. Guide the AC power cables for the Sensus through the provided holes in the extension and connect. Install the LC bundle cables in the extension, and connect LC cables to the rear ports of the patching modules ©... -
Page 28: Figure 4-4: Installing Lc-To-Lc Extension Cover
Secure the cover to the unit at the bottom with the included pins. Ensure the LC bundle cables are threaded through the provided holes on the sides of the extension cover Figure 4-5: Installing LC-to-LC Extension Cover © Copyright 2018, Fiber Mountain, Inc. All Rights Reserved... -
Page 29: Powering The Sensus Device
150-00006.01.04 4.4 Powering the Sensus Management Module The Sensus Management Module is powered by two redundant 100-240V AC power supplies, or by Power-over-Ethernet (PoE+) interface. PoE+ is used only when AC power is unavailable. Note: PoE should not be used as a backup for AC power. In the event of power loss to both AC supplies, the IPSM device will restart before PoE+ can be used. -
Page 30: Front Panel Lc Tx And Rx Port Legend
Sensus FPA Installation Manual 150-00006.01.04 5. Front Panel LC Tx and Rx Port Legend 5.1 96xLC to 8xMPO-12, Front-to-Back Mapping For model numbers: DX-2482-001 and DX-2582-001. Figure 5-1: 96xLC to 8xMPO-12 Port Mapping © Copyright 2018, Fiber Mountain, Inc. All Rights Reserved... -
Page 31: Getting Started
The default console (COM1) port configuration should be set to 115200/8-N-1. Figure 6-1: RJ-45 Connector Signal Input/Output No connect Output Output Input Input No connect Table 1: Description of RJ-45 Connector © Copyright 2018, Fiber Mountain, Inc. All Rights Reserved... -
Page 32: Changing The Sensus' Local/Shh Ip Address
6.2 Changing the Local/SHH IP Address 6.2.1 Changing IP Address from the LCD screen Sensus devices ship from the factory with DHCP enabled, which allows the device to be auto- discovered by AllPath Director. To change the IP of the Sensus, follow these steps: 1. -
Page 33: Changing Ip Address From The Craft Port
1. Configuration will be done via Linux CLI craft (RS232) port on the Sensus or via SSH connection 2. Attach serial cable from the Sensus front panel craft (RJ-45) port to DB-9 serial port on PC 3. Login with username (default: SysAdmin) and password (default: Password1) 4. -
Page 34: Tail The Sensus Log Via The Ssh Craft Port
6.4 Tail the Sensus log via the SSH craft port A user can access the device’s log via the SSH port using the following process: 1. Configuration will be done via Linux CLI craft (RS232) port on the Sensus Management Module or via SSH connection 2. -
Page 35: Changing The Hostname Of The Sensus Device
150-00006.01.04 6.5 Changing the hostname of the Sensus device A user can change the hostname of the Sensus device through either an SSH session or the serial console port connection. However, both /etc/hostname and /etc/hosts must be modified in order for the change to take effect. -
Page 36: Changing The Sfp Status From The Sensus Screen
Figure 6-5: Toggling SFP Functionality 6.7 Discovering Sensus products with APD There are three processes for discovering Sensus products within AllPath Director: auto- discovery through DHCP, auto-discovering through the device, and manual discovery through the FMI Controller in AllPath Director. All three methods are explained in detail in the Glass Core Operations Manual (Document part #: 150-00009). -
Page 37: Password Recovery Procedure
7. ICID Capability and Cable Presence Sensus ports can detect presence of both ICID and non-ICID cables. When a cable is inserted into the port, the port’s LED will flash four times. The LED flashes green for ICID cables and amber for non-ICID cables. - Page 38 Fiber Mountain, Inc. The information in this document is subject to change without notice. Fiber Mountain assumes no responsibility for any damages arising from the use of this document, including but not limited to, lost revenue, lost data, claims by third parties, or other damages.
Need help?
Do you have a question about the Sensus and is the answer not in the manual?
Questions and answers