Advertisement
Quick Links
Advertisement

Summary of Contents for Allen Concepts Tightwatt 2
- Page 1 http://waterheatertimer.org/Digital-control-centers-and-manuals.html#P1353ME...
- Page 2 Inside Front Cover...
-
Page 3: Table Of Contents
Table of Contents I. Cautions / Warnings II. Timer installation III. Understanding TightWatt2 Cycles IV. Quick Set-Up Steps V. Manual Operation VI. Troubleshooting / Cleaning Warranty Back Cover © 2007 Allen Concepts, Inc. Last revised: 03/31/2008... -
Page 4: Cautions / Warnings
I Cautions & Warnings IMPORTANT: READ IMMEDIATELY! In order for your timer to function normally, it must be released from the in-store demo mode. With the 9V battery back-up installed or connected to power, simultaneously press and hold both buttons for 5 seconds. Do not perform this procedure unless the front cover is in place and there is no risk of electrical shock. - Page 5 6. If the equipment is used in a manner not specified by the manufacturer, the protection provided by the equipment may be impaired. The TightWatt timer contains a safety feature which allows the relays to remain in an open state. This is useful for situations when you want to be sure that the pump motor will not turn on automatically.
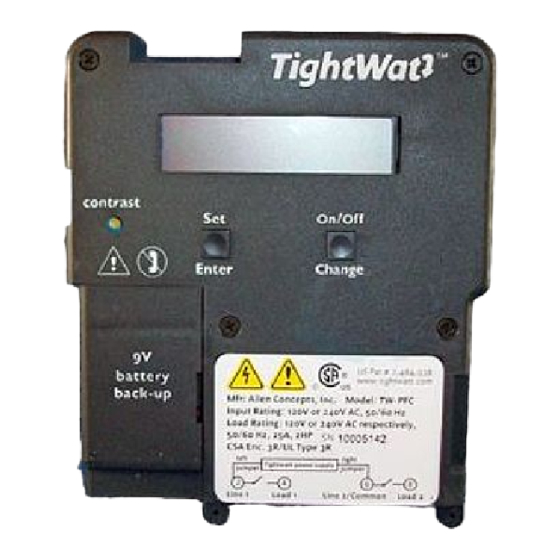
- Page 6 Installation: 1. Mounting the enclosure. If the enclosure is already mounted, proceed to step 2. Mount the timer in the desired location using the mounting holes provided. Mount timer at eye level, if possible, providing room left of the enclosure for the cover to swing open fully.
- Page 7 7. Instructions for protecting earthing. The load ground must be connected to the incoming power ground to prevent a shock hazard in the connected load (in the event of a fault). All grounding wires must be sized according to the applicable electrical codes in order to handle the fault current.
-
Page 10: Iii Understanding Tightwatt2 Cycles
III Understanding TightWatt2 Cycles The TightWatt2 supports up to two start times per day. When the current time reaches a designated start time, a cycle will begin (unless a cycle is already running). Cycle Start End | Start Cycle End | |---- High Speed duration ---------|----------------- Low Speed duration ---------------------------| |---- Auxiliary duration ---| At the cycle start time, the high speed pump and auxiliary pump will begin to run. -
Page 11: Quick Set-Up Steps
off 10 minutes before the high-speed primary pump shuts off. If the duration of the high-speed cycle is less than 20 minutes, the heater will not turn on at all. Mode selection: With the display in its normal mode (time and date displayed), press both buttons at the same time. You should see the following: Next, press and hold the “Set/Enter”... - Page 12 Step 4b | Set the 2nd start time (optional): This is the time your pump will run the second daily cycle (if 2 start-times were selected in option 3). A full pump cycle will run at each of the designated start times. Step 5 | Setting the summer high run time: After your start time(s) have been set, you’ll be prompted to set your “Summer Hi”...
-
Page 13: Manual Operation
Step 10 | Auxiliary Protect (Aux Protect) is a feature designed to prevent damage to booster pumps. Selecting [Y] will cause a 2-minute delay between the primary pump turning on and the auxiliary pump turning on. The booster pump will not run unless the primary pump is running. Selecting [N] will disable the protection, and will cause the auxiliary pump to run with no dependencies on the primary pump. -
Page 14: Troubleshooting / Cleaning
Fireman mode: Example: Hi 2 hours | Low 4 hours | Current Time: 10:20 AM 10:20 AM 12:20 PM 4:20 PM Primary pump |-------2 hours @ High speed--------|------------4 hours @ Low Speed -----------------| Fireman’s switch |-------1 hour, 50 minutes---------| 12:10 PM Stopping a cycle: If a cycle is in progress (as indicated by the animated pump icon), pressing the on/off button will stop the cycle which is currently in progress. - Page 15 VII Limited 3-Year Warranty: If within three (3) years from date of purchase, this product fails due to a defect in material or workmanship, Allen Concepts, Incorporated will repair or replace, at its sole option, the unit free of charge. This warranty applies only to the original purchaser and is not transferable.
- Page 16 Back Cover...
Need help?
Do you have a question about the Tightwatt 2 and is the answer not in the manual?
Questions and answers