Table of Contents
Advertisement
Quick Links
Advertisement
Table of Contents

Summary of Contents for Foryou General Electronics RM4Y65
- Page 1 RM4Y65 Operating Instructions...
-
Page 2: Safety Precautions
Safety Precautions Thank you for purchasing this product. P l e a s e d o n ' t c h a n g e t h e f u s e o n Please read through these operating the power cord without professional instructions so you will know how to guidance, using improper fuse may operate your model properly. - Page 3 Safety Precautions 1. Never disassemble or adjust the unit without any professional guidance. For details, please consult any professional car shop / dealer for inquiry. 2. If the front panel or TFT monitor is dirty, please use a clean silicone cloth and neutral detergent to wipe off the spot.
-
Page 4: Table Of Contents
Contents Safety Precautions ........1 USB cable)..........13 Contents ............3 Settings ...........14 Basic settings........14 Before Using ..........4 General settings........14 Front Panel ..........4 Video settings ........14 Time settings ........14 Basic Operations ........5 System settings ........14 Parking Brake Inhibit.......5 Mute ............5 Other Modes ..........15 Power On / Off ........5 Listen to Other Devices ......15 Playing Source Selection ......5... -
Page 5: Before Using
Before Using Front Panel 1. Microphone 2. Reset Button Reset the unit. 3. [ ] Rotary/pushbutton Short press: Switch on device In operation: Mute audio source Long press: Switch off device 4. [ ] Button Show main menu 5. [ ] Button Returns to previous screen 6. -
Page 6: Basic Operations
Basic Operations Parking Brake Inhibit Playing Source Selection • When the “BRAKE” cable is connected to Press the [ ] button on the front panel to the brake switch, the display on the TFT change between available playing sources. monitor will display video only when the The playing mode is displayed on the screen. vehicle is applied. • Parking brake function is overridden when the video source is set to REVERSE. • When the parking brake inhibit is active, the front monitor displays “Warning!!! It is illegal to view video while driving or operating a motor vehicle. Set parking... -
Page 7: Equalizer
Basic Operations Equalizer Set Date /Time 1. Touch [ 1. Enter the EQ setup mode 2. Touch [ Time ]. Touch the [ EQ ] icon in the user interface The date/time setup menu is displayed. and the EQ setup interface will display on the screen. -
Page 8: Radio Mode
Radio Mode Radio Display Select One Radio Band Touch the [ ] icon on the user interface to select one radio band among FM, AM. Tune Auto Tuning Hold [ ] / [ ] icon on the user interface more than 1 second to seek a higher / lower station. -
Page 9: Preset Station
Radio Mode Preset Station RDS Basics Different memory bands and wavebands are Radio Data System (RDS) enables traffic available Up to 18 FM and 12 AM stations reports to be received and provides many can be stored in each memory bank. hence facilities, including enabling the radio station the unit can store 30 stations in total. -
Page 10: Playback Mode
Playback Mode Connect a USB Device 15. Next track 16. Repeat play Insert a USB device into the USB slot. 17. Show more control buttons When connecting a USB device, the unit will read the files automatically. Remove a USB Device 1. -
Page 11: Video Playback
Playback Mode Delete a song from favorite playlist 1. Touch [ ] on the left of the screen. 2. Press [ ] on the favorite playlist, then remove it from playlist. Video Playback Select [ ] on the screen, the unit will playback all the video files on the storages. -
Page 12: Bluetooth Mode
Bluetooth Mode The Bluetooth allows you to utilize your car’s built-in audio system for handsfree wireless mobile phone or music communication. Some Bluetooth mobile phones have the audio features, and some portable audio players support Bluetooth feature. This system can play audio data stored in a Bluetooth audio device. -
Page 13: Audio Playback Via Bluetooth Streaming
Bluetooth Mode Adjust Bluetooth Settings 1. In Bluetooth menu, touch [ The option menu is displayed. Call History 2. Touch on the selected option to change Access Call History by touching [ ] button. the setting. ∙ [Bluetooth]: To turn on or off “Bluetooth” function. -
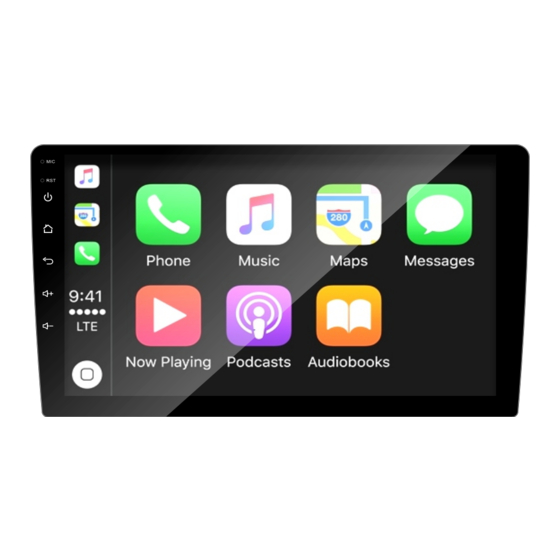
Page 14: Apple Carplay
Apple CarPlay Android Auto Apple CarPlay Android Auto brings the most useful apps to your phone screen or your compatible car Available on select cars, CarPlay is a display, in a format that makes it easy for you smarter, safer way to use your iPhone in the to keep your main focus on drving. -
Page 15: Settings
Settings Basic settings Time settings In the settings menu, you can adjust the The following setting are possible: basic settings for the different functions of the Date - Set the date. device to your requirements. Cloct mode - Selection between 12Hr and 24Hr mode. -
Page 16: Other Modes
Other Modes Listen to Other Devices 7. Once the final steering wheel control button is programmed, the functions are You can connect an external audio/video saved and the programming will end. device to the unit. 8. Touch [ Reset ] to reset the programming. 1. -
Page 17: Specifications
Specifications General Reference Supply Voltage ..............12V(DC) Operating Voltage Range ............10.5 - 15.8V(DC) Max Operating Current .................15A Maximum Output Power ............... 4 X 25W Grounding System ............ Car Battery Negative Pole Dimensions(WXHXD) ............229.2*130.6*50.2 mm Weight(main unit) ..................1.09kg Signal Noise Ratio ................≥55dB Residual Noise Sensitivity (S/N=30dB) .......... -
Page 18: Wire Connections
Wire Connections WHITE AUX-CVBS USB-0.5A CAMERA VIDEO IN BRAKE BACK CAM 12V CAM PWR GND... - Page 19 FCC Statement FCC Radiation Exposure Statement 1. This device complies with Part 15 of the FCC This equipment complies with FCC radiation Rules. exposure limits set forth for an uncontrolled Operation is subject to the following two environment. This equipment should be installed conditions: and operated with minimum distance of 20 (1) This device may not cause harmful interference.
- Page 20 PN.: 1270750014400...
Need help?
Do you have a question about the RM4Y65 and is the answer not in the manual?
Questions and answers