
Related Manuals for Custom Built eBikes Bafang C965 A


Summary of Contents for Custom Built eBikes Bafang C965 A
- Page 1 Bafang C965 A Instruction Manual V1.0 Model:APT12LCD800S...
-
Page 2: Lcd Instructions
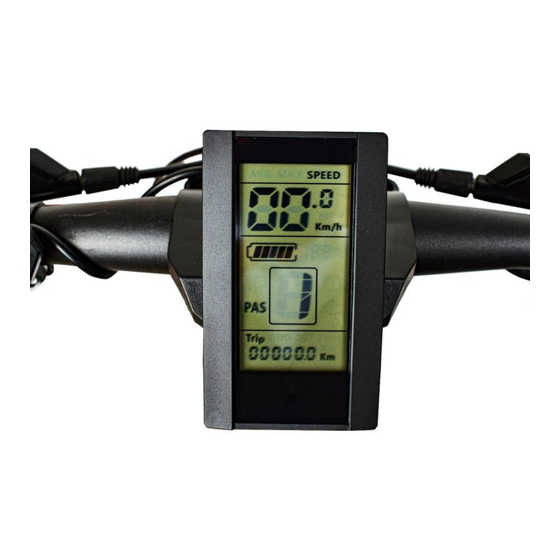
1 Features Easy to operate physical buttons Speed display: AVG SPEED, MAX SPEED, SPEED(Real-time). Kilometer / Mile: Can be set according to your requirements Smart battery indicator: Reliable battery meter giving accurate battery measurements Adjustable backlight: 5 levels ... -
Page 3: Operation
3 Operation 7.1 Power On/Off Press and hold the Power button for 1 second to turn the display on or off. The display will automatically shut down when there are no buttons are pressed and the bike is not being ridden after a set number of minutes (which can be adjusted from 1 – 9 minutes). 7.2 Assistance levels Briefly press either the UP or DOWN buttons to change the assistance levels. - Page 4 MAX speed Speed AVG speed Time Trip Speed mode switch and mileage mode switch *If there is no operation for 5 seconds, the display will return to the speed (Real-Time) display automatically. 7.4 Headlight/backlight On/Off Press and hold the UP button for 1 second to turn on/off the headlight/backlight. When the battery voltage gets too low, the motor is disabled to prevent the battery from being damaged.
-
Page 5: Settings Menu
7.6 Data cleanup Press and hold the UP and DOWN buttons together for 1 second to reset the trip data including average speed, maximum speed and time. 4 Settings menu Double press the POWER button to access the settings menu. Briefly press the UP/DOWN buttons to change the settings value, briefly press the POWER button to switch to the next setting. - Page 6 4.2 .Backlight brightness: Settings option bL1, press the UP/DOWN button display symbol 1~5 to changes the brightness of the backlight. 4.3 Auto off time: Settings option OFF, press the UP/DOWN button to change the value from1 to 9 (minutes). This is the time before the screen powers down when not in use.
- Page 7 4.6 Password/Speed limit set: Settings option PSd, you need to enter a 4 digit PIN to enter this menu – press the UP/DOWN buttons to change the password values (0~9), briefly press the POWER button to switch to the next number. The default password is "1919".
-
Page 8: Error Code Definitions
5 Error Code definitions When the LCD displays the icon, an error code will be displayed in the speed area of the display. The table below defines the error codes: Error Code Error description Error display 0x01 Normal No error 0x03 Brake signal No error... - Page 9 6 Assembly instructions Please pay attention to the screw’s torque value, damaged caused by excessive torque is not within the scope of the warranty. There are 2 directions for the clamp installation, forward or backward. Different assembly methods will need different cable length. https://custombuilt-ebikes.co.uk 01392 580040 info@custombuilt-ebikes.co.uk...
- Page 10 Clamps suit 3 sizes of handlebar, 31.8mm, 25.4mm, 22.2mm, there are transfer rings for 25.4mm and 22.2mm, transfer ring must be assembled with the special directions, pay attention to the green arrow below. 7 Output wire instructions 1、 Red wire: Anode(24v/36v) 2、...
-
Page 11: Electrical Parameters
8 Assistance level instructions The assistance levels can be customised, the highest level is 9 3 level 5 level 9 level No power assist 9 Certification CE / IP65 (waterproof) / ROHS. 10 Electrical Parameters 24V/36V battery supply Rated operating current: 10mA ... - Page 12 11 Dimensions & Material 11.1 The product shell is ABS, the transparent window is made from high strength Acrylic, with the stiffness equaling that of tempered glass. 11.2 Dimensions: L90mm*W54mm*H13.3mm https://custombuilt-ebikes.co.uk 01392 580040 info@custombuilt-ebikes.co.uk...
- Page 13 https://custombuilt-ebikes.co.uk 01392 580040 info@custombuilt-ebikes.co.uk...
Need help?
Do you have a question about the Bafang C965 A and is the answer not in the manual?
Questions and answers