
Summary of Contents for flexicelcrea T13FHL-7
- Page 1 T13FHL-7(EN) Digital Thermostat FLEXICEL HZ 435-140-07 Installation and user guidance...
- Page 3 Language...
- Page 4 Introduction T13FHL-7 (EN) is a stylish appearance digital thermostat designed for electronic floor heating systems, which can be operated more convenient with a 360º freewheeling button to choose the menu option, as well as add or reduce the setting temperature you required.
-
Page 5: Table Of Contents
Main Features - TFT color display screen with backlight - 360º freewheeling, easily operate - Energy monitoring function - Frost protection function - English/Chinese OSD menu optional - Support Holiday mode - Green leaf color = heating OFF - Red leaf color = heating ON Index 1. -
Page 6: Installation
Installation a. Install the c. Install the thermostat b. Install the tight screw back cover 1. Remove the front cover by pressing the release tab on the lower rear part of the thermostat. You can also use a screwdriver to release the cover but gently. - Page 7 Wiring Diagram Cuidado: · Item 1-2: Connected with floor sensor · Item 3: Pilot wire signal · Item 4-5: Connected with head load · Item 6-7: N: Neutral Wire; L: Live Wire...
-
Page 8: Safety Introduction
Safety introduction Please observe the following guidelines: - Do not cover the thermostat, this will impair the ability of the thermostat to sense and adjust the room temperature correctly. - Do not spill any kind of liquids into the thermostat. Do not open, disassemble, or tamper with the thermostat in any way. -
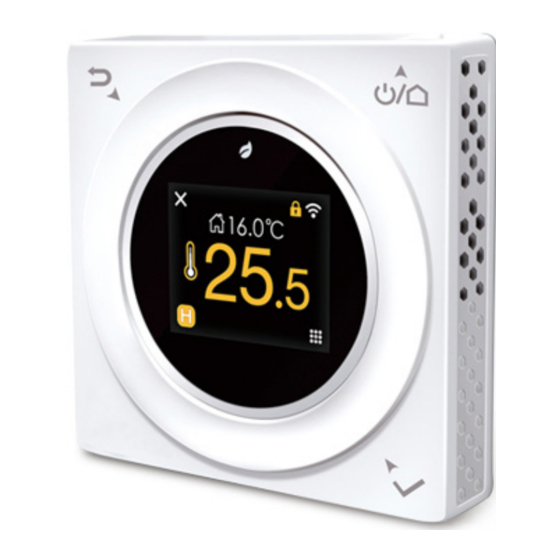
Page 9: Key Description
2.2 Key description Cuando abre el termostato por primera vez, será necesa- rio proceder a los ajustes siguientes: 1). “ON / OFF” button: Press the button on the top right of the thermostat to turn it on; with a long press it will turn off the thermostat or in cold mode when it is working;... -
Page 10: Operation Mode
2.3 Operation mode The Factory default mode is permanent hold mode, you can also select other operation modes according to the following settings:. - Program operation mode In the program operation mode, the thermostat will run according to the program schedule. - Temporary hold mode In temporary hold mode, the new temperature will be maintained only until the next programmed time period begins. -
Page 11: Operation Mode
Menu Option * The third option “Enable” allows to enable or disable programming 3.1 Programming 3.1.1 Program setting Turn the ADJUST button to select the days (Monday-Sunday) you want to edit, press “OK” button, then turn the ADJUST button to choose “NEXT”, press “OK”... - Page 12 You can make the same settings of 7 day (Monday to Sun- day) or make each day different, when you finished the one day’s setting, the zone will be blue, it means that you cannot set again. * Mo: Lunes, Tu: Martes, We: Miércoles, Th: Jueves, Fr: Viernes, Sa: Sábado, Su: Domingo 3.1.2 View the program Turn the ADJUST button to select the day you want to view, e.g.: Monday-Sunday, press “OK”...
-
Page 13: Energy Use History
3.2 Energy use history The history shows the summary of temperature and energy con- sumption during the periods of programming, such as: today, yes- terday, this week, this month and this year. Turn the “ADJUST” button to select a time period you want to view, press “OK”... -
Page 14: Settings
3.4 Settings 3.4.1 Display setting - Brightness Turn the dial to select the brightness of the LCD screen between 1 (dimmest) and 6 (brightest). The default of operation backlight is 6, the standby backlight is1. - Language Turn the dial to select the operation language which you prefer to. -
Page 15: Date Setting
3.4.2 Date setting Press “OK” into the date option, the year will flash first, turn the dial to set it, Press “OK” and then the month begin to flash, turn the dial to set it, Press “OK”. Now the date will flash, turn the dial to set it, press “OK”. Press it again to edit the time setting (hour, minute, second). - Page 16 3.4.4.2 Floor sensor setting Set floor sensor type: The thermostat is compatible with these floor sensors: NTC10K, NTC15K and NTC100K. The Factory default is NTC10K, the sensor will be included (see picture) Set temperatura offset: If you feel the room temperature is not very comfortable, you can set the offset temperature, the maximum limit of the offset temperature is -4ºC ~ 4ºC.
-
Page 17: Error Message
3.4.4.4 Load setting Set Load voltage Turn the dial button to select the load voltage. There have 100-120V, 220-240V for option. Set Load power Turn the dial button to select the load power. There have 100-1700W, 100-3500W for option. 3.4.4.5 Revert to factory default Press RESET button, this will reset the thermostat to factory default setting. - Page 18 FLEXICEL UF (Under Floor) FLEXICEL HZ (Heat Zone) www.flexicelcrea.com Certificate Nº : SEM15079248S Certificate Nº : SEM15079248 T13FHL- 7(EN) / Digital Thermostat / FLEXICEL HZ Security Comfort Energy saving...
Need help?
Do you have a question about the T13FHL-7 and is the answer not in the manual?
Questions and answers