Table of Contents
Advertisement
ARBOTOM®
ARBOTOM®
ARBOTOM®
ARBOTOM®
3-D Tree Impulse Tomograph
Version for Microsoft Windows® 98, 2000, XP, Vista,
Windows 7
User Manual
User Manual
User Manual
User Manual
Contains important information. Please read carefully
Contains important information. Please read carefully
Contains important information. Please read carefully
Contains important information. Please read carefully
before using the ARBOTOM® for the first time.
before using the ARBOTOM
before using the ARBOTOM
before using the ARBOTOM
® for the first time.
® for the first time.
® for the first time.
Advertisement
Table of Contents

Subscribe to Our Youtube Channel
Summary of Contents for RINNTECH ARBOTOM
- Page 1 Contains important information. Please read carefully Contains important information. Please read carefully Contains important information. Please read carefully Contains important information. Please read carefully before using the ARBOTOM® for the first time. before using the ARBOTOM ® for the first time. before using the ARBOTOM before using the ARBOTOM ®...
- Page 2 ® ARBOTOM - Manual...
- Page 3 ® ARBOTOM - Manual Copyright © 2012 Frank Rinn, Heidelberg All rights reserved worldwide. The software described in this reference may be subject to changes. Updates are available via the Internet: www.rinntech.com...
-
Page 4: Table Of Contents
® ARBOTOM - Manual Contents CONTENTS ..........................4 SAFETY INSTRUCTIONS ....................... 5 ® HOW DOES THE ARBOTOM WORK? ..................7 WHAT IS INCLUDED IN THE SYSTEM? ................. 8 ............................ 8 ENSORS ..........................9 ATTERY ............................ 9 HARGER ........................10 ONNECTING CABLES ..........................11... -
Page 5: Safety Instructions
Safety Instructions • Protect all parts from moisture, dust, frost and shock! Handle with care! • Do not open the device! Only RINNTECH or authorized persons are allowed to repair the device • Do not over-bend or fold the cables •... - Page 6 ® ARBOTOM - Manual Please notice: Due to the physical properties and anatomy of wood, tomograms as a result of runtime measurements are in their precision and informational value limited reconstructions of the inner mechanical condition of the tree. They should therefore not be used as sole...
-
Page 7: How Does The Arbotom ® Work
Gathering the impulse velocities in a matrix allows them to be presented as a line or surface graphic. ® Depending on the number and position of the ARBOTOM -sensors, two dimensional as well as three- dimensional scans can be performed. -
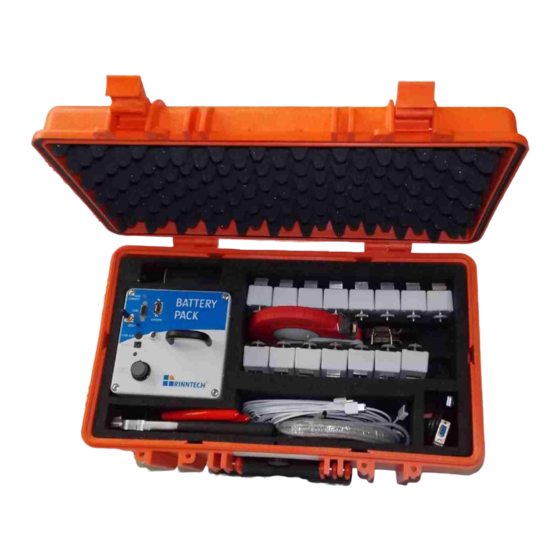
Page 8: What Is Included In The System
The sensors are attached to the tree by steel pins via the holding device. At the front you will notice the shock bolt. While measuring the impulse waves are induced into the tree via the shock bolts. ® IMPORTANT: Never hit any other part of the ARBOTOM -sensor except the shock bolt. Otherwise the sensor may be damaged. Shock... -
Page 9: Battery Pack
® ARBOTOM - Manual Battery Pack Impulse tomography requires basic voltage. This will be supplied by the battery pack. Before starting the measuring process, switch the battery pack on . After a few hours of use, the battery pack must be recharged. Please make sure that the voltage is high enough at the beginning of your measurements. -
Page 10: Connecting Cables
PC with the USB input of your PC. This adaptor ® cable can be purchased in a computer store or via RINNTECH. You can also connect the ARBOTOM ® and your computer via wireless connection if your computer has got a Bluetooth... -
Page 11: Software
The software saves all measurements and they can be printed on a color printer. It is necessary to use a portable PC in the field. We recommend using a Tablet-PC with TFT-monitor. ARBOTOM runs on all Windows systems from Windows 98 upwards. -
Page 12: Installation Of The Arbotom -Software
® Installation of the ARBOTOM -Software The ARBOTOM software can be easily installed on your PC: 1. Insert the RINNTECH Software CD into the CD-ROM drive. 2. After a while the CD starts automatically. Choose your language. Please note that ®... - Page 13 ® ARBOTOM - Manual 5. The Setup-Program will be started. Please follow the instructions. 6. After successful installation the software must be unlocked by RINNTECH (see next chapter). It will offer full performance when unlocked.
-
Page 14: The Arrbotom ® -Software
® The ARRBOTOM -Software ® This chapter shall give you an insight into the ARBOTOM Software before using it for the first time: You will get to this menu by clicking “options”. The following adjustments can be made: Program: Auto fill columns: Copies settings of first line to the others in the columns for: height, diameter and level. - Page 15 ® ARBOTOM - Manual Number of Sensors: Number of sensors that will be used for the measurement. Please note that this information has to be indicated first, changes cannot be made later on. Sensor positioning unit: Unit height and radius difference will be written in cm or inch.
- Page 16 ® ARBOTOM - Manual In this window the following setting can be made: Project, Location, Tree, Tree species, Date, North Tree species: Different tree species have a different wood anatomy and therefore vary their physical properties. These different properties have an influence on the way the impulse travels thought the wood.
-
Page 17: Preparation
Choose an adequate number of sensors. Small trees may require fewer sensors whereas you will need mores sensors for big trees. Keep in mind that a higher number of sensors will increase the resolution. ® The ARBOTOM can be applied in every position. Trunks (horizontal) as well as branches (vertical) can be examined. - Page 18 ® ARBOTOM - Manual Attaching the sensors Step 1: Positioning of the sensors After you made the choice of where to do the analysis, we recommend measuring the circumference of the trunk (or branch) at that level. Decide how many sensors you need. Then choose the position of each sensor that...
- Page 19 ® ARBOTOM - Manual Connect the sensors using the sensor cables. Take into account that there are different sockets for in- and output. The input socket is the one on the right side of the sensor ( ), the output socket ( ) on the left side. Always connect the output socket ( ) of a sensor with the input-socket of the next sensor.
-
Page 20: Entering The Geometry Of The Cross-Section
It is sufficient in its precision for most of the cases. ® Step 1: Open the options menu in the ARBOTOM Software and insert the numbers of sensors used for the measurement. Then choose the unit of length (cm or inch). Use the same unit for the circular sensor positioning and activate the field “Absolute”... - Page 21 ® ARBOTOM - Manual Step 2: Insert the height above ground of the measuring level into the column “Height) in the “Positions” datasheet. Actual circumference Step 3: Insert the positions of the sensors along the measuring tape into the column “Pos [..]”.
- Page 22 ® ARBOTOM - Manual Step 5: Because most of the trees do not have a perfect circular stem at the measuring level, it is necessary to write down the deviation from circularity in the program: In case of the cross section shown on the right, the positions of sensors 2,4,6,8 and 11 need to be corrected.
- Page 23 ® ARBOTOM - Manual The table “Distances” now shows the distances between the sensors. These distances will be taken into account for calculating the runtimes: Step 6 Complete the datasheet, adding information about the project, location, tree, tree species, north- position and date.
-
Page 24: Option: Wireless Connection (Bluetooth)
Options. Check the Windows Device Manager to find out which COM-port is used by Bluetooth. During the startup of the ARBOTOM software, the Bluetooth connection will be established automatically. In case the connection is lost, it can easily be re- established by clicking on the button “Reconnect COM-port”. -
Page 25: Measurement
® ® on and that the ARBOTOM -software is started. To reconnect the ARBOTOM and the Notebook via wireless connection click on “Reconnect COM-Port” The LED in the upper left hand corner of the Battery Pack should now show a green light. - Page 26 ® ARBOTOM - Manual Step 4: Knock on each sensor once with the hammer. To knock on the sensors should not require any force and should be done with an equal intensity. The sensors will indicate a detected signal by flashing red diodes. After each measurement please wait until an acoustic signal appears, then proceed with the next measurement.
- Page 27 ® ARBOTOM - Manual Step 7: Please check the table “Delta %” to ensure that your measurements are reliable. This table displays the standard deviations in per cent. The values should be < 10%. If values are higher, please repeat the measurement for that sensor. In the case of the table below, the values between sensor 3 and 11 still show a very high coefficient of variation.
-
Page 28: Display Of Measured Values
® ARBOTOM - Manual Display of measured values: Runtimes: The runtimes are recorded and presented line by line by the software. If an impulse does not reach a sensor the runtime tends to extraordinary high values. This may be caused by large hollow spaces within the trunk/branch. - Page 29 ® ARBOTOM - Manual Velocities The impulse velocities are calculated from the runtimes and distances between the sensors. They are the key information for the evaluation of the state of the wood. Please take into consideration that the impulse velocity corresponds with wood density and elasticity.
-
Page 30: Graphic Display
- Manual Graphic Display: ® The ARBOTOM gives two options of 2D- visualization and one 3D image. Please note that the 3D Graph can only be shown if the sensors where attached to the tree in at least two levels and the 3D module is unlocked. -
Page 31: Line Graph
® ARBOTOM - Manual Line graph The line graph transfers the impulse velocities between the sensors into a colored image. You can choose an adequate color palette in the “Options” menu. The velocities will be presented in the different palette colors. We recommend the red-yellow-green palette, since it shows the range from low (red) to high velocities corresponding to a traffic light. -
Page 32: Graph Options Of The Line Graph
® ARBOTOM - Manual Graph options of the line graph Common graphic settings Background and grid colors: • Choose the requested colors. For printing we recommend to use a white background. Text color: Choose the requested text color. • Circumference color: Select the color of the trunk or branch circumference •... - Page 33 Typical velocity interval: This option will adapt the graph colors according • to the typical impulse velocities for the species selected. RINNTECH is currently developing a velocity catalogue for certain species. Please note that velocity tables derived from other measurement devices cannot be applied to ®...
-
Page 34: Surface Graph
® ARBOTOM - Manual Surface graph The surface graph is calculated from the line graph using a mathematical algorithm. Depending on the density of the sensor network, this routine allows to localize wood defects. As a default the color palette is scaled according to the range of velocities - from the lowest to the highest value. -
Page 35: Graph Options Of The Surface Graph
® ARBOTOM - Manual Graph options of the surface graph Common graph Background and grid colors: • Choose the desired colors. For printing we recommend using a white background. Text color: Choose the requested text color. • Circumference color: Select the color of the trunk or branch circumference •... - Page 36 Typical velocity interval: This option will adapt the graph colors according to • the typical impulse velocities for the species selected. RINNTECH is currently developing a velocity catalogue for certain species. Please note that velocity tables derived from other measurement devices cannot be applied to ®...
-
Page 37: Additional Modules
® ARBOTOM - Manual Additional modules: Important: All additional modules are only available if the modules are unlocked. If you are interested in one of the modules, please get in contact with us. -
Page 38: Unlocking Modules
1. Click on , select „Programs“, „RINNTECH“ and the „Registration Form“. 2. Choose the module you wish to unlock. (For example ARBOTOM 3D) 3. Please fill in the registration form completely. This helps us to provide the optimal support possible. The fields name. Street, zip code and town are compulsory. -
Page 39: 3D Tomography
® ARBOTOM - Manual 3D Tomography For 3D applications the height of sensor positions must be specified individually. The sensors must furthermore be ordered in levels. A level is defined as a complete circulation of the sensor chain. The next and the following circulations are assigned to further levels. - Page 40 ® ARBOTOM - Manual Example for 3-D positions with screw like sensor attachment...
-
Page 41: 3D-Graph
Concept of the 3D-graph ® Since 3D-graphs are difficult to visualize on the screen, ARBOTOM uses axial and cross-sectional sections through the trunk or branch. For a reliable three- dimensional scanning you should use at least 16 sensors. The 3D-graph provides two independent axial sections and three cross-sections. -
Page 42: Elements Of A 3D-Graph
® ARBOTOM - Manual Elements of a 3D-graph Cross-section (middle) • The three objects in the middle of the graph show the top, intermediate and bottom cross-section through the investigated part of the trunk/branch. The intermediate section can be shifted up- and downwards by moving the vertical position control switch (right). - Page 43 ® ARBOTOM - Manual Example of different cross-sectional layers. The intermediate layer can be shifted up- and downwards.
- Page 44 ® ARBOTOM - Manual Axial section (left and right) • It is possible to choose any two axial sections through the area investigated. As a default the sections are oriented perpendicular to each other. Position and angle of the sections can be controlled by the control bars at the bottom of the window.
-
Page 45: 3D-Graph Options
® ARBOTOM - Manual 3D-graph options Common graph Background and grid colors: • Choose the desired colors. For printing we recommend using a white background Text color: Choose the requested text color. • Circumference color: Select the color of the trunk or branch circumference •... - Page 46 Typical velocity interval: This option will adapt the graph colors according to • the typical impulse velocities for the species selected. RINNTECH is currently developing a velocity catalogue for certain species. Please note that velocity tables derived from other measurement devices cannot be applied to ARBOTOM.
-
Page 47: Mechanic Graph
. ® The ARBOTOM Mechanic Graph is based on this concept. It enables the assessment and visual presentation of the relative moment of resistance for trees with any cross-sectional geometry. -
Page 48: What Does The Mechanic Graph Show
- Manual What does the Mechanic Graph show? The ARBOTOM software presents the moment of resistance as a graph for all wind directions. The value at 0° corresponds to the wind from the opposite direction (180°). If the curve bends out at a certain position, the moment of resistance reaches its minimum at this point. -
Page 49: Mechanic Graph Options
® ARBOTOM - Manual Mechanic Graph Options Mechanic: Moment scale size [%]: recommended setting: 60% • The single lines can be selectively deactivated using the corresponding check boxes in the options. Interpretation It must be emphasized that the Mechanic Graph only takes bending, thus the presence of pure tension and compression into account. -
Page 50: Arboradix
® ARBOTOM - Manual ARBORADIX™ Please note: The ARBORADIX™-mode is only available if this module is unlocked. An instruction how to unlock the module can be found on page 39 in this handbook. Concept ARBORADIX™ was developed for the detection of roots and estimation of the area covered by roots- especially in case of a possible infection with fungi. -
Page 51: Software
® ARBOTOM - Manual Software: Sensor: Insert in front of which sensor you want to measure. The sensor you want to choose is always the sensor, which is in a straight line between the measuring point and center of the tree. -
Page 52: Interpretation
® ARBOTOM - Manual Step 4: Go to tablet „Radix“ and insert in front of which sensor in what distance the metal pole will be placed for the first measurement.. Save this position by clicking „new position“. This position should be in one line with the rot butts and if necessary in between. -
Page 53: Interpretation Of Results
In particular differences between wood species must be taken into account. The ARBOTOM®-user takes the responsibility for interpretation of measurements. To achieve an optimum of results, we recommend attending one of our training seminars. -
Page 54: Troubleshooting
Control all contacts for any disturbance by dirt or dust. ® Problem: The ARBOTOM -software does not record any values. (Different causes are possible) Solution: Please check whether the measurement has been started in the Software •... - Page 55 ® ARBOTOM - Manual ® Problem: I am analyzing stem disks using ARBOTOM in a test environment. The measurements results do not resemble the condition of wood. ® Explanation: ARBOTOM is constructed for investigation of living trees. Dead or dry wood ®...
-
Page 56: Getting Help
ARBOTOM - Manual Getting help In case this handbook does not provide the necessary help, please contact us: 1. Via our website: www.rinntech.com 2. Via email: support@rinntech.com Via phone: +49-6221-71405-0 Service We gladly do maintenance service for you. Sensors should be re-calibrated every 2 years to ensure greatest precision. -
Page 57: Warranty Terms
Should anyone not authorised by the manufacturer open any part of the instrument all warranty claims become invalid. If it is necessary to return the device or any parts of the device to RINNTECH, we strongly recommend using the original packaging to avoid shipping damages.
Need help?
Do you have a question about the ARBOTOM and is the answer not in the manual?
Questions and answers