
Related Manuals for Kwik Mark KM-64

Summary of Contents for Kwik Mark KM-64
- Page 1 KwikMark OPERATIONS MANUAL - The KM-64 - “The Best is Now the Simplest” Designed & Manufactured in the USA Kwik Mark Inc...
- Page 2 Copyright © 2003-2017 Kwik Mark Inc. All rights reserved. In the interest of constantly improving our product, Kwikmark Inc. reserves the right that these products including without limitation product features, specifications, designs, availability and pricing are subject to change by Kwikmark Inc., at any time without notice...
-
Page 3: Table Of Contents
Work Safely. Always wear safety glasses near the machine. Table of Contents SECTION 1.0 ................. GENERAL DESCRIPTION SECTION 2.0 ................. SET UP & START UP SECTION 3.0 ..............QUICK REFERENCE GUIDE SECTION 4.0 ......................RULES SECTION 5.0 ....................CONTROLS SECTION 6.0 ................MACHINE DIAGRAMS SECTION 7.0 ............. - Page 4 SECTION 1.0 GENERAL DESCRIPTION...
- Page 5 Furthermore, this concept transfers no direct stresses into the machine slides, for greater longevity. The standard KwikMark (KM-64) operates within an approximate 6" x 4" work area and features solid-state proximity switches as limit sensors for homing and initializing each axis. The KwikMark features high resolution, repeatable performance due in part to the anti-backlash assembly of the axial take up mechanism.
- Page 6 SECTION 2.0 SET-UP & START-UP...
- Page 7 Section 2.0 - Set Up & Start Up Work Safely. Always wear safety glasses near the machine. Machine Set Up Because of the fast speeds and extremely high acceleration rates caution should be taken to keep the operator aware of pinch points, moving slides and sudden motions. Select a steady work bench or machine base to support the Kwikmark.
- Page 8 Section 2.0 - Set Up & Start Up Work Safely. Always wear safety glasses near the machine. Machine Start Up After the connections are complete, begin the following: Turn the machine on (twist E-Stop). The 4 line LCD display will show a “welcome” screen in about 20-25 seconds.
- Page 9 SECTION 3.0 QUICK REFERENCE GUIDE...
- Page 10 Section 3.0 - Quick Reference Guide Work Safely. Always wear safety glasses near the machine. Keyboard (ps/2) Control Machine Description Ps/2 Programmable Keypad Event Keyboard Hot Keys Express Text Enter ENTER Actuate Pin Escape Set Origin SCROLL Scroll Up Scroll Down SCROLL Edit Text Move Back Y...
- Page 11 Section 3.0 - Quick Reference Guide Work Safely. Always wear safety glasses near the machine. Express Text Express Text mode will mark one straight line and will not save it Type the text to be marked Accept the default Text Height or type over to change it For Rotary Press R...
- Page 12 Section 3.0 - Quick Reference Guide Work Safely. Always wear safety glasses near the machine. Acute Pin Pressing F2 will actuate the marking pin Ready to start marking...
- Page 13 Section 3.0 - Quick Reference Guide Work Safely. Always wear safety glasses near the machine. Set Origin Saves the current X, Y, Z positions (from Home) to the machine’s Setup File on the CF card Origin Point is Set...
- Page 14 Section 3.0 - Quick Reference Guide Work Safely. Always wear safety glasses near the machine. Edit Text Edit just the text in any line of the loaded file Job Must be Loaded Scroll down to find the line you want to edit, then hit ENT when done.
- Page 15 Section 3.0 - Quick Reference Guide Work Safely. Always wear safety glasses near the machine. Set Batch Count Setup, enable and disable Batch Count Mode Job Must be Loaded No More Batch Count Mode When set, the count will display Quantity Run/Quantity Set values SPACE BAR to: JOB LOADED...
- Page 16 Section 3.0 - Quick Reference Guide Work Safely. Always wear safety glasses near the machine. New Job Setting up a new Marking file Type the name to save this job under Choose the Line Type: Normal Serial Graphic Date Code Variable Move X &...
- Page 17 Section 3.0 - Quick Reference Guide Work Safely. Always wear safety glasses near the machine. Edit Job Allows full editing, adding and deleting lines Job Must be Loaded Scroll to desired function using the + & - keys Type line positions or teach positions by jogging the machine Does NOT Will return to selection screen...
- Page 18 Section 3.0 - Quick Reference Guide Work Safely. Always wear safety glasses near the machine. Edit Lines Allows editing line properties Job Must be Loaded Use the scroll down to find the line you want to edit, then hit ENT Type line positions or by jogging the machine Does NOT Save Work...
- Page 19 Section 3.0 - Quick Reference Guide Work Safely. Always wear safety glasses near the machine. Teach Park Path Park Path is always tied to the marking file that was loaded when this mode was enabled Job Must be Loaded Jog Machine to Any Point Optional More Moves...
- Page 20 SECTION 4.0 RULES...
-
Page 21: Section 4.0
Section 4.0 - Rules Work Safely. Always wear safety glasses near the machine. Rules There are two ways to setup a marking job: Express Text and Standard Job Setup Both (F1 & F8) are described below and explained in detail in the following pages. Express Text Setup Standard Job Setup Full availability of all features and functions. - Page 22 Section 4.0 - Rules Work Safely. Always wear safety glasses near the machine. Standard Job Setup Description File Name: Must be 8 characters or less. No spaces or math symbols. This will be saved to the CF card on the machine. EX: PART_123 Normal Line Type: Any numbers and characters and symbols available on the keyboard.
- Page 23 Section 4.0 - Rules Work Safely. Always wear safety glasses near the machine. Date Code Line Type: Date, Time and Shift Code functions are used to automatically mark the current values as listed in below chart. EXAMPLES: Format Output Description MM/DD/YY 01/12/18 Year...
- Page 24 Section 4.0 - Rules Work Safely. Always wear safety glasses near the machine. Text to be Marked: The text to be marked may be any keyboard characters or symbols. Upper and lower case are supported. There is a limit of 20 characters per line when input with the machine. There is no limit to the number of lines in a file.
- Page 25 SECTION 5.0 CONTROLS...
-
Page 26: Section 5.0
Section 5.0 - Controls Work Safely. Always wear safety glasses near the machine. The system features a backlit LCD display and a touch pad for operation and control. The following is a description of all of the features and their functions throughout all of the modes of operation. Please note some keys have multiple functions. - Page 27 Section 5.0 - Controls Work Safely. Always wear safety glasses near the machine. NORMAL MODE • Performs the following homing cycle • X axis moves left at high speed to limit sensor • Y axis moves back at high speed to limit sensor •...
- Page 28 Section 5.0 - Controls Work Safely. Always wear safety glasses near the machine. NORMAL MODE • Scrolls downward through menu DIAGNOSTIC MODE • Rotates 4th axis JOB LOADED MODE • Displays all of the lines of text in that job Plain Text = Alpha-numerics (Blank) = Serial Number ( .JOB) = Graphic File...
- Page 29 Section 5.0 - Controls Work Safely. Always wear safety glasses near the machine. NORMAL MODE • Enters tool and clearance depth setting mode. See Z axis controls. ROTARY VALVE SETUP • Jogs 4th axis up PROGRAMMABLE MODE • User defined functionality. Setup to accept all supported G-codes and custom commands. See Setup Section NORMAL MODE •...
-
Page 30: Section 6.0
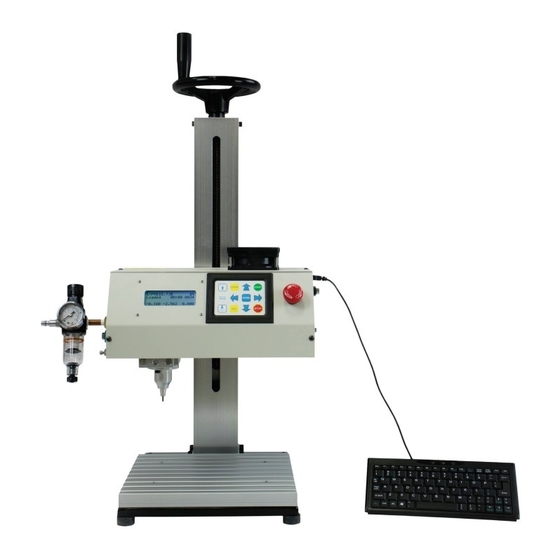
SECTION 6.0 MACHINE DIAGRAMS... - Page 31 Section 6.0 - Machine Diagrams Work Safely. Always wear safety glasses near the machine.
- Page 32 Section 6.0 - Machine Diagrams Work Safely. Always wear safety glasses near the machine.
- Page 33 Section 6.0 - Machine Diagrams Work Safely. Always wear safety glasses near the machine.
- Page 34 Section 6.0 - Machine Diagrams Work Safely. Always wear safety glasses near the machine.
- Page 35 Section 6.0 - Machine Diagrams Work Safely. Always wear safety glasses near the machine. Close-up dimensions for clearing obstructions Notes: Pin extends approximately 0.150” from below view when “ON” Pin diameter is: 0.1250” Pin is solid carbide Standard angle of tip: 90 degrees...
-
Page 36: Section 7.0
SECTION 7.0 MAINTENANCE... - Page 37 Section 7.0 - Maintenance Work Safely. Always wear safety glasses near the machine. Unplug the power supply and air hoses before beginning any maintenance or cleaning. Most marking quality issues are due to dirty or worn part(s) in the Marking Head Assembly. The maintenance operations listed here are intended as a guideline.
- Page 38 Section 7.0 - Maintenance Work Safely. Always wear safety glasses near the machine. Unplug the power supply and air hoses before beginning any maintenance or cleaning. X and Y Slides Normally maintenance is not required. Keep rails free of any Inspect every 3 months or debris and residue, wipe with dry cloth.
- Page 39 Section 7.0 - Maintenance Work Safely. Always wear safety glasses near the machine.
-
Page 40: Section 8.0
SECTION 8.0 POWER REQUIREMENTS... - Page 41 Section 8.0 - Power Requirements Work Safely. Always wear safety glasses near the machine. To operate properly, the KwikMark requires the following electrical and pneumatic service: ELECTRICAL SERVICE............. 120-220 VAC, 50-60 hertz, single phase, 2.5 AMP power supply from standard wall outlet. PNEUMATIC SERVICE............
-
Page 42: Section 9.0
SECTION 9.0 ELECTRICAL SCHEMATIC... - Page 43 Sections 9.0 - Electrical Schematic Work Safely. Always wear safety glasses near the machine.
- Page 44 SECTION 10.0 TROUBLESHOOTING...
-
Page 45: Section 10.0
Section 10.0 - Troubleshooting Work Safely. Always wear safety glasses near the machine. Unplug the power supply and air hoses before beginning any maintenance or cleaning. Diagnosis Solution(s) Description 1. Mark is Not Legible A. Turn the regulator until the mark A. - Page 46 Section 10.0 - Troubleshooting Work Safely. Always wear safety glasses near the machine. Unplug the power supply and air hoses before beginning any maintenance or cleaning. Diagnosis Solution(s) Description 4. Marking Image varies in Depth A. Indicate the top surface of the part by A.
- Page 47 Section 10.0 - Troubleshooting Work Safely. Always wear safety glasses near the machine. Unplug the power supply and air hoses before beginning any maintenance or cleaning. Diagnosis Solution(s) Description 8. Machine does not jog A. Jog the KwikMark using the keypad on A.
Need help?
Do you have a question about the KM-64 and is the answer not in the manual?
Questions and answers
I’m needing a drawing of how the axis cable route I need to replace one that is broken
For the Kwik Mark KM-64, use the following components to route the axis cable:
- Use 2 sets of the DC-49 Cable for X and Y Axis Drive (2 sets are required per machine).
- Secure the cables with CA-2 Cable Anchor Screws with Nuts (2 sets).
- Route the cables through the appropriate pulleys (PY-1 Pulley for Cable Drive, 10 required per machine).
Ensure cables are properly anchored and guided using the pulleys to avoid tangling or obstruction during machine movement.
This answer is automatically generated