Advertisement
Quick Links
STEAMbot V2.0 User Guide, Rev 0
STEAMbot V2.0 User Guide
Introduction
Welcome to the world of STEAMbot robot kits! We at The STEAM Train want to thank you for
getting a STEAMbot robot kit. We believe that any child that wants a robot should be able to get
one, no matter their socio-economic background. This kit will help you learn more about
Science, Technology, Engineering, Art, and Math (STEAM). We hope you will have lots of fun
putting your robot together and learning how to program it. Your efforts will be rewarded and
give you opportunities for a better future.
This guide has the following chapters:
1. Assembly of Your STEAMbot – provides the steps of how to assemble your STEAMbot
robot.
2. Connectivity – describes how the STEAMbot communicates over a WiFi network.
3. STEAMbot Home Page – describes the home page of the STEAMbot. Via the home page
you can control your STEAMbot, change the operating modes of your STEAMbot, ,
mange the WiFi networks it connects to, calibrate the motors of your STEAMbot, update
the firmware of your STEAMbot and finally, you can program your STEAMbot.
Why Robotics?
When you learn about robotics, you will learn about the following fields:
• Mechanical engineering – how is the robot designed to mechanically work together and
make sure all the parts fit and not fall apart.
2020 © Copyright The STEAM Train
1
Advertisement

Subscribe to Our Youtube Channel
Related Manuals for STEAM Train STEAMbot V2.0

Summary of Contents for STEAM Train STEAMbot V2.0
- Page 1 STEAMbot V2.0 User Guide Introduction Welcome to the world of STEAMbot robot kits! We at The STEAM Train want to thank you for getting a STEAMbot robot kit. We believe that any child that wants a robot should be able to get one, no matter their socio-economic background.
-
Page 2: Documentation Updates
STEAMbot V2.0 User Guide, Rev 0 • Electrical engineering – most robots use some sort of electricity to function. In addition, when you connect a sensor or actuator, you must make sure it is connected electrically correct. Otherwise, the sensor or actuator will not work. -
Page 3: Web Server
STEAMbot V2.0 User Guide, Rev 0 Web Server When powered on, your STEAMbot robot runs a web server. All you need to control or program your STEAMbot is a WiFi-enabled device that runs modern web browser. Clicking In this document, the term “click” is used throughout. It applies to devices where you use a mouse to move a cursor to an object and your press the left button of the mouse. - Page 4 STEAMbot V2.0 User Guide, Rev 0 Table 3, Alternative Batteries Total Type Pros Cons Voltage Low capacity, cannot be 9 Volt Only one battery needed recharged. Rechargeable Higher cost than regular 9-volt, Only one battery needed 9 Volt low capacity.
- Page 5 STEAMbot V2.0 User Guide, Rev 0 Figure 1, STEAMbot Robot Kit Parts The following table lists the parts of the kit (except for the chassis and screws). Table 4, STEAMbot Parts List Number Name Quantity USS Bracket (see note below)
- Page 6 STEAMbot V2.0 User Guide, Rev 0 Figure 2, STEAMbot Chassis 2020 © Copyright The STEAM Train...
-
Page 7: Parts Not Included
STEAMbot V2.0 User Guide, Rev 0 The following table lists the parts of the chassis. Table 5, STEAMbot Chassis Parts List Number Name Left Motor Mount Bottom Plate Right Motor Mount Back Wall Top Plate Left Support Right Support USS Support... - Page 8 STEAMbot V2.0 User Guide, Rev 0 2. Insert the left motor mount into the bottom plate (from the bottom). Push the mount until it snaps in place. 3. Insert the right motor mount into the bottom plate (from the bottom). Push the mount until it snaps in place.
- Page 9 STEAMbot V2.0 User Guide, Rev 0 Figure 4, Roller Wheel 14. Take a 3/8-inch screw and insert it into the other hole and start tightening the second 3/8- inch screw. 15. Tighten both screws so the roller ball is fixed in place. BE VERY CAREFUL NOT TO STRIP THE WOODEN THREADS.
- Page 10 STEAMbot V2.0 User Guide, Rev 0 Figure 6, Bottom Plate with Motors 20. Tighten the screw, remembering to being careful not to strip the wooden thread. 21. Repeat steps 17 – 20 for the right DC motor. 22. Attach both wheels to the left and right motors.
- Page 11 STEAMbot V2.0 User Guide, Rev 0 Figure 8, First controller screw placement 26. Tighten the screw until the controller is snug in place. Remember not to strip the wooden threads. 27. Take the last remaining 3/8-inch screw and place it in the lower right hole of the controller as shown in the following figure.
- Page 12 STEAMbot V2.0 User Guide, Rev 0 Figure 10, Tightening the 2nd controller screw 29. Loosen all the screws in the terminal block of the controller except for the one labeled VM and the one next to it labeled GND. 30. With the roller wheel facing you and the other two wheels away from you, insert the wires from the right motor into the left most wire terminals as shown in the following figure.
- Page 13 STEAMbot V2.0 User Guide, Rev 0 31. Repeat step 30 for the left motor as shown in the following figure. Figure 12, Left motor wiring 32. Optional: You can push in the wires for both motors through the hole in the top plate as shown in the following figure.
- Page 14 STEAMbot V2.0 User Guide, Rev 0 Figure 14, Batteries 34. Place the battery holder on the top plate as shown in the following figure. Note where the wires from the holder go. Figure 15, Battery Holder 35. Insert the wires from the battery holder to the rightmost terminal posts as shown in the following figure.
- Page 15 STEAMbot V2.0 User Guide, Rev 0 Figure 16, Battery wiring 36. Insert the ultrasonic sensor into the USS bracket, being careful not to push in the protective grill. Insert the USS bracket into the front of the top plate as shown in the following figure.
- Page 16 STEAMbot V2.0 User Guide, Rev 0 Figure 18, Ultrasonic wiring 38. Take the speaker and insert it into the hole of the top cover as shown in the following figure. Figure 19, Speaker placement 39. Take the two wires from the speaker and connect them to the row 7 of the controller as shown in the following figure.
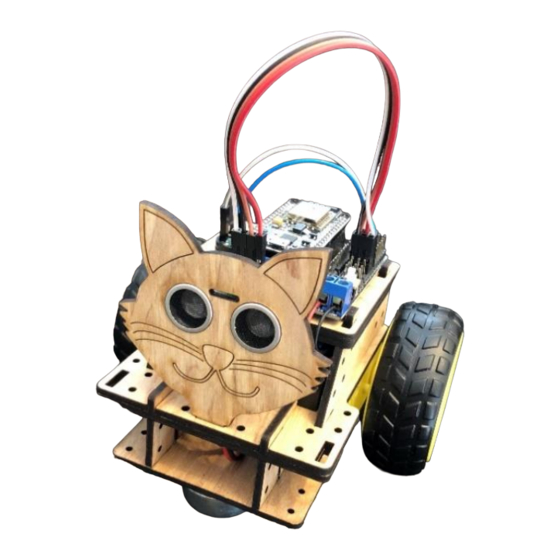
- Page 17 STEAMbot V2.0 User Guide, Rev 0 Figure 20, Speaker wiring 40. Your STEAMbot should now look like the following figure. Figure 21, Assembled STEAMbot Congratulations, your STEAMbot is ready to be controlled via a mobile device or a computer. In...
-
Page 18: Sta Mode
STEAMbot V2.0 User Guide, Rev 0 Connectivity Your STEAMbot operates over a WiFi connection. The STEAMbot configures itself either as a standalone WiFi Access Point (AP) or as a station (STA) connected to an existing WiFi network. Once the WiFi is configured, a blue LED on the controller will blink, waiting for a connection from a device. - Page 19 STEAMbot V2.0 User Guide, Rev 0 iOS Device If you have an iOS device, we recommend that you install either Bonjour Search for HTTP app or the Hola Browser app. When you run the app, it will display a list of available web servers.
- Page 20 STEAMbot V2.0 User Guide, Rev 0 Apple Computer There are several options to find the IP address of your STEAMbot on an Apple computer. These are as described below. Discovery – DNS-SD Browser App You may install the application “Discovery” (free from the Apple App store). When it is run, the app will display a list of services.
- Page 21 STEAMbot V2.0 User Guide, Rev 0 STEAMbot Home Page The following figure shows your STEAMbot’s home page. Figure 22, STEAMbot Home Page Each button represents a set of functions that are supported by your STEAMbot. These are described in the following sections below.
- Page 22 STEAMbot V2.0 User Guide, Rev 0 Control Your STEAMbot When you click on the Control Your STEAMbot button, the following page appears. Figure 23, Control Your STEAMbot To move your STEAMbot, just drag the blue joystick. Your STEAMbot will in the direction that you drag the joystick.
-
Page 23: Change Mode
STEAMbot V2.0 User Guide, Rev 0 Change Mode When you click on the Change Mode button, the following page appears. Figure 24, Change Mode Besides the remote-control mode, your STEAMbot supports the following additional modes of operation: • Cat Mode – in this mode, your STEAMbot will act like a cat. If your STEAMbot detects an object between 15 and 45 cm (6 and 18 inches), your STEAMbot will move forward. - Page 24 STEAMbot V2.0 User Guide, Rev 0 Manage WiFi Settings When you click on the Manage WiFi Settings button, the following page appears: Figure 25, Manage WiFi Settings As shown, there are two subsections: 1) Saved WiFi Networks and 2) Add a new WiFi Networks.
- Page 25 STEAMbot V2.0 User Guide, Rev 0 An alternative way to delete all the saved WiFi networks is to use the button on top of the controller labeled “FLASH”. As soon as you push it, you will hear a beep and the blue LED on the controller will start flashing fast.
- Page 26 STEAMbot V2.0 User Guide, Rev 0 Manage Motor Settings When you click on the Manage Motor Settings button, the following page appears: Figure 26, Manage Motor Settings The purpose of the motor power settings is to calibrate the power applied to the motors so your STEAMbot moves straight.
- Page 27 STEAMbot V2.0 User Guide, Rev 0 • Update Settings – clicking this button will save the current setting on your STEAMbot. If you make changes to the power settings and do not click this button, your STEAMbot will forget the settings when you turn it off.
- Page 28 STEAMbot V2.0 User Guide, Rev 0 Update STEAMbot Firmware When you click on the Update STEAMbot Firmware button, the following page appears: Figure 27, Update STEAMbot Firmware This page will display the current version of your STEAMbot’s firmware. If your STEAMbot is...
- Page 29 STEAMbot V2.0 User Guide, Rev 0 Figure 28, Program your STEAMbot This is the programming environment for your STEAMbot and it is based on technology from Google called Blockly. Clicking on the categories on the left will show different instructions that you can use in your program.
- Page 30 STEAMbot V2.0 User Guide, Rev 0 Figure 29, Sounds Category If you click on the play builtin melody block, it will appear in the right area. Drag the block until it snaps to the start of program block as shown below.
- Page 31 STEAMbot V2.0 User Guide, Rev 0 Figure 30, Play Builtin Melody If you click the Run button, your STEAMbot will play its builtin melody. In a similar fashion, you can drag blocks from the different categories on the left and snap them onto the area to create a program that will be executed by your STEAMbot.
- Page 32 STEAMbot V2.0 User Guide, Rev 0 • Name – this field contains the name of the program that you just loaded or that you want to save. • Save – clicking this button will save the program in the right area to your computer or...
- Page 33 STEAMbot V2.0 User Guide, Rev 0 Figure 31, Go Around A Square Challenge 3 Program your STEAMbot to go forward until it detects an object at around ten cm (4 inches). When the object is detected have your STEAMbot stop and beep twice.
Need help?
Do you have a question about the STEAMbot V2.0 and is the answer not in the manual?
Questions and answers