
Related Manuals for Digifort DGF-KB1000

Summary of Contents for Digifort DGF-KB1000
- Page 1 Digifort Keyboard Controller Manual Version 1.0 Rev. A © 2002 - 2010 for Digifort. All rights reserved...
-
Page 2: Table Of Contents
Reverse Screen Style ................................18 Forw ard Screen Style ................................18 Full Screen ................................18 Hide Toolbar ................................19 Refresh ................................19 Motion Detection ................................19 Change Screen ................................19 Screenshot ................................19 © 2002 - 2010 for Digifort. All rights reserved... - Page 3 4 Playback Mode ........................... 46 Start Playback ................................46 Selection of Tim e ................................47 Forw ard Recording ................................49 Reverse Recording ................................50 Start and Pause Playback ................................50 Index © 2002 - 2010 for Digifort. All rights reserved...
- Page 4 Capítulo...
-
Page 5: Parte I Welcome To The Digifort Keyboard Manual
The screenshots contained in this manual may not be identical to the interface that you will see using Digifort. Some differences may appear, and will not affect the use of this manual. This is because frequent updates and new features are conducted aiming the continuous improvement of the system. - Page 6 Capítulo...
-
Page 7: Installation
Installation Installation The DGF-KB1000 was designed based on the existing demand in the market for a product that would allow a better performance of operators when activating certain functions of Digifort software in a quicker and practical way. Reducing management time was also a factor that led to the development of this product. -
Page 8: Installation 2
USB interface, simply connect it to your computer's USB port. You can also check in the LCD display of the DGF-KB1000, because when the Surveillance Client is open it should display the message Digifort-Live Mode, as shown in the figure below: ©... - Page 9 Installation © 2002 - 2010 for Digifort. All rights reserved...
- Page 10 Capítulo...
-
Page 11: Parte Iii Configuration
2- Adjust speed of repetition when the key on the keyboard is maintained pressed. 3- Set the maximum speed of video acceleration in media playback while rotating the z-axis of the joystick on the keyboard. © 2002 - 2010 for Digifort. All rights reserved... -
Page 12: Screenshots Destination
Screenshots destination In the tab "General" (fig. 3), on client settings you can choose the directory where you want to save the screenshots taken by the keyboard, as explained on next item. © 2002 - 2010 for Digifort. All rights reserved... - Page 13 Configuration (Fig. 3) Destination folder where the screenshots will be saved. © 2002 - 2010 for Digifort. All rights reserved...
- Page 14 Capítulo...
-
Page 15: Parte Iv How To Use The Keyboard
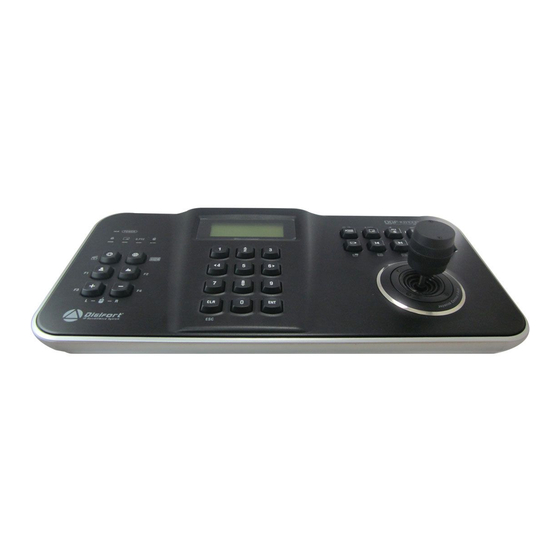
- Playback Mode, that is when the operator is watching a recorded video. Introduction This is version 1.00 of Digifort keyboard, below you can see a photo illustration (fig. 4) and a brief explanation of its handling. (Fig. 4) Photo of the k eyboard 1- LED indicates when the keyboard is in operation;... -
Page 16: Symbols
7- Keys for Digifort function calls that we will see in subsequent chapters; 8- Joystick for PTZ control, acceleration or reversal of video in Media Player and mouse control. -
Page 17: Num Ber 6
Surveillance Client. 4.2.13 Enter Confirms value entered in the display and requested by a process, if the value is blank, the process is canceled. 4.2.14 F1 Function reserved for future versions. © 2002 - 2010 for Digifort. All rights reserved... -
Page 18: Shift
Selects the "Screen Style" to the left of the current one. 4.2.22 Forward Screen Style Selects the "Screen Style' to the right of the current one. 4.2.23 Full Screen Places the selected object in full-screen mode. © 2002 - 2010 for Digifort. All rights reserved... -
Page 19: Hide Toolbar
4.2.30 Virtual Mouse Enables and disables the feature which allows the use of the mouse control from the keyboard. 4.2.31 Mouse Left Button Executes the click of the mouse left button. © 2002 - 2010 for Digifort. All rights reserved... -
Page 20: Mouse Right Button
Adjusts sharpening Focus for distant objects or landscapes. 4.2.38 PTZ Blocking Locks and unlocks the PTZ control of the camera selected. 4.2.39 Presets Invokes a preset from your index. 4.2.40 PTZ Patrol Toggles the scheme of PTZ Patrol. © 2002 - 2010 for Digifort. All rights reserved... -
Page 21: Virtual Ptz
Increases Zoom of the selected camera. 4.2.45 Media Playback Starts Media Palyback mode. 4.2.46 Play & Pause Starts and pauses the video in Media Player. Live Mode Uses the keyboard in Live Mode (Fig. 5). © 2002 - 2010 for Digifort. All rights reserved... -
Page 22: Navigation Between Objects
(Fig. 6) Keys used for navigation between objects By pressing the arrow keys of the keyboard the object selection will skip to the next object in the direction of the respective arrow (Fig. 7). © 2002 - 2010 for Digifort. All rights reserved... - Page 23 (Fig. 7)When the down arrow is pressed the object below is selected. If the SHIFT key is pressed when pressing any arrow the object selection should skip to the next monitor in the direction of the corresponding arrow (Fig. 8). © 2002 - 2010 for Digifort. All rights reserved...
- Page 24 (Fig. 8) When you press the right arrow with shift enabled the first object of the monitor to the right will be selected. The key "CLR" has the function of unselect the object (Fig. 9). © 2002 - 2010 for Digifort. All rights reserved...
-
Page 25: Calling Camera By Shortcut
When "CLR" is pressed, the selected object will be unselected. 4.3.2 Calling camera by shortcut To call a camera through its shortcut we must press the key as shown in the illustration below (Fig. 10): © 2002 - 2010 for Digifort. All rights reserved... -
Page 26: Virtual Matrix
(fig. 12) by positioning of the screen style in which © 2002 - 2010 for Digifort. All rights reserved... - Page 27 (Fig. 12) Screen to help selection of the window for Virtual Matrix display The window in which the camera should appear must be entered (fig. 13), and then the image of the camera sent will appear (Fig. 14). © 2002 - 2010 for Digifort. All rights reserved...
- Page 28 Digifort Keyboard - Version 1.0 (Fig. 13) Selection of window for camera display (Fig. 14) Display of Virtual Matrix © 2002 - 2010 for Digifort. All rights reserved...
-
Page 29: Navigation Between Screen Styles
4.3.4 Navigation between screen styles The two arrows below (fig. 15) must be pressed to navigate between the various screen styles (Fig. 16). (Fig. 15) Navigation k eys between screen styles © 2002 - 2010 for Digifort. All rights reserved... -
Page 30: Full Screen Mode Of Object
Full screen mode of object To enable or disable the full screen mode (fig. 18) of an object we must press the reverse key (fig. 17) of the screen style navigation with "SHIFT" activated. © 2002 - 2010 for Digifort. All rights reserved... -
Page 31: Hide Toolbar
To hide the toolbar in the surveillance client (fig. 20) we must press the forward key (fig. 19) of the screen style navigation with "SHIFT" enabled, as shown in the figure below: © 2002 - 2010 for Digifort. All rights reserved... -
Page 32: Surveillance Client Update
(Fig. 20) Surveillance Client with the toolbar hidden. 4.3.7 Surveillance Client Update To update the Surveillance Client (fig. 22) with the keyboard we must press the button "PLAY/ PAUSE" (fig. 21) with the "Shift" activated as pictured below: © 2002 - 2010 for Digifort. All rights reserved... - Page 33 How to use the keyboard (Fig. 21) Keys used to update the surveillance client (Fig. 22) Surveillance client after the update. © 2002 - 2010 for Digifort. All rights reserved...
-
Page 34: Motion Detection
(Fig. 24) Example of enabling motion detection. 4.3.9 Change Screen style To change the screen style (fig. 26) it is necessary to press the key "Screen Style" (fig. 25) identified in the image below: © 2002 - 2010 for Digifort. All rights reserved... -
Page 35: Screenshot
After pressing the key it will appear on the display the confirmation or error message. To change or verify the directory where the images are saved just follow the steps described in chapter "Screenshots Destination". © 2002 - 2010 for Digifort. All rights reserved... -
Page 36: Triggering Events
After the key is pressed you must enter the event number as per keyboard display and according to the list of events (fig. 29) that will appear on the Surveillance Client, as in the figure below: © 2002 - 2010 for Digifort. All rights reserved... -
Page 37: Virtual Mouse
Also note that when the Virtual Mouse this enabled the keys "+" and "-", also indicated in the figure below, will function as the left button and right button of the mouse respectively. © 2002 - 2010 for Digifort. All rights reserved... -
Page 38: Virtual Keyboard
"SHIFT" activated. (Fig. 31) Key to open/close Virtual Keyboard This way the Virtual Keyboard (fig. 32) will be displayed and hidden in a practical and quick way. © 2002 - 2010 for Digifort. All rights reserved... -
Page 39: Iris Adjustment
To adjust the IRIS of the cameras and properly adjust brightness (fig. 34), you must select the camera and use the two keys "IRIS Adjustment" (fig. 33) to open or close the IRIS. We must remember that not all cameras have this functionality. © 2002 - 2010 for Digifort. All rights reserved... - Page 40 Digifort Keyboard - Version 1.0 (Fig. 33) Keys for IRIS adjustment (Fig. 34) Example of IRIS adjustment © 2002 - 2010 for Digifort. All rights reserved...
-
Page 41: Focus Adjustment
Zoom by turning the z axis of the joystick or pressing keys "+" and "-" (fig. 37) of the keyboard. © 2002 - 2010 for Digifort. All rights reserved... -
Page 42: Ptz Blocking
To have exclusive use of any camera PTZ you must press the button "PTZ blocking" (fig. 39). Note that when a camera has PTZ blocked, the led "PTZ blocking" located on top left side of the keyboard lights on. © 2002 - 2010 for Digifort. All rights reserved... -
Page 43: Presets
You can easily call a preset of a camera (fig. 41), simply select it and press "Presets" (fig. 40), and then enter the preset number. (Fig. 40) Key used to call presets © 2002 - 2010 for Digifort. All rights reserved... -
Page 44: Ptz Patrol
Virtual PTZ led, also indicated in the figure below, lights on when the Virtual PTZ is enabled. In fixed cameras this resource is always enabled. When the camera Virtual PTZ is disabled the image from the camera returns to its original state instantly. © 2002 - 2010 for Digifort. All rights reserved... -
Page 45: Ptz Simple
2, 4, 6 and 8. To enable and disable PTZ Simple just press the key "Virtual PTZ" with "Shift" activated. Note that the PTZ Simple Led (fig. 45) illuminates when this feature is enabled. © 2002 - 2010 for Digifort. All rights reserved... -
Page 46: Playback Mode
"Opening IRIS" with "Shift" activated. This way it should load an assisting window for the selection of recording time desired (fig. 47). © 2002 - 2010 for Digifort. All rights reserved... -
Page 47: Selection Of Time
To choose the desired time of recording that you want to watch, type in the keyboard the number corresponding to the index of time displayed in the assisting window (fig. 48). © 2002 - 2010 for Digifort. All rights reserved... - Page 48 (fig. 49 and 50). You must enter the date in the format that is configured on your Windows, for example, for Windows in English language should this date format DD/MM/YYYY. © 2002 - 2010 for Digifort. All rights reserved...
-
Page 49: Forward Recording
General Settings chapter. © 2002 - 2010 for Digifort. All rights reserved... -
Page 50: Reverse Recording
(Fig. 52) Example of video rewinding 4.4.5 Start and Pause Playback To start and pause and easily preview video in Media Player you can use the key "Play & Pause" (fig. 53). © 2002 - 2010 for Digifort. All rights reserved... - Page 51 How to use the keyboard (Fig. 53) Key to start and pause the video playback © 2002 - 2010 for Digifort. All rights reserved...
Need help?
Do you have a question about the DGF-KB1000 and is the answer not in the manual?
Questions and answers