Advertisement
Quick Links
16-Channel Digital Proportional R/C System
ATTENTION
● Please read this manual carefully before use.
● Please keep this manual in a safe place after reading.
Warranty Card
● A warranty card is included in the kit. Please stamp the model store signature and purchase
date at the time of purchase.
User Manual
Digital Proportional R/C System
Advertisement

Summary of Contents for Changzhou Smoothies Electronics Jumper T16
- Page 1 16-Channel Digital Proportional R/C System User Manual ATTENTION ● Please read this manual carefully before use. ● Please keep this manual in a safe place after reading. Warranty Card ● A warranty card is included in the kit. Please stamp the model store signature and purchase date at the time of purchase.
- Page 2 TABLE OF CONTENTS •S.BUS Wiring example ........38 INTRODUCTION..........4 •S.BUS2 System ..........39 •Support and Service .......... 4 •S.BUS/S.BUS2 device setting ......40 •Application, Export, and Modification .... 5 •Switch harness ..........41 • Compliance Information Statement ....5 •...
- Page 3 TABLE OF CONTENTS Aileron → Rudder ........136 Throttle cut ............. 83 Idle down ............84 Elevator → Camber ........137 Camber mixing ..........138 Swash ring (Heli only) ........85 Airbrake → ELE .......... 140 Swash (Heli only, except H-1) ......86 Camber flap →...
- Page 4 Introduction Thank you for purchasing the Jumper® JumperTX-2.4GHz System T16 Remote Control. The system is versatile and can be used by beginners and professionals. Please read this instruction manual carefully before use to ensure correct and safe use. Due to version upgrades, there have been changes. The information contained in this manual is subject to change without notice.
- Page 5 Precautions for ensuring safe use: Please observe the following precautions to ensure that the product is always used safely. The meaning of special tags: From a safety point of view, the parts marked with the following marks in this manual require special attention. = Prohibited = Pay Attention Warning: Keep away from children at all times.
- Page 6 Ensure to check all flight control surfaces working Do not operate remove control craft in the Correctly before flight. following situations. ■ If others a operating RC craft near by ■ ■ In cities or populated areas. Any control surfaces jammed or not working ■Near airports or hospitals or any take of and landing Correctly may cause crash.
- Page 7 ■ Charging exceeding the specified value may cause the battery to heat up, rupture, leak, or Make sure the power plug is fully inserted into catch fire. Waiting for danger. Do not charge the socket hole more than 1C when charging quickly. ■...
- Page 8 Precautions when using an SD card WARNING Do not allow the SD card to become wet or exposed to Do not modify or damage the SD card Sunlight. Do not use excessive force or bend SD Card WARNING ■ SD cards are electronic products, so be Keep the remote-control SD card slot clean to careful to prevent static electricity.
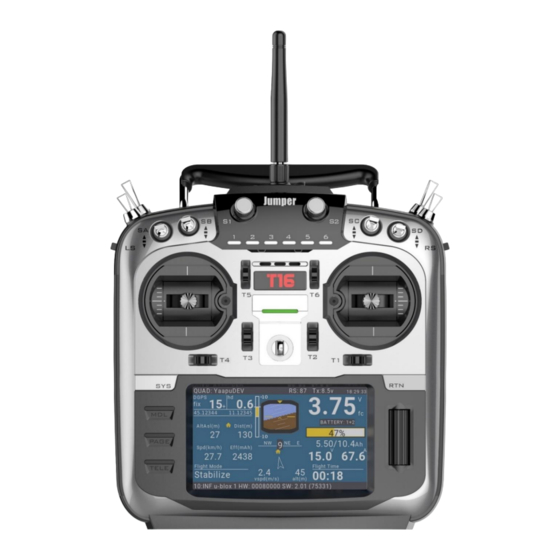
- Page 10 Before use Features: 2.4G multi-function 16 channel transmitter (T16) The T16 uses a 2.4 GHz two-way communication system. The data transmitted from the receiver can be received and confirmed by the remote controller. Color LCD screen With a 4.3-inch large color LCD screen, the operation at the time of setting is greatly improved. S.BUS system The receiver supports the S.BUS interface and can be used with the T16 up to 16 channels.
- Page 11 Package content Your T16 includes the following components: (Depending on the package, the accompanying content will vary.) • T16 remote control • Receiver • 18650 lithium battery tray • Orange lanyard • User's manual • Only Chinese formal sales channels are equipped with this Chinese manual. T16 Remote Control Remote control frequency: 2.4GHz System: JumperTX mixed control + multi-protocol high frequency transmission...
- Page 12 Components The LCD screen used in this manual may be upgraded according to the settings and version. BEFORE USE...
- Page 13 Direction of the antenna The remote-control antenna has directivity. The signal strength is greatest in the horizontal direction. Therefore, please try not to let the antenna point in the direction of the body. The antenna can be rotated to adjust the angle. Please adjust the position of the antenna according to the operating habits. Antenna adjustment range Note The horizontal rotation angle of the antenna is 360...
- Page 14 2 Position 3 Position 1 Position Momentary...
- Page 15 Knob operation Digital fine-tuning operation This transmitter is equipped with 6 trimmer switches. Each time you touch the fine adjustment switch, the corresponding fine adjustment position will move according to the fixed span. However, if you keep pressing the fine adjustment switch, the movement speed of the fine adjustment position will increase, and a “beep”...
- Page 16 Slide Lever S1 (Left), S2 (Right): The Linear Slider S1and S2 offer analog input. *The T18SZ transmitter beeps when the lever comes to the center. *You can select a slide lever and set the movement direction on the setting screen of mixing functions. BEFORE USE...
- Page 17 Example of operation of digital fine-tuning *Example using Mode2 ◆ Elevator and joystick in neutral ◆ Elevator and joystick in neutral position, position, aircraft out the situation of aircraft There is a decline. rising action. Elevator fine-tuning down Elevator neutral position Elevator neutral position...
- Page 18 Battery installation and use Installing/removing the FT2F2100B V2 BEFORE USE...
- Page 19 Joystick operation *Example using Mode2 Elevator operation Aileron operation Pitch axis Heading axis Engine Motor Output Rudder operation Throttle Operation BEFORE USE...
- Page 20 Example of joystick operation: fixed wing example * Example using Mode2 The method of operation may vary depending on the model. Nose Up Right Aileron Left Aileron Down Elevator Up Elevator Nose Down Down Left Aileron High Right Medium Speed BEFOEW USE...
- Page 21 Example of joystick operation: helicopter example *Example using Mode2 The method of operation may vary depending on the model. Nose Up Down Nose Down Pitch plus Open Hover Nuetral Half Open Down Pitch Reduced Lowest Down BEFORE USE...
- Page 22 Example of joystick operation: multi-rotor example *Example of Mode2 The method of operation may vary depending on the model. Nose Up Back Nose Down Neutra Down Left Down BEFORE USE...
- Page 23 Joystick adjustment method Length adjustment of the joystick head Angle adjustment of the joystick Use a 1.5mm hex wrench Joystick lower Joystick head The length of the joystick head can be adjusted The neutral angle of the joystick can be adjusted Slightly to the inside or outside.
- Page 24 Adjustment of Throttle Stick (Ratchet System) You can choose either airplane ratchet system or helicopter-touch. 1. Open the dust protection cap on the back of the transmitter that is covering the hole for throttle stick adjustment. 2. Use the attached 1.5mm hexagonal wrench (inside stylus) to turn the adjustment screw and set it as you prefer.
- Page 25 TF Card (secure digital memory card) (not included) The T18SZ transmitter model data can be stored by using any commonly found SD card. When T18SZ transmitter update software is released, the software is updated using an SD card. The T18SZ is capable of using SD and SDHC cards (SD:32MB-2GB SDHC:4GB-32GB).
- Page 26 CAUTION Be sure to turn off the power to the transmitter before inserting or removing the SD card. As the SD card is a precision device, do not use excessive force when inserting. -When an SD card is installed in the T18SZ trans- mitter, a folder called "Futaba"...
- Page 27 Before Use This equipment has been tested and found to comply with the limits for a Class B digital device, pursuant to part 15 of the FCC Rules. These limits are designed to provide reasonable protection against harmful interference in a residential installation. This equipment generates, uses and can radiate radio frequency energy and, if not installed and used in accordance with the instructions, may cause harmful interference to radio communications.
Need help?
Do you have a question about the Jumper T16 and is the answer not in the manual?
Questions and answers