Table of Contents
Advertisement
Quick Links
Thank you for your purchase. We have developed a quality DI with preamp for use by professional musicians.
With the addition of our proprietary tube circuit, you will be amazed by the full rich tone you can get from this
one of a kind Preamp/DI.
Features: The Ai ProTube is a quality DI and full‐featured preamp with active tone controls. You will be able
to dial in your clear natural acoustic sound and route it through a balanced XLR output or unbalanced standard
line output to the PA sound system. We also added a "Tube Circuit" that utilizes a 12AX7A tube to give the Ai
ProTube a warm rich tone for all of your acoustic instruments.
Power Requirements: 13 VAC
This unit requires more power than a standard "pedal" because of the tube circuit and "high headroom"
preamp circuitry, so it must be connected to the power supply in order to operate.
• Power Supply: 13V AC , 1A
Initial Setup
Begin with all of the knob controls at the mid point (12:00 o'clock) with the "Ground (GND) LIFT" switch
"OFF". The "PHASE" switch can be in either the "IN" or "OUT" position.
This initial setup will provide a medium gain setting with FLAT frequency response.
Each control is fully explained in the next section.
Power is supplied to the Ai ProTube via the 13VAC power jack, the tube window will illuminate when
the unit is activated. (It will take a few seconds for the tube to warm up)
Ai ProTube OWNER'S MANUAL
Getting Started:
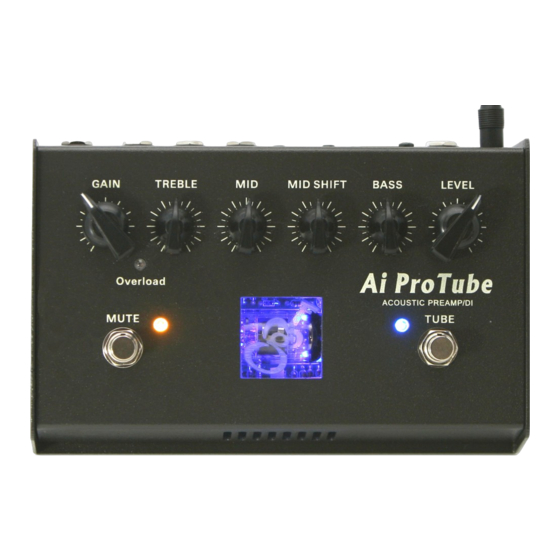
Control Panel
Advertisement
Table of Contents

Summary of Contents for GMF Music Ai ProTube
- Page 1 Ai ProTube OWNER’S MANUAL Thank you for your purchase. We have developed a quality DI with preamp for use by professional musicians. With the addition of our proprietary tube circuit, you will be amazed by the full rich tone you can get from this one of a kind Preamp/DI. Features: The Ai ProTube is a quality DI and full‐featured preamp with active tone controls. You will be able to dial in your clear natural acoustic sound and route it through a balanced XLR output or unbalanced standard line output to the PA sound system. We also added a “Tube Circuit” that utilizes a 12AX7A tube to give the Ai ProTube a warm rich tone for all of your acoustic instruments. Getting Started: Power Requirements: 13 VAC This unit requires more power than a standard “pedal” because of the tube circuit and “high headroom” preamp circuitry, so it must be connected to the power supply in order to operate. • Power Supply: 13V AC , 1A Initial Setup Begin with all of the knob controls at the mid point (12:00 o'clock) with the “Ground (GND) LIFT” switch “OFF”. The “PHASE” switch can be in either the “IN” or “OUT” position. This initial setup will provide a medium gain setting with FLAT frequency response. Each control is fully explained in the next section. Control Panel Power is supplied to the Ai ProTube via the 13VAC power jack, the tube window will illuminate when the unit is activated. (It will take a few seconds for the tube to warm up) ...
- Page 2 1. GAIN: is the first control you should adjust. It is not a volume control. The "GAIN" sets the level of amplification applied to the input signal to boost it to a useable level. This adjustment allows for a wide range of pickup devices. You will want to use the highest "GAIN" setting you can without overdriving or distorting the signal. (See Overload below) This will give the ProTube the most signal to work with and the best signal to noise ratio. If you are using a high output active pickup system you will likely want to use a lower setting on the "GAIN". If you are using a passive type pickup system you will likely need a higher setting on the "GAIN". 2. TREBLE: Adjusts the amount of cut or boost in the high frequency (5kHZ) range. 3. MID: Adjusts the amount of cut or boost in the mid frequency range. 4. MID SHIFT: Adjusts the frequency of cut or boost of the MID control. (250HZ‐3.5KHZ) range. 5. BASS: Adjusts the amount of cut or boost in the low frequency (100HZ) range. 6. LEVEL: Adjusts the amount of signal sent to the Outputs (DIRECT OUT, LINE OUT). 7. Overload:– This indicator will light up if there is an overload/overdrive situation. The ProTube has a proprietary sensing circuit that monitors the signal level at various points in the signal path and will indicate if there is an overload situation in any of these critical points along the signal path. • At the input • After the GAIN control • After the Effects loop If an overload situation occurs, it is simple to adjust your instrument or ProTube unit to eliminate this. First turn down the GAIN control, this will usually eliminate the overload situation. If the overload still exists, even with a low setting on the GAIN control, turn your Instrument volume down. It will be very rare that your instrument will have enough output to overload the input, but it can happen. When using the Effects Loop, you may be able to overload the circuit if the effects you are using have a high output signal. To best way to remedy this is by decreasing the level of your effects output. Special Note: If you are using an effect that squares off the signal, like a distortion or overdrive pedal, the ProTube will sense this and can give an overload reading even if the signal level is below the overload threshold. 8. MUTE: – This footswitch is used to mute the output of the ProTube. No signal will pass to the DIRECT OUT or LINE OUT jacks when the mute is on. There will be signal available at the TUNER OUT jack when ...
- Page 3 Input Output Panel: 1. 13VAC: – This is the power supply input. A 13VAC power supply must be used for the ProTube. 2. LINE OUT: Plug a standard instrument cable from a stage monitor, amp, or mixer into this unbalanced output. Use the “LEVEL" control to set all ProTube output levels to best match your sound system and give you the least amount of noise. 3. DIRECT OUT: Plug a standard XLR cable from your PA or recording console into this low impedance balanced output. Use the “LEVEL" control to set all ProTube output levels to best match your sound system and give you the least amount of noise. 4. GND LIFT: If you have multiple grounds, you may have hum or ground loops. Disconnect the DIRECT OUT ground by switching “ON” the Ground Lift to eliminate this problem. 5. PHASE: affects the way the signal mixes live and when recording. If you experience “positive acoustic” feedback, flipping the phase switch to the alternate setting will kill the feedback. 6. SEND: The signal on the SEND jack is post input gain and pre EQ. This means that you can use the SEND signal as an auxiliary unbalanced direct output. This signal is not affected by any of the panel controls with exception of the "INPUT GAIN" control. 7. RETURN: A plug inserted into the RETURN jack will interrupt the signal path. The signal on the tip of the plug inserted into the RETURN jack will be the signal that the DI PLUS will process. SPECIAL NOTE: The SEND and RETURN jacks form a real world "EFX LOOP". In an effort to save room, most of our competition uses a TRS jack (tip, ring, sleeve) and Y cable type system. We provide you with two 1/4" jacks, one for ...
- Page 4 Specifications: Input: Connector: Standard ¼” TS Jack Impedance 1M ohm LINE OUT: Connector Standard ¼” TS Jack Impedance 510 ohm DIRECT OUT: Connector XLR Balanced Impedance 100 ohm Dimensions 7.75” x 5” x 3” ‐ (197x127x77)mm (Including knobs and jacks) Weight 2.2 lbs. – 1Kg Block Diagram: ...
Need help?
Do you have a question about the Ai ProTube and is the answer not in the manual?
Questions and answers