Advertisement
Quick Links
*Lies zunächst alle Schritte bevor du anfängst*
*Please read all steps before starting*
Empfohlene Werkzeuge (nicht enthalten) //
Suggested tools (not included)
•
Weiches Papiertuch und Isopropanol zum Reinigen der GPU
•
Phillips-Schraubendreher
•
Soft paper towel and Isopropanol to clean the GPU
•
Phillips screwdriver
Haftungsausschluss // Disclaimer
Alle Kühler sind auf Dichtigkeit getestet. Mit der Demontage des
Kühlers erlischt die Dichtigkeitsgarantie der TechN GmbH.
Unsachgemäße Montage des Kühlers kann zu Schäden an der
Grafikkarte und dem PC führen. TechN GmbH übernimmt keine
Haftung für Schäden durch unsachgemäße Installation.
All coolers are leak tested. If you disassemble the cooler the leak
warranty will be voided. Improper installation can damage the graphics
card and your PC. TechN GmbH assumes no liability for any damage
caused by improper installation.
TIPP: Durch Entfernen des originalen Kühlers kann die Garantie der
Grafikkarte erlöschen. Verwende nur Kühlflüssigkeit mit Korrosionsschutz.
TIP: By removing the stock cooler, warranty of the graphics card can
be voided. Only use coolant with anti-corrosion additives.
Packungsinhalt // Box content
Wasserkühler mit G¼" Anschluss
Bedienungsanleitung
Water block with G¼" connector
User Manual
Wärmeleitpads (vorinstalliert)
Wärmeleitpaste
Thermal pads (preinstalled)
Thermal paste
13 Schrauben M3x4 mm (kurz)
15 Unterlegscheiben
13 screws M3x4 mm (short)
15 Plastic washers
2 Schrauben M3x6 mm (lang)
2 Muttern M3
2 screws M3x6 mm (long)
2 Nuts M3
Bedienungsanleitung
User Manual
1a. Original Backplate demontieren //
Disassemble stock backplate
Löse die Schrauben der Backplate und demontiere diese.
Unscrew and dismount the backplate as illustrated.
1b. Kompatibilität prüfen // Check compatibility
Prüfe die Kompatibilität auf www.techn.de/compatibility
Check compatibility online at www.techn.de/compatibility
2. Original Kühler demontieren //
Disassemble stock cooler
Entferne beide Slotblendenschrauben, alle gekennzeichneten
Außensechskant-Abstandshalter und Schrauben von der
Rückseite des PCB. Demontiere den Luftkühler und ziehe das
Lüfterkabel ab.
Remove the two slot bracket screws, all the highlighted hex spacers
and screws on the back of the PCB. Dismount the air cooler. Don't
forget to unplug the fan.
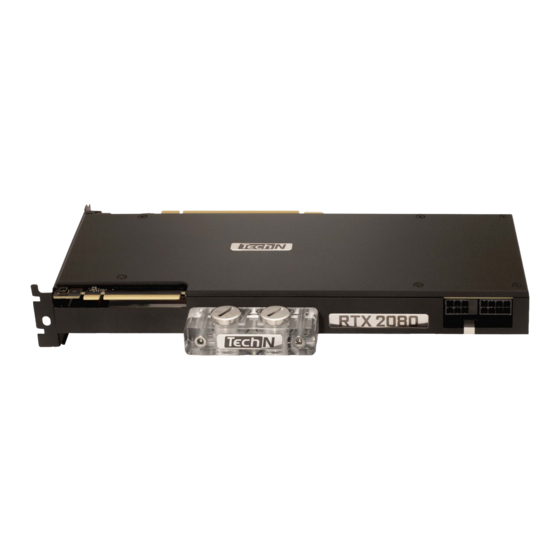
GPU Waterblock
RTX 2080 / 2070 Super
3. Slotblende verschrauben // Fasten slot bracket
Befestige die Slotblende mit den mitgelieferten Schrauben (lang)
und Muttern, platziere hierbei eine Unterlegscheibe zwischen
Mutter und PCB.
Secure the slot bracket using the two included screws (long) and
nuts, don't forget to place a washer between the nut and the PCB.
Unterlegscheibe M3x4mm
Mutter M3
Nut M3
Washer M3x4mm
Schraube M3x6mm (lang)
Screw M3x6mm (long)
4. Grafikkarte reinigen // Clean the graphics card
Entferne die alte Wärmeleitpaste mit Isopropanol und einem
weichen Papiertuch. Achte darauf, dass die Grafikkarte staub-,
fussel- und fettfrei ist.
Remove the stock thermal paste using isopropanol and a soft paper
towel. Make sure that the graphics card is completely clean.
5. Wärmeleitpaste auftragen // Apply thermal paste
Trage nach der Reinigung die mitgelieferte Wärmeleitpaste auf die
GPU auf. Der Tropfen sollte ca. 3mm im Durchmesser sein.
After cleaning, apply the provided thermal paste onto the GPU. The
drop should be around 3mm in diameter.
6. Schutzfolie entfernen // Remove protective film
Entferne die Schutzfolie von allen Wärmeleitpads. Überprüfe
deren Position nach Abbildung auf der Rückseite.
Remove the protective film from each of the thermal pads.
Compare their positioning with the figure on the back.
7. Montage // Assembly
Lege den Kühler umgedreht auf die Verpackungsbox. Positioniere
das PCB auf dem Kühler, achte hierbei auf die Ausrichtung der
Befestigungslöcher.
Place the cooler bottom up on the packaging box. Position the PCB
on the cooler. Make sure that the mounting holes are aligned.
8a. Verschrauben // Fasten screws
Platziere unter jeder Schraube (kurz) eine Unterlegscheibe.
Verschraube die 4 gekennzeichneten GPU Schrauben
gleichmäßig über Kreuz.
Fasten the 4 highlighted GPU screws (short) crosswise and evenly,
place a washer underneath each screw.
1.
4.
3.
2.
WARNUNG! Verwende nicht zu viel Kraft bei der Installation des
Kühlers und dem Verschrauben. Chip Dies können leicht brechen.
ATTENTION! Do not to use too much force by pressing the block
down onto the PCB or overtightening the screws. Chip dies are
prone to cracking.
Advertisement

Summary of Contents for Tech N RTX 2080
- Page 1 6. Schutzfolie entfernen // Remove protective film *Please read all steps before starting* User Manual RTX 2080 / 2070 Super Entferne die Schutzfolie von allen Wärmeleitpads. Überprüfe deren Position nach Abbildung auf der Rückseite. Remove the protective film from each of the thermal pads.
- Page 2 GPU Waterblock 8b. Verschrauben // Fasten screws User Manual RTX 2080 / 2070 Super Verschraube zuerst die 3 markierten Schrauben (kurz). Platziere unter jeder Schraube eine Unterlegscheibe. Fasten the 3 marked screws (short) first. Place a washer under each screw.
Need help?
Do you have a question about the RTX 2080 and is the answer not in the manual?
Questions and answers