Advertisement
Quick Links
Advertisement

Summary of Contents for ARTinoise re.corder
- Page 1 Owner’s Manual 1.0beta February 2021...
- Page 2 Table of Contents …description …good handling habits …quick start with the app …app advanced use …windows re.corder router …care and troubleshooting …regulatory and certification …warranty...
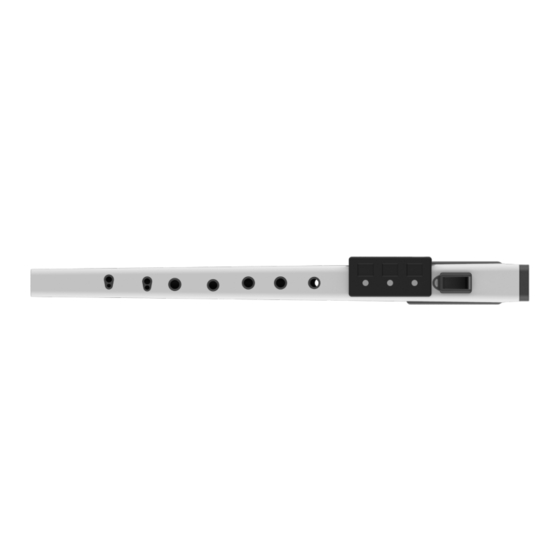
- Page 3 (descant) recorder, up to a endless possibilities digital musical instrument when you connect to our app. You can also use the re.corder to play virtual instruments on any BLE-MIDI compatible platform (MAC, PC, Linux). The following pictures describes the most important part of the instrument.
- Page 4 To turn on (exiting from stand-by) the re.corder press the CIRCLE button for at least two seconds. The BLUE led will start blinking to indicate that the re.corder is ready for a connection. IMPORTANT NOTE: After 2 minutes of blinking...
- Page 5 To let the re.corder turn itself off you have to close the application or disconnect the re.corder from inside the CONFIGURATION/DEVICES page (see relevant chapter).
- Page 6 The pressure sensor subsystem is capable of continuous self calibration, avoiding problems when sudden barometric pressure (due to weather or air conditioning, for example) changes could...
- Page 7 (very simple) rules to reach a full experience and create a successful physical bond with this musical instrument. The re.corder interprets the position of the fingers, the lips of the player, and the pressure inside the windway to decide when and which note to play.
- Page 8 One last point, the re.corder is a sophisticated electronic musical instrument and while sufficiently robust, it cannot be washed with water, handled roughly, used as a stick, and launched around (like some time a plastic recorder happens to be!). So treat it with care and avoid letting it fall, beating it on hard surfaces or using it as a saber…..
- Page 9 No strong Soft Cloth Inside magnets STEP1. Charge the re.corder: connect the supplied USB cable with a PC/MAC or a USB wall adapter. Depending on the status of the battery, the re.corder will take a maximum of two hours to get...
- Page 10 STEP2.While re.corder is recharging, insert the lanyard loops in the back ring (near the thumb hole) and the mute plug. This is important to avoid re.corder fall and loosing the mute plug. Check out the following picture to understand how to use the cord loop.
- Page 11 Now, by pressing and holding the ROUND button for at least TWO seconds, you turn the re.corder on and ready for connection (BLUE led blinking). Press the connect button on the app and then START.
- Page 12 To start from scratch, try the Learn mode. When you select the Learn mode, you are presented with the choice of instrument and then the song to start with.
- Page 13 Keep in mind that to access all the songs, you have to rise your ranking by earning points! Follow closely the notes on the score and check you score go up and unlock the next song! You can try several instruments!
- Page 14 While you are playing you can also change the base octave of the re.corder and hear what a very low cello note can feel! (press together for a brief moment the CIRCLE and SQUARE buttons to go up an octave and CIRCLE and TRIANGLE buttons to go down.
- Page 15 The recorder app is compatible with devices which have at least the following OSes installed: -Android (smartphones, tablets): OREO (8.0) on Arm platform. It is possible to start and connect to the re.corder with a prior version but audio optimizations are implemented starting from this OS version.
- Page 16 Android SETTINGS/CONFIGURATION panel. Avoid using Bluetooth headphones or speakers with the re.corder app. The Bluetooth Audio transmission standard doesn’t allow low latency audio. You will experience long delays between the production of a note and the audio that you hear! Use only wired connections to your headset or speaker.
- Page 17 After the splash and welcome screens, the first time you open the re.corder app, you will be presented with the connection page, asking you to bind the instrument with the app. As already described in the QuickStart chapter, after having...
- Page 18 Now the app prompts you with the registration. This is mandatory for the warranty to take place and for having a user account on the app that will track your points, badges and advancements. See the picture below for an example. Please input a valid email.
- Page 19 In your profile section, you can see a summary of your information and status. In the main PROFILE screen you see your email, you points and badges and, if you click on your picture, you can jump to a screen that allows you to take a picture of you, select a character or choose from your photo album.
- Page 20 This is the main operating window of the application, from here you can choose which way you want to play and, described in following chapters, how to customize your re.corder. The LEARN mode: Here you can start learning to play the recorder by approaching a series of increasing complexity musical scores that you need to learn to unlock the following one.
- Page 21 The instrument list will evolve and widen with subsequent app releases, giving you inspiration and great exploration grounds! After choosing the instrument, the app presents you with the choice of the song: As already said, in LEARN mode you will have to earn points to unlock the next song, to allow you to learn to play the instrument little by little.
- Page 22 Clicking on the watch button you can set the tempo of the song (in BPM) and the volume of the backing/accompaniment track You can also enable the metronome by pressing the metronome icon button (see picture below).
- Page 23 (if turned it on) the metronome. If you selected the re.corder instrument, on the left panel you can also see the actual fingering you are operating on the instrument in real time.
- Page 24 The PLAY mode: The re.corder app includes many songs, traditional, classic or pop, that can be played directly with the re.corder! In the play mode you are free to play whatever song you want, following the score of the available song.
- Page 25 The DUO mode: The DUO mode allows to add a friend with its re.corder and play together on a single smartphone or tablet, with different instrument sounds!! Press the DUO icon to start!
- Page 26 You will see the following screen appear: After pressing the ‘CONNECT’ button you will see the codename of your friend’s re.corder on the list, connect with it exactly with the same procedure of your instrument: Press the ROUND button while clicking the name of the recorder, then release the ROUND button when the BLUE led stays ON.
- Page 27 In the page shown above, press ADD FRIEND, the app will ask you to enter its name and choose a picture. We take on board Johann Sebastian Bach himself!
- Page 28 After the creation of your friend’s profile, you can click on its profile picture and the app will show you the instrument section: Now you can choose (and try) the instrument for you and your friend, you can obviously choose also the same instrument if y ou want to do, for example, a Cello duet.
- Page 29 Apple Store, Play Store or AppGallery. The configuration menu includes items for both the re.corder and the app itself. You can see its divided in four main tabs: General, Midi, Fingering and Devices.
- Page 30 This is the DEFAULT choice of the re.corder. § LIP SENSOR: the note is generated (when a correct fingering is set) everytime you put your mouth and lips on the mouthpiece. This allows several features like ‘continuous playing’, drones, and an aid to reduced lung capacity...
- Page 31 This section of the app, on the other hand, is particularly useful when you want or need to use the re.corder as a standard midi wind controller with every other software and VSTs.
- Page 32 § SENSITIVITY: This menu allows you to change the way the re.corder reacts to your breath. Mainly you can modify the Threshold, to allow for three different ‘forces’ or ‘hardness’. We suggest to use the default that is a good compromise between a recorder and other wind instruments.
- Page 33 CC#11 (EXPRESSION). If you want to change the CC number or sending the pressure information to the Channel Aftertouch MIDI message, you can do it here! Also in this case, to transfer the config to the re.corder, just press SEND.
- Page 34 NONE as the curve. As default, the Z-AXIS is disabled while the ROTATION is sent to MIDI CC# 52. Also in this case, to send the config to the re.corder, just press the SEND button. The third tab, FINGERING, is where you can select and customize the fingering of the re.corder.
- Page 35 You can see this by going up and down with the + and – button. If you have the Lightning edition of the re.corder, you will see the selected configuration LIGHT UP on the tone holes of your instruments!!!!
- Page 36 You can then upload the fingering to the re.corder by pressing the SEND button. The fourth tab, DEVICES, allows you to connect or disconnect the re.corder without having to start the app again and do it in the first CONNECT screen.
- Page 37 The usage is very simple, to connect to a recorder, after turned it on, and pressing the CIRCLE button while you touch the re.corder codename. To disconnect, just touch on the recorder codename (that, when connected, is displayed in BOLD character.
-
Page 38: Copyright Notice
COPYRIGHT NOTICE: Artinoise and re.corder are registered trade marks of Artinoise Srl, Italy. Every other cited marks and brands are property of the legal owner. Usage of text, images and any information contained in this manual is... - Page 39 Certification statements, markings and Patents FCC/CE/MIC/WEEE...
Need help?
Do you have a question about the re.corder and is the answer not in the manual?
Questions and answers