Table of Contents
Advertisement
Quick Links
m
D
p
Owner's Manual
Owner' s Manual outdoor patio heater.
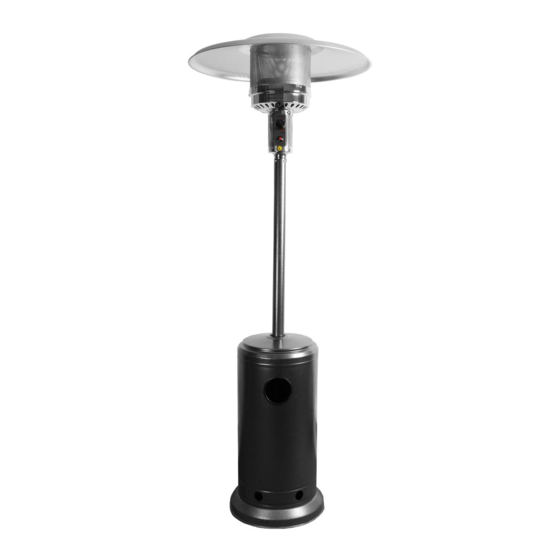
Rangland 46,000 BTU Propane Patio Heater
Model:CZGB-A/B
If you smell gas:
1. Shut off gas to the appliance.
2. Extinguish any open flame.
3. If odor continues, keep away from the appliance
and immediately call your gas supplier or fire
department.
Do not store or use gasoline or other flammable
vapors and liquids in the vicinity of this or any other
appliance. An LP-cylinder not connected for use shall
not be stored in the vicinity of this or any other
appliance.
WARNIN :
Improper installation, adjustment, alteration, service
or maintenance can cause property damage, injury or
death. Read the installation, operation and
maintenance instructions thoroughly before installing
or servicing this equipment.
h
1
SKU: OH480GY
SKU: OH579GY
DAN ER
WARNIN
For Outdoor Use Only
This appliance can produce carbon
monoxide which has no odor.
Using it in an enclosed space can kill
you.
Never use this appliance in an
enclosed space such as a camper,
tent, car or home.
WARNIN
D
Advertisement
Table of Contents

Summary of Contents for Rangland OH480GY
- Page 1 Owner’s Manual Owner' s Manual outdoor patio heater. Rangland 46,000 BTU Propane Patio Heater SKU: OH480GY Model:CZGB-A/B SKU: OH579GY DAN ER If you smell gas: 1. Shut off gas to the appliance. 2. Extinguish any open flame. 3. If odor continues, keep away from the appliance and immediately call your gas supplier or fire department.
-
Page 2: Package Contents
PACKAGE CONTENTS QUANTITY Reflector Panel Head Assembly Gas Hose Cylinder Housing Regulator Post F1&F2 Support Bracket Base Wheel Kit Bucket (preassembled) -
Page 3: Safety Information
HARDWARE CONTENTS (shown actual size) Flange Bolt Stainless Bolt Reflector Washer Φ8 M8 x 16 steel bolt M6 x 30 spacer Qty. 2 Qty. 6 Qty. Qty. 5 Qty. 4 Qty. 6 Qty. 3 Wrench Wing nut Qty. 1 Qty. 3 (not actual size) SAFETY INFORMATION... - Page 4 SAFETY INFORMATION DANGER DANGER DANGER WARN NG WARN NG DANGER WARN NG WARN NG...
-
Page 5: Burn Hazard
SAFETY INFORMATION WARNING WARNING California Proposition 65 • This product is fueled by propane gas. Propane gas Combustion by-products produced when using is invisible, odorless, and flammable. An odorant is this product contain chemicals known to the State normally added to help detect leaks and can be of California to cause cancer, birth defects, and described as a “rotten egg”... - Page 6 ASSEMBLY INSTRUCTIONS 1. Attach wheel assembly (I) to base (H). Line up holes in wheel bracket with corresponding holes in base, insert two bolts M8 x 16 (BB) through holes, and finger tighten Fill Sand two M8 flange nuts (AA). Be sure that the wheel assembly is parallel to the base, and fully tighten bolts.
- Page 7 ASSEMBLY INSTRUCTIONS 4. Load Cylinder Housing onto Post. Slide Cylinder Housing down. 5. Attach reflector spacers (FF) to the top of head assembly (B) . Tighten the reflector spacers (FF). Unscrew stainless steel bolts (DD) from head assembly (B). Hardware Used Reflector spacer Stainless Steel Bolt 6.
- Page 8 WARNING:Remove protective cover before assembling. Note: If necessary for proper alignment of reflector sections, loosen each bolt prior to further assembly and retighten after sections are aligned. Slide two reflector panels together. M6 nut M6X8 Slide reflector plate onto reflector panels. Insert one screw M6 X 8 and screw on cap nut loosely.
- Page 9 ASSEMBLY INSTRUCTIONS 10. Slide 8 washers (GG) over the threaded ends of reflectors spacers(FF). Attach reflector assembly to head assembly (B). Place 8 washers (GG) over threaded ends of reflector spacers(FF) sticking out through reflector Wing nut assembly and secure with wing nuts (HH). Note: Do not overtighten.
- Page 10 ASSEMBLY INSTRUCTIONS A dented, rusted or damaged propane cylinder may be hazardous and should be checked by your cylinder supplier. Never use a propane cylinder with a damaged valve connection. The propane cylinder must be constructed and marked in accordance with the specifications for LP gas cylinders of the U.S.
- Page 11 OPERATION INSTRUCTIONS To check for a leak: WARNING 1. Make 2-3 oz. leak check solution (one part liquid dishwashing detergent and three parts • Perform all leak tests outdoors. water). • Extinguish all open flames. 2. Apply several drops of solution where •...
- Page 12 OPERATION INSTRUCTIONS C E IL IN G DANGER 48'' 48'' Caution: Do not attempt to operate until you have read and understand all General Safety Information in this manual and all assembly is complete and leak checks have been performed. This appliance shall be used only in a well-ventilated space and shall not be used in a building, garage or any other enclosed area.
- Page 13 OPERATION INSTRUCTIONS Lighting: 1. Turn on the valve on the gas cylinder. 2. Press and turn the control knob to "Pilot" position (anti-clockwise 90º). (Figure 1) 3. Holding down the control knob, press the igniter button several times until the pilot is ignited. Release the control knob 10 seconds after the ignition.
-
Page 14: For Your Safety
OPERATION INSTRUCTIONS WARNING FOR YOUR SAFETY Be careful when attempting to manually ignite this heater. Holding in the control know for more than 10 seconds before igniting the gas will cause a ball of flame upon ignition. When Heater is ON: Emitter screen will become bright red due to intense heat. -
Page 15: Care And Maintenance
OPERATION INSTRUCTIONS 9. Heater is away from gasoline or other flammable liquids or vapors. 10. Heater is away from windows, air intake openings, sprinklers and other water sources. 11. Heater is at least 2.3 feet on top and at least 3.3 feet on sides from combustible materials. 12. - Page 16 CARE AND MAINTENANCE Visually checking portions of the hose assembly located within the confines of the heater post. Inspect the entire hose assembly at least annually, disassembling the reflector and burner. Inspect the hose assembly for evidence of excessive abrasion, cuts, or wear. Suspected areas should be leak tested. Then assembling the reflector and burner again following with step 6 and 7.
-
Page 17: Troubleshooting
TROUBLESHOOTING PROBLEM POSSIBLE CAUSE CORRECTIVE ACTION Wait until the propane cylinder Propane cylinder is frosted over warms up and is defrosted Burner won’t light Blockage in orifice Clear blockage Control knob is not in ON position Turn control knob to ON Turn cylinder valve OFF and replace Gas pressure is low cylinder... -
Page 18: One-Year Limited Warranty
ONE-YEAR LIMITED WARRANTY This product is inspected, tested and carefully packaged to minimize the chance of damage during shipment. If a part within one year from the date of purchase proves to be defective in material or fabrication under normal use, the part will be repaired or replaced. The Company's obligation under the warranty is to replace or repair defective parts at our discretion.
Need help?
Do you have a question about the OH480GY and is the answer not in the manual?
Questions and answers