Advertisement
Quick Links
Advertisement

Summary of Contents for Bestsin Y4A
- Page 1 Model:Y4A Wireless Outdoor Solar Security Camera User Manual...
- Page 2 Warranty Service Thanks For Choosing Bestsin. Please contact us through either way below. Bestsin care staff team will offer you the best solution to solve any problems 24 hours within 3 months replacement or full refund 24 months worry-free warranty Contact us support@bestsin.com...
-
Page 3: Table Of Contents
Table of Contents Part1: Installation Preparation--------------------3-7 Part2: APP Setup--------------------------------------8-11 Part3: Installation-------------------------------------12-14 Part4: Detailed App Instructions----------------15-25 Part5: Question and Answer----------------------26-27... -
Page 4: Part1: Installation Preparation
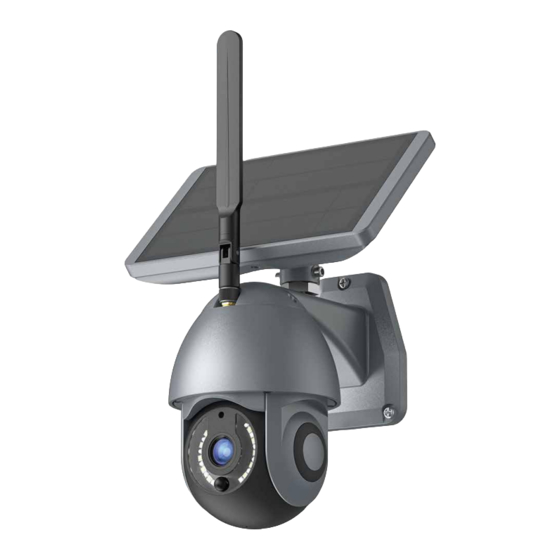
Installation Preparation Important Tips: Bestsin cameras can only be set up with 2.4G Wi-Fi network. (First, the cameras set up with 2.4G Wi-Fi network, then it's ok to use both 4G Date and Wi-Fi to live viewing.) You may possibly need a Wi-Fi extender when it is long between the camera and Wi-Fi transmitter. - Page 5 Installation Preparation Product Diagram Camera Charge Antenna Reset Power on/off IR Sensor Lens White&Red light Battery light Battery box Adjust angle Battery Power Battery Charging on/off Port Camera code Reset SD Card...
- Page 6 Installation Preparation 1. Charge the solar panel battery Please charge the battery at the side of the solar panel before installation with supplied USB cable inside the package. May take 6-8hrs to fully charge the12000mAh battery. At the side of the solar panel, turn on the battery (via on/off switch) and you can see the battery lights during charging.
- Page 7 Installation Preparation Please Note: We suggest you format the SD card to FAT32 in the APP before first time use.
- Page 8 B a t t e r y N e t wo r k P T Z C a me r a U ltr a - L o w P o we r S ola r B a ttery N etwork P T Z C a mera Model:Y4A Ultra- L ow P ower Wireless Outdoor Solar Security Camera User Manual...
-
Page 9: Part2: App Setup
APP SETUP 1. Download the App (works only with iOS & Android devices) Please locate “FINDCAM MAX” in your Google Play store or App store to FINDCAM Max download the App. FINDCAM Max 2. Add Device Open the App and Add device 1)Please click "Allow"... - Page 10 APP SETUP 1)Enter “Configuring the Wi-Fi network for the device”, keep the camera waiting for the network, Search starting with“IPC-XXX” on your cell phone Wi-Fi.
- Page 11 APP SETUP 2)Choose your WiFi and enter the password, keep your router, phone and device powered on and nearby while establishing a connection. Setting the name for your camera is last. With these steps you have successfully completed the installation and now your ready to enjoy the security camera. Please choose a Wi-Fi Enter WIFI password...
- Page 12 APP SETUP 4. If you're unable to pair the camera, please check below suggestions: 1) Please reset the camera to default settings after the camera is fully charged. 2) Please put the camera and phone close to your router (within 1.5 feet) to get the strongest WiFi signal strength.
-
Page 13: Part3: Installation
Installation 1. Check your camera signal strength Check on the APP or solar panel light. Signal Strength:95% Security: Password Camera If you’re not satisfied with the video smoothness and the signal strength Wifi extender Router in the App is not strong, then we would suggest adding a WiFi-extender between the Router and the camera. - Page 14 Installation 2. Recommended height to install the camera We suggest installing the camera about at a height of about 9ft. You may adjust the camera angle physically according to the live view mode on your mobile device. In doing so, you can focus your motion area to get the most accurate motion triggered events.
- Page 15 Installation 3. Take out the mounting bracket that is included in the fittings bag. Place the mounting bracket against the mounting location and mark 3 holes where you want to install the camera using the predrilled holes on the bracket. Then you can install the bracket securely using the expansion screws.
-
Page 16: Part4: Detailed App Instructions
Detailed APP Instructions Device name(Check page 10 to setting device name) Setting: Click to enter into device Battery Level Low Power Consumption When the battery level is less than 10%, the camera will close PIR and enable low power consumption to keep the camera online. - Page 17 Detailed APP Instructions Check the device's log EVENT HISTORY The working mode of the device can be modified MOTION ALARM Lighting Mode When detected object enter the monitoring range of camera at night, the headlamp will be turned on automatically for 15 sec. Night Alarm Mode Alarm Light Alarm Whistle...
- Page 18 Detailed APP Instructions 2020-08-31 Pan,Tilt PRESET CALIBRATE PRESET ZOOM CALIBRATE...
- Page 19 Detailed APP Instructions Setup Password Resolution Speaker Playback Alarm Full screen 2020-08-31 Date Time Sound alarm Light Catch video Talk Catch photo...
- Page 20 Detailed APP Instructions Change Name&Device Password Click setting into device detail 1)Name-- Modify device name “admin” 2)Change Device Password—The default password is...
- Page 21 Detailed APP Instructions SD Card Setting Click “Settings” to view details: 1) SD Card — shows available memory remaining. 2) Format SD Card — Needed on first time install of SD card. 3) REC Mode — Close & continuous recording or alarm video. 4) Record Time —...
- Page 22 Detailed APP Instructions Image flip Depends on how you installed your hardware. The default setting is Normal.
- Page 23 Detailed APP Instructions LED indicator Night Vision — Suggested choice “AUTO”, when the night vision is active, the picture will become mono-colored, even during the daytime.
- Page 24 Detailed APP Instructions Environment Settings Allows you to choose Outdoor or Indoor mode. Please choose 50HZ or 60HZ according to your local frequency. The default setting is 60HZ for the United States users.
- Page 25 Detailed APP Instructions Volume Settings Choose your speaker and Mic volume to your desired level.
- Page 26 Detailed APP Instructions Motion Snooze The camera will send a message to you if anything is detected. If motion is still detected after 30s, another message will be sent. Can be set to 10s or 20s if so desired. Linger is an option that lets you determine how long something can be in the field of detection moving, before a message is sent.
-
Page 27: Part5: Question And Answer
Question and Answer Q1: How to share your camera with more users? A1: Share your camera with your friends and family members. Click “SHARE”, add a user, share the QR code (Only inviting one person) to your family. Q2: What is the original password? A2: The original password is “ADMIN”. - Page 28 Question and Answer Q7: Why can’t the camera record the motion on the road? But, I can see the road viewing live. A7: The PIR range is 18 feet around. The recommended camera install height is 9 feet. The road is to far away to be record. Q8: Can I install the APP on PC? A8: Sorry, the software only works with Android and IOS devices.
- Page 29 THANK YOU...
Need help?
Do you have a question about the Y4A and is the answer not in the manual?
Questions and answers