
Summary of Contents for vwin VJ201-S2
- Page 1 Height-Adjustable Table Base VJ201-S2 Please register the product for 5-year warranty Assembly and Operation Instructions...
-
Page 2: Parts List
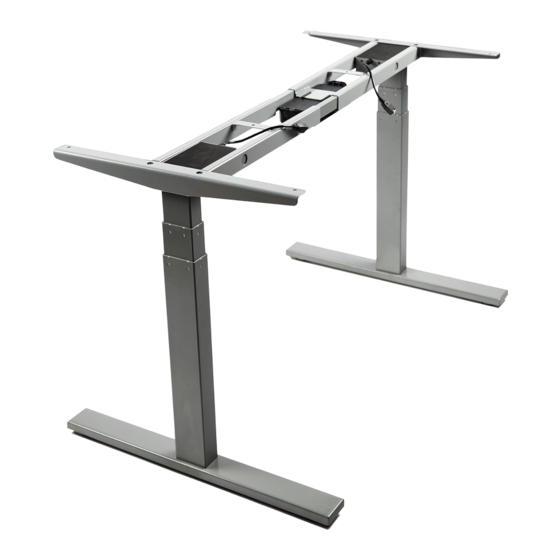
Parts List Part Name Lift Column Table Frame End Frame Cross Rails Side Bracket Cable Foot Leveling Feet Control Box Handset Cable Power Cord Machine Screws M6*10 Countersunk Head Screws M6*10 Machine Screws M6*12 Wood Screws M5*16 Cable Clips... - Page 3 Step 1 Remove the table frame (Part 1) from the packaging out. This part is heavy. You can only take the product out by holding the table frame legs with your both hands. Do not put your hands in the crossbeam. The frame legs are not fixed and them will rotate.
- Page 4 Step 2 Fit side brackets (Part 2) as shown. You need to align the screw holes. Insert 4pcs M6*12 mm Machine Screws (Part 11) on the side of both Side Brackets (Part 2) and tighten them as shown. Insert 4pcs M6*10 mm Countersunk Head Screws(Part 10) on the top of both Side Brackets (Part 2)and tighten them as shown.
- Page 5 Step 4 Place your desktop on the ground with the good side down.Taking care that there is no stray hardware that may damage the top. Stretch the frame out leaving 50mm at each end. Suggest: If your top is 1500mm long your frame should measure 1400 mm After confirming that the frame length is correct, tighten 8pcs screws on both sides of the frame.
- Page 6 Check that the frame is properly positioned on the underside of the desktop. Attached the base to the underside of the desktop using 8pcs M5*16 mm Wood Screws (Part 12) 2 per Side Bracket (Part 2) ---4 total 1 per End Frame (Part 2) ---2 total 2 per Handset (Part 6)--- 2 total Place the Handset (Part 6) so the front of the handset is flush with the edge of the front desktop edge or recessed up to 4mm.
- Page 7 Step 6 Connect the following to the Control Box (Part 5) as show: Handset (Part 6), Cable (Part 7) and Power Cord (Part 8). Use the adhesive-backed Cable Clips (Part 13) to secure all cables neatly. With assistance, turn the desk right side up by the frame, not the desktop surface.
- Page 8 Step 7 Almost done .Before using your desk, it is recommend to run through the reset procedure. Press and hold the down arrow on the handset until the desk reaches its lowest height. Release and hold down arrow again until the display reads RST. You will here 1 beep sound the frame will move down slightly then up.
-
Page 9: Up Down Operation
1.The interface of hand controller The key instructions: 2.Initialization Operation ➢ When the system is abnormal, or hand controller display the "RST", you need to make lift table initialized, initialization, Press the "DOWN" button, until the motor stopped then after 5 second, enter the initialization mode automatically.At this time can't loosen the "DOWN"... - Page 10 label position, the corresponding height position then automatically run to the store, run time, any key to stop the system. 5.The minimum limit set ➢ System supports desktop minimum height limit, methods for operation, when it comes to setting the lowest height for the desktop height, the corresponding height at the same time Press the "SET"...
- Page 11 Error code Instructions How to do? Main power is to high Check the main power Screw clearance over 1cm Initialization Hand Controller no connect Waiting for the system sleep Hand Controller communication error Check hand controller line Blocked off Stop Loosen the button Rerun the Main power start error Change controller box...
Need help?
Do you have a question about the VJ201-S2 and is the answer not in the manual?
Questions and answers