Table of Contents
Advertisement
ORTECO S.r.l.
Via 2 Giugno, 19
40011 Anzola Emilia (Bo) - Italia
Tel. +39 051 731051
Fax +39 051 731925
mail: orteco@orteco.com
www.orteco.com
UN21-0456BO
PILE DRIVER ON CRAWLER
USE AND
MAINTENANCE MANUAL
Translations of the original instructions in italian language
Serial number
Manual code: 170310
Language: english
HD 800 - 1000
IV
Series
th
Edition: 01/2017
Advertisement
Table of Contents

Summary of Contents for ORTECO HD Series
- Page 1 HD 800 - 1000 Series PILE DRIVER ON CRAWLER USE AND ORTECO S.r.l. Via 2 Giugno, 19 MAINTENANCE MANUAL 40011 Anzola Emilia (Bo) - Italia Tel. +39 051 731051 Fax +39 051 731925 mail: orteco@orteco.com www.orteco.com Translations of the original instructions in italian language...
-
Page 3: Table Of Contents
SUMMARY 1 GENERAL INFORMATION ..........................1 2 TECHNICAL INFORMATION ........................5 3 SAFETY INFORMATION .......................... 18 4 HANDLING AND TRANSPORTATION ....................21 5 ADJUSTMENT INFORMATION ......................26 6 INFORMATION FOR USE ........................31 7 MAINTENANCE INFORMATION ......................76 8 BREAKDOWN INFORMATION ....................... 85 9 INFORMATION CONCERNING REPLACEMENTS ................ - Page 4 Gripper for metal pile extraction - instructions for assembly, use, and maintenance ..43 Handling and transport safety precautions ..................19 Hose check ................................ 81 Hydraulic oil level check ..........................82 Information and safety signs .........................8 Intended uses ..............................6 Lifting the machine ............................22 Lifting the pile driver .............................
- Page 5 Scrapping the machine ..........................90 Shifting on slopes procedure ........................39 Shifting procedure ............................38 Sound emissions ............................. 10 Starting the engine ............................36 Starting the engine with the auxiliary battery ..................37 Summary ................................III Supplements ..............................17 System for adjusting/reducing the hammer drill frequency - instructions for use ....67 System for measuring the distance between the piles - instructions for assembly, use, and maintenance ............................
-
Page 7: General Information
GENERAL INFORMATION Aim of the manual This manual, which is an integral part of the machine, has been prepared by the manufac- turer to provide the operator with the necessary information and criteria for the use and maintenance of the machine. The original instructions are provided by the manufacturer in English. -
Page 8: Manufacturer And Machine Identification Details
GENERAL INFORMATION Manufacturer and machine identi cation details The picture shows the identi cation plate and the position of the serial numbers of the units that make up the machine. The plate contains all the information to identify the machine and the manufacturer. UN21-0512AP Machine identi cation plate A) Manufacturer’s details... -
Page 9: Annexed Documentation
GENERAL INFORMATION Engine identi cation Engine identi cation data is shown on the identi cation plate applied to the engine. For the meaning of the data contained on the plate see the engine manufacturer’s use and maintenance manual. UN21-0513AP Technical assistance procedure For technical assistance (machine malfunction, failure, etc.) contact the nearest technical assistance service or the manufacturer. -
Page 10: Glossary Of Terms
GENERAL INFORMATION Glossary of terms Version: type of machine that features technical and performance di erences with respect to the standard model. Accessory: unit that increases the machine’s functionality for speci c operations. The accessory must be requested by the customer when placing the order. Supplement: component or unit that completes the machine, which is not included in the standard model. -
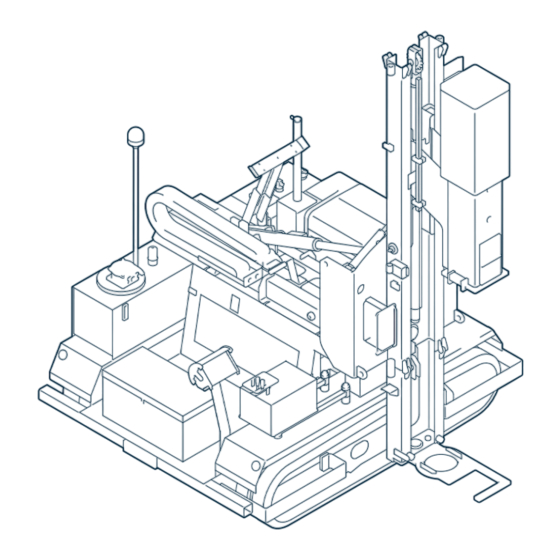
Page 11: Technical Information
TECHNICAL INFORMATION General description This machine has been designed and built to sink into the ground steel piles or wood piles using a percussion hammer. The machine is made up of a tracked truck for manoeuvres and a percussion hammer to drive the pile into the ground. -
Page 12: Intended Uses
TECHNICAL INFORMATION Intended uses This machine has been designed and built to sink metal piles for guard-rails, wood piles and metal piles for photovoltaic systems. Using special accessories approved by the manufacturer, it is possible to extract piles, make holes and drill (see “Accessories”). Any other use is considered improper and is therefore forbidden. -
Page 13: Safety Devices
TECHNICAL INFORMATION Safety devices WARNING On no account must you tamper with or by-pass the safety devices. Keep all safety devices in good working order through regular maintenance. The illustration shows the position of the safety devices on the machine. UN21-0515AP A) Emergency stop button: to stop the machine in the case of impending risk. -
Page 14: Information And Safety Signs
TECHNICAL INFORMATION Information and safety signs WARNING Always respect the safety instructions on the plates. Check that the plates are always in place and legible; if they are not, replace them with new ones, maintaining the original location on the machine. The illustrations show the position of the safety and information signs on the machine. - Page 15 TECHNICAL INFORMATION Attachment points of lifting hooks. Operators and site assistants must keep a safe distance from the machine. Greasing points. 10) Type of oil used for the hydraulic system. 11) Type of engine fuel. 12) Before starting the engine check that the emergency button is not pressed down. 14) This shows the sound pressure at the operator's work station.
-
Page 16: Overall Dimensions
TECHNICAL INFORMATION Overall dimensions The illustration shows the general dimensions of the machine when operating and when resting. D(*) E(*) UN21-0517AP (*) Dimensions of the machine without accessories or supplements. The dimension (G) cor- responds to the maximum length of the pile to be driven into the ground. Model (mm) (°) -
Page 17: Environmental Operating Limits
TECHNICAL INFORMATION The operator and nearby people must wear personal protective equipment (ear de- fenders, ear plugs, etc.) to reduce the noise level received or eventually work shifts that foresee interruptions must be programmed to reduce the exposure to noise. Gas emissions During operation and/or when standing still, the machine emits the toxic gases listed be- low. -
Page 18: Declaration Of Conformity
( A n n e x I I A t o D i r e c t i v e 2 006/ 4 2 / C E ) The Manufacturer Orteco S.r.l. Via 2 Giugno, 19 - 40011 Anzola dell’Emilia (BO) – Italia Tel. - Page 19 TECHNICAL INFORMATION Versions UN21-0520AP A) Additional extension skid: this is used to drive in piles or to use accessories at a dis- tance from the side of the tracked crawler which is further than possible with the stand- ard machine. B) 4.5 m sliding vertical column: this is used to drive in piles or to use accessories which are longer than the standard machine (up to 4500 mm).
- Page 20 TECHNICAL INFORMATION 4,5 m sliding vertical column The machine is equipped with a coun- terweight (E) to prevent transverse over- turning. Do not use the machine without the counterweight. On sloping ground, do not exceed the maximum longitudinal and transverse slope limits stated in the "Speci cations".
- Page 21 TECHNICAL INFORMATION Macro tilt The pile driver is tilted via a manually operated cylinder (see "Procedure for use of the macro tilt"). The chart shows the increase in weight. Description Weight (kg) Macro tilt UN21-0524AP English language Use and maintenance...
-
Page 22: Accessories
TECHNICAL INFORMATION Accessories UN21-0525AP A) Clamp: used to extract piles from the ground (piles for guard-rails, piles for photovoltaic Pos. Weight (kg) systems, etc). For assembly, use and maintenance of the clamp, see "Metal pile extrac- tion procedure". B) Corer: to make circular holes with a diamond cup-shaped tool in hard and compact areas (road surfaces in cement, asphalt, etc.). - Page 23 TECHNICAL INFORMATION Supplements UN21-0526AP A) Supplementary air lter: to lter the air taken in by the motor in particularly dusty work conditions. B) “Laser” device: to automatically stop the driving of a pile or the execution of a hole at the required depth.
-
Page 24: Safety Information
SAFETY INFORMATION General safety warnings Failure to comply with some simple safety and prudence rules is the cause of most accidents and injuries at work. In most cases, accidents can be avoided by foreseeing the possible causes and conse- quently acting with the necessary care and caution. Every worker in uences, with his /her behaviour, the risks related to the activity to be carried out, therefore a careful and prudent worker is the best guarantee against accidents. -
Page 25: Handling And Transport Safety Precautions
SAFETY INFORMATION Keep a safe distance from the lines of public utilities. In case of work near buried pipe- lines or cables (gas or water pipes, electric cables) contact the provider requesting assistance to search for the lines and eventually disable them. Do not ll the fuel tank when smoking, when the engine is on or hot or near naked ames. -
Page 26: Environmental Protection Precautions
SAFETY INFORMATION Environmental protection precautions Improper disposal of waste can cause environmental and ecological damage. Potentially polluting waste installed on the machine (fuel, oil, coolant, lters and bat- teries) must be separated and disposed of in di erent ways, according to the di erent composition of the products, in compliance with the laws in force. -
Page 27: Handling And Transportation
HANDLING AND TRANSPORTATION Advice for handling and transportation Before starting any operation, the work area must be organised to safely carry out lifting and handling operations. During lifting and handling operations anyone not involved must keep a safe dis- tance. Hooks and ropes in good condition suitable for the load to be lifted must be used for lifting operations. -
Page 28: Lifting The Machine
HANDLING AND TRANSPORTATION Lifting the machine WARNING The assembled machine must only be lifted when the pile driver is in resting position using suitable equipment (lifting beam) to avoid damaging it. Hooks and ropes in good condition suitable for the load to be lifted must be used for lifting operations. -
Page 29: Lifting The Pile Driver
HANDLING AND TRANSPORTATION Lifting the pile driver WARNING Be extremely careful when using a forklift truck to handle the pile driver; the pile driv- er has a high barycentre therefore it becomes particularly unstable. Use lifting means with a su cient capacity for the load to be lifted. Hooks and ropes in good condition suitable for the load to be lifted must be used for lifting operations. - Page 30 HANDLING AND TRANSPORTATION Pull the parking brake of the transport means and position the chocks (A) against the wheels. Move on and o the transport means with the controls facing the truck bed as shown in the gure to reduce to a minimum the risk of accidents should the machine tip over. UN21-0467BO To get the machine on proceed as outlined below.
-
Page 31: Assembly Of Pile Driver On The Crawler
HANDLING AND TRANSPORTATION UN21-0468BO To get the machine o proceed as outlined below. 1) Remove the ropes that anchor the machine to the transport means from the eyebolts (E), indicated by the special sign. 2) Remove the chocks (D) from the tracks. 3) Start the machine (see “Starting the engine”). -
Page 32: Adjustment Information
ADJUSTMENT INFORMATION Safety advice for the adjustments To protect the people involved, the adjustment operations must be carried out with all safety devices activated and unauthorised people must not be allowed to access the area of operation which must be appropriately marked. Prima di riavviare la macchina controllare che non siano rimasti attrezzi, stracci o al- Before starting the machine, check that there are no tools, cloths or other material near the moving parts or in risk areas. -
Page 33: Adjusting Of "Proximity Device" That Stops The Hammer's Down Stroke
ADJUSTMENT INFORMATION Adjusting of “PROXIMITY device” that stops the hammer’s down stroke The “PROXIMITY device” that stops automatically the hammer’s down stroke is used to drive piles into the ground or make holes in the ground at the same depth dependending on the type of ground. - Page 34 ADJUSTMENT INFORMATION Adjusting the hole depth (For holes made with the boring device and drill) UN21-0527AP Proceed as outlined below. Rotate the selector switch (D) to “OFF” position. Make the hole at the depth required (see the “Procedure to make holes using the bor- ing device”...
-
Page 35: Adjusting The "Laser Device" That Stops The Hammer's Down Stroke
ADJUSTMENT INFORMATION Adjusting the “laser device” that stops the hammer’s down stroke The “laser device” is used to drive piles into the ground or make holes in the ground at the same depth compared to a xed reference (emitter) and automatically stops the descent of the percussion hammer when the preset depth is reached (pile driving or hole depth), independently from the type of ground. - Page 36 ADJUSTMENT INFORMATION Adjusting the hole depth (For holes made with the boring device and drill) UN21-0528AP Proceed as outlined below. Rotate the selector switch (A) to “OFF” position. Make the hole at the depth required (see the “Procedure to make holes using the bor- ing device”...
-
Page 37: Information For Use
INFORMATION FOR USE Safety advice concerning use Do not allow unauthorised persons to work on the machine. The operator must be appropriately trained and informed on the use of the machine; upon rst use of the machine, the operator must perform a range of practice manoeu- vres to acquire familiarity with the controls and main functions. -
Page 38: Dashboard Controls (Base Version)
INFORMATION FOR USE Dashboard controls (base version) The controls of any accessory installed on the machine are described in the use procedures of each single accessory. UN21-0473BO A) Disconnecting switch to isolate the batteries: to disconnect and connect the battery to the electrical system. -
Page 39: Controls To Run The Machine
INFORMATION FOR USE Q) Area without control device. R) Accelerator lever: to change the engine rpm. S) Emergency stop button: to stop the machine in the case of impending risk. T) Signal light (orange): this shows that the pre-heating glow plugs have been activated (for diesel engines). -
Page 40: Operation Controls
INFORMATION FOR USE Operation controls UN21-0529AP A) Pressure gauge: this shows the pressure of the pile driver’s hydraulic circuit. B) Switch: to switch the hydraulic power supply to the hammer or accessory. C) Lever: to tilt the column lengthways in relation to the machine. - Position (1): this activates column tilt to the left. - Page 41 INFORMATION FOR USE G) Lever: to shift the column lengthways. - Position (1): this activates column shifting to the left. - Position (2): this activates column shifting to the right. - When the lever is released, it returns to neutral position (0). - Neutral position (0): this disables longitudinal column travel.
- Page 42 INFORMATION FOR USE Starting the engine NOTICE The electric starting motor must not be used continuously for more than 10 seconds. When trying to start the machine wait one minute between each attempt to allow the electric motor to cool. At each start-up check that the buzzer (Q) is in good working order (continuous sound signal).
- Page 43 INFORMATION FOR USE Keep the key in that position for the heating time necessary (usually 1 minute). Release the key; the signal light will switch o . 5) Turn the ignition key (B) by one click (position “I”). 6) The signal lights (D and E) switch on and the buzzer (Q) sounds. 7) Turn the ignition key (B) one more click to position "B1"...
- Page 44 INFORMATION FOR USE Shifting procedure WARNING Machines in the additional extension version must be equipped with a counter- weight. The operator must control the machine from the ground. Turn (both forwards and backwards) gradually to reduce the wear of the tracks. The controls must be operated gently and smoothly to avoid sudden movements of the machine which could injure the operator or people nearby.
- Page 45 INFORMATION FOR USE Shifting on slopes procedure WARNING Travel only on slopes within the maximum slope limits foreseen by the manufacturer (see “Technical characteristics”). On sloping ground keep the percussion hammer completely lowered to increase ma- chine stability. In the case of long stretches on sloping ground keep the pile driver in resting position (C) to increase machine stability.
-
Page 46: Pile Driving Procedure
INFORMATION FOR USE Pile driving procedure WARNING Only drive the pile into sloping ground within the limits foreseen by the manufac- turer. On sloping ground position the machine with the pile driver as close as possible to the truck to reduce the risk of tipping over. The operator must be positioned as shown in the gure. - Page 47 INFORMATION FOR USE Support the guide (F), release it from the pin (G) and rotate it downwards. Slide in the pin (D) and the peg (C). Lock the guide with the bolts (E). Fit the guide plate (L) and lock it with the pins (M) and the safety split pins (N). Install the matrix (T) on the guide plate (L).
-
Page 48: Procedure For Use Of The Macro Tilt
INFORMATION FOR USE Procedure for use of the macro tilt On steeply sloping ground tilt the pile-driver to place the column in vertical position. To place the column in a vertical position use the level gauge (L). The pile-driver can be longitudinally tilted from the right or left side. UN21-0531AP Proceed as outlined below. -
Page 49: Gripper For Metal Pile Extraction - Instructions For Assembly, Use, And Maintenance
INFORMATION FOR USE Gripper for metal pile extraction - instructions for assembly, use, and maintenance The extraction gripper is designed to extract metal piles from soil and from bituminous concrete. To extract metal piles the extraction clamp must be tted on the hammer. Remove the pile-guide if present. - Page 50 INFORMATION FOR USE NOTICE Before extracting piles, check the area where the bracket (C) comes into contact with the stop plate (V). This contact must be made between smooth, at surfaces. If the stop plate features machining for centring the piles, it may be damaged or bro- ken during extraction work.
-
Page 51: Core Borer - Instructions For Assembly, Use, And Maintenance
INFORMATION FOR USE Core borer - instructions for assembly, use, and maintenance Use the corer tted on the pile driver to make holes in bituminous conglomerates, concrete and reinforced concrete. The corer tool must be cooled with water. WARNING Fit the corer with the machine parked on at and stable ground, the engine o and the percussion hammer at minimum distance from the ground. - Page 52 INFORMATION FOR USE Using the corer UN21-0533AP Y) Control position foreseen for the operator Technical characteristics Maximum operating temperature °C Minimum operating temperature °C Minimum output speed Maximum output speed 1000 Maximum bore diameter Minimum bore diameter High abrasion Very high abrasion Medium hardness, resistance High hardness...
- Page 53 INFORMATION FOR USE To use the corer proceed as outlined below. WARNING Do not lift or lower the percussion hammer when the corer is tted to avoid accidents or damage to the corer. During use, the operator must stand at the side of the percus- sion hammer (see gure).
-
Page 54: Drilling Machine - Instructions For Assembly, Use, And Maintenance
INFORMATION FOR USE Drilling machine - instructions for assembly, use, and maintenance Use the boring device tted on the pile driver to make holes in rocks and unreinforced concrete. The boring device requires compressed air for the percussion of the tool and to remove the dust from the hole. - Page 55 INFORMATION FOR USE RP 200 RP 500 UN21-0534AP Y) Control position foreseen for the operator Start the machine (see “Starting the engine”). Move the lever (R) to lift the percussion hammer and the boring device. 10) Tighten the safety lock pin (E) to avoid the accidental fall of the percussion hammer and prevent injuring the people involved in the operations.
- Page 56 INFORMATION FOR USE Using the boring device UN21-0535AP Y) Control position foreseen for the operator To use the boring device proceed as outlined below. Rotate the lever (U) to by-pass the percussion hydraulic supply from the hammer to the boring device. All machine movements are enabled except for the percussion. Move the lever (R) to lower the tool (H) near the surface to be drilled.
- Page 57 INFORMATION FOR USE 10) Once the required depth has been reached move the lever (V) to the disabled position "V0" to manually stop tool rotation or activate the automatic stop devices (proximity or laser). 11) Deactivate the compressed air. 12) Move the lever (R) to position "R1" to remove the tool from the hole. Counter-rotation of the tool - If the counter-rotation tool is foreseen, move the lever to position "V2"...
- Page 58 INFORMATION FOR USE NOTICE To operate in con guration “A” the pin (E) and the split pin (W) must be removed. Down-The-Hole Hammer Air consumption at 10,5 (DTHH) bar m /min 3” 4” 5” 6” 11,4 UN21-0138EH Refuelling of air lubricating oil The oil used the rst time is of the ISO VG32 type for pneumatic tools, suitable for winter temperatures.
- Page 59 INFORMATION FOR USE Head lubrication (RP200) Proceed as outlined below. 1) Before carrying out any lubrication work, clean the greasing nozzle, to prevent pollution of the lubri- cant. 2) Lubricate via greasing nozzle. Grease type: use PA- KELO BEARING EP2 or equivalent. UN21-0536AP Checking the gear unit oil level (RP500) Proceed as outlined below.
-
Page 60: Drill - Instructions For Assembly, Use, And Maintenance
INFORMATION FOR USE Drill - instructions for assembly, use, and maintenance Holes in the ground, even with modest amounts of small sized solid elements (gravel, crushed stone, etc.) are made with the drill tted on the pile-driver. The drill can be installed either in front or behind the percussion hammer. WARNING Fit the drill with the machine parked on at and stable ground, the engine o and the percussion hammer at the necessary distance from the ground to t the tool. - Page 61 INFORMATION FOR USE Front tting of the drill UN21-0541AP Y) Control position foreseen for the operator For front tting proceed as outlined below. Fit the support (A) and tighten the screws (B) to x it to the percussion hammer. Fit the head (C) of the drill on the support (A). Insert the pin (D) and the lock pin (E).
- Page 62 INFORMATION FOR USE Using the drill UN21-0542AP Y) Control position foreseen for the operator To use the drill proceed as outlined below. Rotate the lever (A) to by-pass the percussion hydraulic supply from the hammer to the drill. All machine movements are enabled except for the percussion. Move the levers (E) and (G) to place the column in vertical position.
- Page 63 INFORMATION FOR USE Tooth replacement Proceed as outlined below. 1) Remove the pin (A). 2) Remove the part (B). 3) Remove the damaged tooth (C). 4) Fit the new tooth. 5) Position the element (B). 6) Insert the plug (A). UN21-0543AP Drill cleaning When cleaning the drill, use non- ammable, non-toxic detergents authorised by legislation...
-
Page 64: Electric Generator - Use And Maintenance Procedures
INFORMATION FOR USE Electric generator - use and maintenance procedures Use of the electric generator WARNING Do not use the electric generator if it is wet, or if it is raining heavily or particularly humid. UN21-0507CO To activate the electric generator proceed as outlined below. 1) Start the machine (see “Starting the engine”). -
Page 65: Blade Raiser - Instructions For Assembly, Use, And Maintenance
INFORMATION FOR USE Blade raiser - instructions for assembly, use, and maintenance This accessory is used to lift up the segments of guardrail (already bolted and laid on the ground). Using the machine's travel motion, the accessory raises the guardrail, positions it in the point of installation and provides the exact location where the pile needs to be driven in. - Page 66 INFORMATION FOR USE Blade raiser removal Proceed as outlined below. 1) Disconnect the ttings (R - S). 2) Separate and remove the individual units working in reverse order to the procedure described for the assembly. Adapting the accessory to the size of the guardrail The accessory is usually supplied in the con guration (1) illustrated in the gure.
- Page 67 INFORMATION FOR USE Use of the blade raiser A) Lever: this is used to activate the ex- tension and retraction of the head on the blade raiser. Use the lever (1) to extend the head and bring the guardrail near the pile. Set the lever in position (2) to retract the head and move the guardrail away from the pile.
-
Page 68: Pointed Bit - Instructions For Assembly, Use, And Maintenance
INFORMATION FOR USE Maintenance of the blade raiser Carry out scheduled maintenance as stated by the manufacturer (see "Sched- uled maintenance charts"). Carry out the operations described. 1) Check the tightness of the main nuts and bolts (see section on scheduled maintenance). - Page 69 INFORMATION FOR USE UN21-0550AP Unscrew the unit (H) and the components (E -F). Remove the components (G) from the component (C). Position the components (G) on the new component (L). Position the stop plate (E). Position the component (F). CAUTION Pay particular attention to the component (F) which could fall and injure the opera- tor.
- Page 70 INFORMATION FOR USE Procedure for drilling holes WARNING Holes may be drilled in sloping ground, subject to the limits set by the manufacturer. On sloping ground position the machine with the pile driver as close as possible to the truck to reduce the risk of tipping over. Carry out the operations described.
-
Page 71: Automatic Verticality System - Instructions For Use
INFORMATION FOR USE 6) Once the required depth has been reached move the lever (R) to position "R0" to stop the percussion or activate the automatic stop devices (Proximity and laser). 7) Use the lever (B) to lift the hammer drill and remove the tool from the hole. 8) Drive the machine to the area where the hole is needed (see section on travel mode). - Page 72 INFORMATION FOR USE UN21-0490BO A) Control panel: to manage the column automatic verticality system. B) Electronic control unit: to check the vertical position of the column by means of soft- ware incorporated in the component. The software can be updated or reinstalled via personal computer connected to the can/usb gateway (1) connector or via the internet (remote assistance).
- Page 73 INFORMATION FOR USE Automatic verticality system operating mode Carry out the operations described. 1) Position the column near the pile to be driven into the ground (see “Pile driving procedure”). 2) Turn the key of the switch (A) to position “I”. One or both the signal lights (B) and (C) may switch on and the illuminated pushbutton (D) will light up.
- Page 74 INFORMATION FOR USE UN21-0554AP A) Two-position permanent-contact switch: this is used to activate and deactivate the hammer drill strokes and the stroke frequency reduction device for the said hammer drill hammer. B) Signal light (green light): this signals the activation and deactivation of the switch (A).
-
Page 75: Magnets - Instructions For Assembly, Use, And Maintenance
INFORMATION FOR USE Magnets - instructions for assembly, use, and maintenance The magnet is used to lift particularly large ferromagnetic piles into the driving position. Fitting the magnet Proceed as outlined below. 1) Position the pile guide (A). 2) Insert the pins (B). 3) Insert the safety lock pins (C). - Page 76 INFORMATION FOR USE 5) Use the lever (S) to lift the pile. NOTICE Use a lever (T) to manoeuvre around the pile guide plate (U). 6) Once the vertical position is reached, place the pile inside the guide (A) manually and insert it into the stop plate.
- Page 77 INFORMATION FOR USE System for measuring the distance between the piles - instructions for as- sembly, use, and maintenance The system for measuring the distance between the piles is used when driving in piles (made of either metal or another material) to keep the same distance between the piles. Assembling the system for measuring the distance between the piles Fit the system based on the direction in which the ma- chine drives.
- Page 78 INFORMATION FOR USE UN21-0559AP Using a tape measure, check the distance between the two piles. If necessary, use the levers (F - G) to position the hammer drill and the pile exactly in the spot where the second pile will be positioned. Drive the second pile into the ground (see "Pile driving procedure").
-
Page 79: Lighting - Instructions For Working At Night Or In Poor Visibility Conditions
INFORMATION FOR USE Removal of the system for measuring the distance between the piles To remove the system for measuring the distance between the piles, carry out the steps in reverse order to the procedure described for the assembly. Maintenance of the system for measuring the distance between the piles Carry out scheduled maintenance as stated by the manufacturer (see "Scheduled mainte- nance charts"). -
Page 80: Long Out-Of-Use Periods
INFORMATION FOR USE Refuelling WARNING Do not ll the fuel tank completely when the machine is exposed to the sun as the fuel may spill out and catch re. NOTICE The fuel must comply with the speci cations provided by the manufacturer of the engine (see the engine manufacturer’s user manual). -
Page 81: Emergency Stop
INFORMATION FOR USE Operational stop UN21-0493BO Proceed as outlined below. Remove any accessories from the machine. Close the machine in the resting position (A). Park the machine on solid and even ground. Use the accelerator lever (B) to reduce to a minimum the rpm. Turn the ignition key (C) to position (0) to switch o the engine. -
Page 82: Maintenance Information
MAINTENANCE INFORMATION Safety advice for maintenance To protect the people involved, maintenance operations must be carried out with all safety devices activated and unauthorised people must not be allowed to access the area of operation which must be appropriately marked. Before starting the machine, check that there are no tools, cloths or other material near the moving parts or in risk areas. - Page 83 MAINTENANCE INFORMATION Scheduled maintenance chart (maintenance engineer) Interval Component Type of work Reference Tracks Tension check See “Track tension check” Every 250 hours of work Hydraulic oil tank Oil level check See “Hydraulic oil level check” Every 500 hours Pile extraction gripper Cleaning of work Greasing...
-
Page 84: Lubrication Diagram
MAINTENANCE INFORMATION Lubrication diagram Lubricate the parts as shown in the illustration. Before lubricating, clean the components concerned and the greasing nipples to prevent contamination of the lubricant. 500 h 200 h 100 h UN21-0495BO PAKELO HAMMER GREASE PAKELO GEAR OIL EP/E PAKELO BEARING EP2 GL-5 SAE 80W/90 PLUS NLGI 2... -
Page 85: Checking And Cleaning The Supplementary Air Filter
MAINTENANCE INFORMATION Nut and bolt check Check that the main xing nuts and bolts are tight. If the bolts are loose tighten them to the prescribed torque (see the “Nuts and bolts tighten- ing torques chart”). Checking and cleaning the supplementary air lter NOTICE Never carry out maintenance operations on the air lter with the engine on to pre- vent dirt and debris suspended in the air from seriously damaging the engine. - Page 86 MAINTENANCE INFORMATION - Primary lter 6) Unscrew the wing nut (F). 7) Remove the cover (G). 8) Unscrew the wing nut (H). 9) Slide out the primary lter (L). If the lter is clogged do not beat it to remove the dust. Do not wash the lter.
-
Page 87: Hose Check
MAINTENANCE INFORMATION Track gearmotor oil level check UN21-0508EO Proceed as outlined below. 1) Stop the machine on at ground with caps (A) and (B) arranged as shown in the gure. 2) Remove the ignition key and store it safely. WARNING Take special care when removing the caps as any excess pressure inside the gear unit may force them outwards. -
Page 88: Hydraulic Oil Level Check
MAINTENANCE INFORMATION Track tension check Proceed as outlined below. 1) Stop the machine on solid and even ground. 2) Switch o the engine and remove the ignition key and keep it in a safe place. 3) Lift the tracks o the ground. 4) Lock the machine lifted from the ground using ap- propriate external means (stands, etc.). -
Page 89: Cleaning And Lubrication Of Hammer Lifting Chain
MAINTENANCE INFORMATION Cleaning and lubrication of hammer lifting chain WARNING The percussion hammer lifting chain is a fundamental safety device therefore it must be maintained e cient through regular maintenance. The lifting chain wears quickly if it is not regularly lubricated. The lubrication frequency shown in the maintenance schedule chart refers to normal use. -
Page 90: Lubricant Comparison Table
MAINTENANCE INFORMATION Lubricant comparison table Hydraulic oil - suitable for room temperature of -20 to +40 °C Brand PAKELO AGIP MOBIL SHELL HYDRAULIC EP HYDRUS OIL SHELL Type ENI-ARNICA 46 DTE 10 EXCELL ISO 46 HI 46 TELLUS S2 V 46 Track gearmotor oil Brand PAKELO... -
Page 91: Breakdown Information
BREAKDOWN INFORMATION Safety advice in case of faults Repairs that require speci c technical competence or special skills must be carried out only by an authorised service centre. Fault Likely cause Solution Reference Hammer percussion is not Cold oil Repeat machine movements regular several times to heat the oil Recharge... -
Page 92: Information Concerning Replacements
INFORMATION CONCERNING REPLACEMENTS Safety advice in case of replacements To protect the people involved, the replacement of parts must be carried out with the machine cut-o from any power source and unauthorised people must not be al- lowed to access the area of operation which must be appropriately marked. Replace worn components with original spare parts. -
Page 93: Replacing Supplementary Air Filter Cartridges
INFORMATION CONCERNING REPLACEMENTS Replacing the delivery line lter cartridge (high pressure) CAUTION The lter cartridge must be replaced with the hydraulic system depressurised. Replace the lter cartridge when the signal (L) lights up and remains constantly switched on for a few minutes. Proceed as outlined below. -
Page 94: Replacing Hosing
INFORMATION CONCERNING REPLACEMENTS Proceed as outlined below. 1) Unscrew the wing nut (F). 2) Remove the cover (G). 3) Unscrew the wing nut (H). 4) Slide out the primary lter (L). 5) Unscrew the wing nut (M). 6) Slide out the secondary lter (N). Fit the new lter cartridges following the removal sequence in reverse order. -
Page 95: Replacing The Chain
INFORMATION CONCERNING REPLACEMENTS Replacing the chain WARNING The percussion hammer lifting chain is a fundamental safety device therefore it must always be intact otherwise it must be replaced. Check the percussion hammer lifting chain very carefully. If the chain is damaged, worn, corroded, etc., it must be replaced immediately. When replacing the chain replace the connection link and the xing pins that connect the chain to the anchorage blocks. - Page 96 INFORMATION CONCERNING REPLACEMENTS 4) Gently move the lever (D) and carefully lift the percussion hammer. The components (C, E, F) will remain on the resting surface. CAUTION Pay particular attention to the component (F) which could fall and injure the opera- tor.
-
Page 97: A Enclosures
ENCLOSURES Material Safety Data Sheet Preparation and company identification Identification of the preparation 0036 PAKELO HYDRAULIC EP ISO 46 Preparation use Hydraulic oil. Company PAKELO MOTOR OIL srl Via Fontanelle - 37047 S. Bonifacio (Verona) -Italy- (Tel.+39 045-6101643) Emergency telephone +39 045 6101643 (Mon - Fri 8 - 12 / 14 - 18) Urgently seek medical assistance. - Page 98 ENCLOSURES Material Safety Data Sheet First aid measures Inhalation In case of exposure to high concentration of vapours or fogs move the person from contaminated area to well ventilated place. Seek medical assistance if necessary. If you suspect inhalation, urgently go to hospital. Contact with the skin Remove contaminated clothes and wash with plenty of water.
- Page 99 ENCLOSURES Material Safety Data Sheet Exposure controls / personal protection Exposure borderline values TLV - TWA (1) TLV - STEL (2) mg/m mg/m lubricating oils (petroleum), C 2 4 - 5 0 , s o l v e n t - e x t d . , dewaxed, hydrogenated (1) Long exposure limits (2) Short exposure limits...
- Page 100 ENCLOSURES Material Safety Data Sheet 12 - Ecological information Mobility The product keeps afloat. Degradability Not determined. Accumulation Not determined. Ecotoxicity In compliance with EEC Regulations the product is not regarded as hazardous to the environment. Ecotoxicity Test LC50 acute for freshwater fish: 100 - 1000 mg/L. EC50 acute for freshwater invertebrates: 100 - 1000 mg/L.
- Page 101 ENCLOSURES English language Use and maintenance...
- Page 102 ENCLOSURES Material Safety Data Sheet Preparation and company identification Identification of the preparation 0088 PAKELO BEARING EP 2 Preparation use Lubricating grease. Company PAKELO MOTOR OIL srl Via Fontanelle - 37047 S. Bonifacio (Verona) -Italy- (Tel.+39 045-6101643) Emergency telephone +39 045 6101643 (Mon - Fri 8 - 12 / 14 - 18) Urgently seek medical assistance.
- Page 103 ENCLOSURES Material Safety Data Sheet Fire-fighting measures Fire-fighting equipment Extinguish flames with foam, dry chemicals, CO2. Inappropriate extinguishers Do not use direct water jets. Use water jets just to cool down surfaces exposed to fire. Specific dangers in case of Avoid breathing combustion fumes that, in case of fire, can form carbon monoxide, exposition to the chemicals, carbon dioxide, oxid of sulphur, phosphorus and unburnt hydrocarbon compounds...
- Page 104 ENCLOSURES Material Safety Data Sheet Exposure control Avoid the formation of hazes or aerosol and use engineering controls, ventilation or localized aspiration if necessary. Breathing equipment Not necessary under normal working conditions. Keep oil hazes within the TLV-TWA limit of 5 mg/m3. (A.C.G.I.H. 2000). Use masks with filters for organic vapours in case of exposure superior to the fixed limits.
- Page 105 ENCLOSURES Material Safety Data Sheet Transport name PAKELO BEARING EP 2 15 - Regulatory information Reference Laws This Safety Data Sheet complies with the Regulation n.453/2010. Regulation (CE) n.1907/2006 (REACH); Regulation (CE) n.1272/2008 (GHS/CLP); I ATP n.790/2009; II ATP n.86/2011; III ATP n.618/2012; IV ATP n.487/2013. Refer also to local laws.
- Page 106 ENCLOSURES Material Safety Data Sheet Preparation and company identification Identification of the preparation 0282 PAKELO GOLDEN DIESEL HP/A SAE 15W/40 Preparation use Engine oil. Company PAKELO MOTOR OIL srl Via Fontanelle - 37047 S. Bonifacio (Verona) -Italy- (Tel.+39 045-6101643) Emergency telephone +39 045 6101643 (Mon - Fri 8 - 12 / 14 - 18) Urgently seek medical assistance.
- Page 107 ENCLOSURES Material Safety Data Sheet First aid measures Inhalation In case of exposure to high concentration of vapours or fogs move the person from contaminated area to well ventilated place. Seek medical assistance if necessary. If you suspect inhalation, urgently go to hospital. Contact with the skin Remove contaminated clothes and wash with soap and plenty of water.
- Page 108 ENCLOSURES Material Safety Data Sheet Exposure controls / personal protection Exposure borderline values TLV - TWA (1) TLV - STEL (2) mg/m mg/m lubricating oils (petroleum), C 2 4 - 5 0 , s o l v e n t - e x t d . , dewaxed, hydrogenated (1) Long exposure limits (2) Short exposure limits...
- Page 109 ENCLOSURES Material Safety Data Sheet 12 - Ecological information Mobility The product keeps afloat. Degradability Not determined. Accumulation Not determined. Ecotoxicity In compliance with EEC Regulations the product is not regarded as hazardous to the environment. 13 - Disposal considerations General information Do not dispel the environment.
- Page 110 ENCLOSURES Material Safety Data Sheet Preparation and company identification Identification of the preparation 4026 PAKELO GEAR OIL EP/E GL-5 SAE 80W/90 Preparation use Lubricant for transmissions and differentials. Company PAKELO MOTOR OIL srl Via Fontanelle - 37047 S. Bonifacio (Verona) -Italy- (Tel.+39 045-6101643) Emergency telephone +39 045 6101643 (Mon - Fri 8 - 12 / 14 - 18)
- Page 111 ENCLOSURES Material Safety Data Sheet Composition / Information on ingredients Ingredients composition No. 1272/2008/CE Residual oil (crude oil) refine with solvent <= 56.00 01-2119488707-21 No. EU: 265-101-6 No. CAS: 64742-01-4 lubricating oils (petroleum), C24-50, solvent-extd., dewaxed, hydrogenated <= 37.50 01-2119489969-06-XXXX No.
- Page 112 ENCLOSURES Material Safety Data Sheet Accidental release measures Person - related safety Wear gloves and protective glasses. In case of spillage of considerable quantities precautions into bordering place, avoid to breathe exhalations; air the environment or wear protective breathing apparatus. Remove any possible ignition sources. Environmental precautions The product contains substances harmful to the aquatic environment.
- Page 113 ENCLOSURES Material Safety Data Sheet Physical and chemical properties Physical status : Liquid Colour : Dark amber Odour : Typical pH : Not applicable Water Solubility : Insoluble Density at 15°Ckg/l : 0,899 Kinematic Viscosity at 40°CcSt : Flash Point (C.O.C.) : >200 Pour Point : 10 -...
- Page 114 ENCLOSURES Material Safety Data Sheet Regulation (CE) n.1907/2006 (REACH); Regulation (CE) n.1272/2008 (GHS/CLP); I ATP n.790/2009; II ATP n.86/2011; III ATP n.618/2012; IV ATP n.487/2013. Refer also to local laws. 16 - Other information Relevant H phrases H226 Flammable liquid and vapour. H302 Harmful if swallowed.
- Page 115 ENCLOSURES Material Safety Data Sheet Preparation and company identification Identification of the preparation 4292 PAKELO GOLDENSTAR LA 77-51 SAE 5W/30 Preparation use Engine oil. Company PAKELO MOTOR OIL srl Via Fontanelle - 37047 S. Bonifacio (Verona) -Italy- (Tel.+39 045-6101643) Emergency telephone +39 045 6101643 (Mon - Fri 8 - 12 / 14 - 18) Urgently seek medical assistance.
- Page 116 ENCLOSURES Material Safety Data Sheet Fire-fighting measures Fire-fighting equipment Extinguish flames with foam, dry chemicals, CO2. Inappropriate extinguishers Do not use direct water jets. Use water jets just to cool down surfaces exposed to fire. Specific dangers in case of Avoid breathing combustion fumes that, in case of fire, can form carbon monoxide, exposition to the chemicals, carbon dioxide, oxid of sulphur, phosphorus and unburnt hydrocarbon compounds...
- Page 117 ENCLOSURES Material Safety Data Sheet Exposure control Avoid the formation of hazes or aerosol and use engineering controls, ventilation or localized aspiration if necessary. Breathing equipment Not necessary under normal working conditions. Keep oil hazes within the TLV-TWA limit of 5 mg/m3. (A.C.G.I.H. 2000). Use masks with filters for organic vapours in case of exposure superior to the fixed limits.
- Page 118 ENCLOSURES Material Safety Data Sheet Transport name PAKELO GOLDENSTAR LA 77-51 SAE 5W/30 15 - Regulatory information Reference Laws This Safety Data Sheet complies with the Regulation n.453/2010. Regulation (CE) n.1907/2006 (REACH); Regulation (CE) n.1272/2008 (GHS/CLP); I ATP n.790/2009; II ATP n.86/2011; III ATP n.618/2012; IV ATP n.487/2013. Refer also to local laws.
- Page 119 ENCLOSURES Material Safety Data Sheet Preparation and company identification Identification of the preparation4226 PAKELO HAMMER GREASE PLUS Preparation use Lubricating grease. Company PAKELO MOTOR OIL srl Via Fontanelle - 37047 S. Bonifacio (Verona) -Italy- (Tel.+39 045-6101643) Emergency telephone +39 045 6101643 (Mon - Fri 8 - 12 / 14 - 18) Urgently seek medical assistance.
- Page 120 ENCLOSURES Material Safety Data Sheet First aid measures Inhalation In case of exposure to high concentration of vapours or mist, move into fresh air. Seek medical attention if necessary. If you suspect that there has been inhalation, urgently go to hospital with the patient. Contact with the skin Undress the person who has come in contact with the chemical.
- Page 121 ENCLOSURES Material Safety Data Sheet Exposure controls / personal protection Exposure borderline values TLV - TWA (1) TLV - STEL (2) mg/m mg/m Residual oil (crude oil) refine with solvent Distillate (petroleum) hydrotreated heavy naphthenic (1) Long exposure limits (2) Short exposure limits Exposure control Avoid the formation of hazes or aerosol and use engineering controls, ventilation or localized aspiration if necessary.
- Page 122 ENCLOSURES Material Safety Data Sheet 12 - Ecological information Mobility The product keeps afloat. Degradability Not determined. Accumulation Not determined. Ecotoxicity In compliance with EEC Regulations the product is not regarded as hazardous to the environment. 13 - Disposal considerations General information Do not dispel the environment.
- Page 123 ENCLOSURES English language Use and maintenance...
- Page 124 ENCLOSURES English language Use and maintenance...
- Page 125 ENCLOSURES English language Use and maintenance...
- Page 126 ENCLOSURES English language Use and maintenance...
- Page 127 ENCLOSURES English language Use and maintenance...
- Page 128 ENCLOSURES English language Use and maintenance...
- Page 129 ENCLOSURES English language Use and maintenance...
- Page 130 ENCLOSURES English language Use and maintenance...
- Page 131 ENCLOSURES English language Use and maintenance...
- Page 132 ENCLOSURES English language Use and maintenance...
-
Page 133: Maintenance Register
ENCLOSURES Maintenance register This register is made up of di erent maintenance operation sheets; ll out the sheets after each periodic ordinary and extraordinary maintenance carried out on the machine. When the sheets have nished, photocopy one or more pages of the register and keep them together with this manual, to record future maintenance operations. - Page 134 ENCLOSURES Maintenance sheets after 300 hours of work Date of operation Description of operation ______/_______/_____ Stamp of the authorised service centre Signature of the technician Maintenance sheets after 400 hours of work Date of operation Description of operation ______/_______/_____ Stamp of the authorised service centre Signature of the technician Maintenance sheets after 500 hours of work...
- Page 135 ENCLOSURES Maintenance sheets after 700 hours of work Date of operation Description of operation ______/_______/_____ Stamp of the authorised service centre Signature of the technician Maintenance sheets after 750 hours of work Date of operation Description of operation ______/_______/_____ Stamp of the authorised service centre Signature of the technician Maintenance sheets after 800 hours of work...
- Page 136 ENCLOSURES Maintenance sheets after 1000 hours of work Date of operation Description of operation ______/_______/_____ Stamp of the authorised service centre Signature of the technician Maintenance sheets after 1100 hours of work Date of operation Description of operation ______/_______/_____ Stamp of the authorised service centre Signature of the technician Maintenance sheets after 1200 hours of work...
- Page 137 ENCLOSURES Maintenance sheets after 1300 hours of work Date of operation Description of operation ______/_______/_____ Stamp of the authorised service centre Signature of the technician Maintenance sheets after 1400 hours of work Date of operation Description of operation ______/_______/_____ Stamp of the authorised service centre Signature of the technician Maintenance sheets after 1500 hours of work...
- Page 138 ENCLOSURES Maintenance sheets after 1700 hours of work Date of operation Descrizione intervento ______/_______/_____ Stamp of the authorised service centre Signature of the technician Maintenance sheets after 1750 hours of work Date of operation Descrizione intervento ______/_______/_____ Stamp of the authorised service centre Signature of the technician Maintenance sheets after 1800 hours of work...
- Page 139 ENCLOSURES Maintenance sheets after 2000 hours of work Date of operation Description of operation ______/_______/_____ Stamp of the authorised service centre Signature of the technician English language Use and maintenance...
Need help?
Do you have a question about the HD Series and is the answer not in the manual?
Questions and answers