Advertisement
Table of Contents
®
IoTKey
- Quick Start Guide
Please refer the below numbers to equivalent images on page 2.
®
IoTKey
Gateway
1. Plug in the antennas at the gateway device's rear panel as shown in the picture: two mobile data
antennas to the upper corners (CELL/AUX) and one LoRa antenna to the lower connector (RF/AP2).
2. Insert the mobile data SIM card, if needed. Depending on your order, the SIM card can already be in
place, or you can add it yourself later. The SIM card slot is located at the front of the device, under the
name plate. The SIM card should be a mobile data (3G/4G) card, size Mini (the largest size).
3. Connect the gateway power supply cable to the rear panel connector (- +). The device starts up
immediately after getting power, and will be ready for use within a few minutes, depending on the set
measurement interval.
®
IoTKey
Transmitter
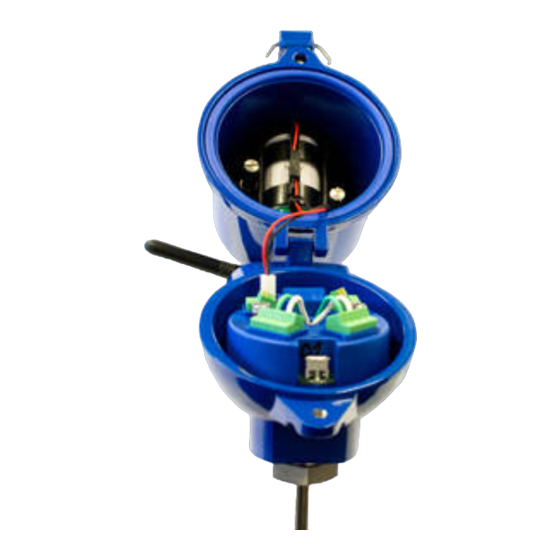
4. Connect the antenna, if delivered disconnected. Carefully screw in the nut to the transmitters SMA
connector.
5. a) Enclosure types D/W/H and Bocube: Open the enclosure for powering the transmitter. Either
connect external voltage to connector (Supply) or ensure that the battery is correctly inserted in the
battery holder; positive pole of the battery is at the end of red wire.
b) Enclosure type ATEX XD: Do not open the enclosure when potentially explosive gas/dust mix is
present! Otherwise, follow the instructions given above, see list item 5. a).
6. a) Enclosure types D/W/H and Bocube: When delivered, the transmitter battery cable is
disconnected to extend the battery lifetime. Connect the battery cable (red and black wire, white
connector) to the transmitter's 2-pin connector (Battery).
b) Enclosure type ATEX XD: When delivered, the transmitter fuse is disconnected to extend the
battery lifetime. The fuse is inside the transmitter enclosure. Attach the fuse and place the cover plate
on top.
If the transmitter is subsequently not used for an extended period, it is advised to disconnect
the battery cable / fuse to extend the battery lifetime.
7. After the transmitter is powered, it starts connecting with the gateway according to configurations. It
may take a few minutes for the transmitters to connect, but once the connection is ready, the
measurement data is sent automatically.
8. The ordered sensors are pre-installed in the applicable connectors (S1/S2/AUX) of the transmitter.
®
IoTKey
Portal
9.
The contact person named in the order, has been granted a user ID (email address) to IoTKey® Portal,
the cloud-based service for data monitoring. Please follow the link sent to the email address given in
the order, to create your password. When logging in for the first time, you will be asked to read and
accept the licence agreement. After your first login, please go directly to https://iotkey.lappautomaatio.fi
and click on the login link at the upper right corner of the browser window. Fill in your user ID and
password, and follow the instructions given in the "USER MANUAL IoTKey® Portal – cloud-based
service web UI".
Lapp Automaatio Oy
Martinkyläntie 52
FI-01720 Vantaa
Email: info.automaatio@lappgroup.com
Tekninen myynti/Technical sales:
P: +358 (0)20 764 6410
Avoimet tilaukset/Open orders:
P: +358 (0)20 764 6420
Kotipaikka/Domicile
Lapp Automaatio on osa LAPP Groupia
Vantaa
A Lapp Group Company
Y-tunnus: 1107293-1
Lapp Insulator ei ole osa LAPP Groupia
VAT: FI11072931
Lapp Insulator is not affiliated
with the LAPP Group
EN-2020-01-21
Advertisement
Table of Contents

Subscribe to Our Youtube Channel
Summary of Contents for Lapp Automaatio IoTKey
- Page 1 IoTKey Portal The contact person named in the order, has been granted a user ID (email address) to IoTKey® Portal, the cloud-based service for data monitoring. Please follow the link sent to the email address given in the order, to create your password. When logging in for the first time, you will be asked to read and accept the licence agreement.
- Page 2 ® IoTKey Gateway Power Ethernet LoRa 4G SIM ® IoTKey Transmitter Fuse Battery Supply ® IoTKey Portal IoTKey® Quick Start Guide – EN-2020-01-21 Page 2 / 2...
Need help?
Do you have a question about the IoTKey and is the answer not in the manual?
Questions and answers