Advertisement
001
A risk assessment must be carried out to ensure that the correct size and style of sling has been met before use.
1.
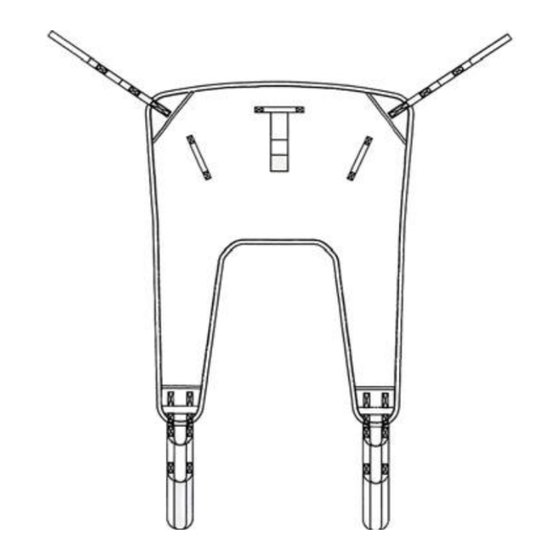
Ensuring that the sling label is facing out wards, glide the body of the sling down the back of the client, just past
the base of the spine.
2.
Take left leg section of the sling and glide under the clients left thigh and back up between their legs ensuring that
the fabric is not twisted. Repeat for the right leg section. Feed one leg tape through the other closest to sling to
prevent the clients legs from abducting during transfer.
3.
Head support fitting (if applicable).
a. Roll head support to desired position.
Feed head support straps through the shoulder straps and back through the slider, adjusting the position
via the slider.
b. The Arched head support is self-supportive.
Under no circumstances should the head support tapes be attached directly to the spreader bar of the hoist.
Doing so may cause tearing to the sling and compromise the safety of the client.
4.
Attach each of the shoulder tapes onto the spreader bar of the hoist ensuring that the corresponding coloured
loops are used on each side. Attach each of the leg section tapes to the spreader bar of the hoist, again ensuring
that corresponding coloured loops are used on either side.
5.
Slings fitted with additional intermediate straps (Hip Tapes)
If the hoist is fitted with a 3-claw cradle fitting, place the loop of the additional strap over the centre claw. If the
hoist has a 2-claw fitting, place the loop of the additional strap over the same claw as the leg loops.
6.
Once you are happy that all tapes are correctly & securely attached to the spreader bar of the hoist, the transfer
can commence.
Do not attempt to lift your client until you are satisfied that the four/six tape fixings are securely attached to the
spreader bar and you are happy that the sling is the correct size and fit for your client.
Whilst every attempt is made to instruct a safe move you must conform to the current Moving and Handling
regulations/procedures. If in any doubt, consult your Moving & Handling Advisor.
Reference: Silvalea Ltd - Sling Fitting Instructions
Fastfit Sling
Code/s: 001, 001HS, 002, 002HS, 1PL, 1PLHS, 2PL & 2PLHS
Revision: July 2009
Copyright & Design Rights: Pauline Guilfoyle 1999
Standard Sling Range
Fastfit Sling
(Replacement)
Instructions for use
1PL
Poly
Mesh
001HS
Certificate No. FM 35946
Advertisement
Table of Contents

Subscribe to Our Youtube Channel
Related Manuals for Silvalea Standard Sling Series


Summary of Contents for Silvalea Standard Sling Series
- Page 1 Whilst every attempt is made to instruct a safe move you must conform to the current Moving and Handling regulations/procedures. If in any doubt, consult your Moving & Handling Advisor. Reference: Silvalea Ltd - Sling Fitting Instructions Fastfit Sling Code/s: 001, 001HS, 002, 002HS, 1PL, 1PLHS, 2PL & 2PLHS Revision: July 2009 Copyright &...
- Page 2 • Metal fixings are sometimes used in our products. Silvalea Ltd use Stainless Steel fixings which therefore will not rust when washed. Care should be taken to ensure that all products containing metal attachments are washed in a pillowcase or wash bag to prevent damage to the product or to washing equipment.
Need help?
Do you have a question about the Standard Sling Series and is the answer not in the manual?
Questions and answers