Advertisement
Table of Contents
- 1 Table of Contents
- 2 Key Features
- 3 Registering Your MODE Device
- 4 MODE PCB Layout and Connectors
- 5 Saturn Install Instructions
- 6 Dreamcast Install Instructions
- 7 Setting up Your Storage Device
- 8 MODE Menu and Interface
- 9 Multi Disc Games
- 10 Updating the Firmware
- 11 Limitations and Frequently Asked Questions
- Download this manual
Advertisement
Table of Contents

Summary of Contents for MODE Terraonion
- Page 1 SET UP & INSTRUCTION MANUAL SET UP & INSTRUCTION MANUAL REV. 0.2 REV. 0.4 1 - MODE SET UP & INSTRUCTION MANUAL...
- Page 2 This Installation Guide is a work in progress, an advanced revision is forthcoming. Please visit our Discord channel for further assistance: https://discord.gg/JexuJVW if you have any questions or concerns.
-
Page 3: Table Of Contents
MODE is an Optical Disc Emulator for both the Sega Saturn and Dreamcast consoles. Contents 4 - Key Features 23 - Setting up your Storage Device 5 - Registering your MODE device 24 - MODE Menu and Interface 6 - MODE PCB Layout and Connectors... -
Page 4: Key Features
Key Features • Supports both 20 and 21 pin Sega Saturn models • Supports VA0 and VA1 Dreamcast models (VA2 not supported) • Auto region patching (loads games from different regions without patching games) • Auto detects the console that it’s plugged into. No jumpers to configure •... -
Page 5: Registering Your Mode Device
Downloads section You can find the serial number one of two ways: • On the MODE PCB itself there is a box that says serial and it will have a printed serial number label. • Or if you power on your console and at the MODE menu press the X button (on Dreamcast) or press C button (on Saturn) to bring up the Options menu. -
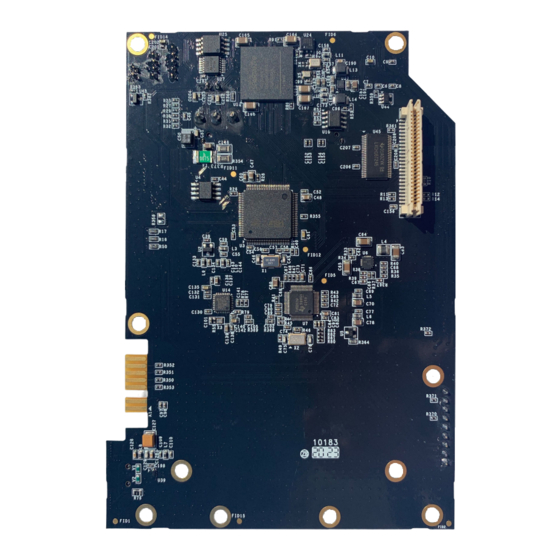
Page 6: Mode Pcb Layout And Connectors
MODE PCB Layout and Connectors / Top of MODE PCB Saturn 21 PIN Power Connector Saturn 20 PIN Power Connector External Power Connector Saturn 20 PIN Tray Connector (For some Saturn 21 pin models. See Below) MicroSD Slot External Power Connector Switch... - Page 7 MODE PCB Layout and Connectors / Bottom MODE PCB Dreamcast Connector...
-
Page 8: Saturn Install Instructions
Saturn Install Instructions... - Page 9 • 2 SATA drive screws to hold down a hard disk or SSD • 4 adhesive feet to secure MODE to the console (enough for 1 console) • 1 Optional Sega Saturn power cable (Only needed in case your console requires it. See below) If at any point in these instructions you have questions about the install please contact support@terraonion.com...
- Page 10 General Saturn Install Instructions • Start by removing the rear battery/expansion cover door. • Flip over your Sega Saturn console and remove the 5 screws holding the top to the bottom case. • Lift off the top cover. If your Saturn has the power supply in the lid please disconnect the wiring from the connected wiring from the CD Assembly.
- Page 11 General Saturn Install Instructions • On the rear of the console, remove the 2 black screws securing the power supply in place. • Remove the power supply by unplugging the white connector in the rear, remove any screws from the power supply board, and gently pull upwards.
- Page 12 Removing the metal shielding is required because the plastic standoffs that the optical drive sat on block the MODE PCB from being installed and the standoffs are screwed from the underside. Please note the Saturn with the PSU in the lid does not need the metal shielding removed as the pegs can be removed from the top.
- Page 13 General Saturn Install Instructions • Flip the metal plate over and remove the screws securing the posts. • You can safely set aside both the posts and screws as they will no longer be needed.
- Page 14 • Reinstall the metal plate, controller port data ribbon, and secure it with the original 8 screws. • Insert the four sticky feet into the MODE PCB screw holes. Then remove the film from the bottom of the sticky feet and install MODE onto the metal plate.
- Page 15 • Insert the CD-ROM power/tray cables. Please only plug connectors with the same pin number into the corresponding MODE connection. 2-pin connectors must only go in the 2-pin connection and so-on. If you have two connecters (2-pin and 4-pin) plug the ribbon cable into the 20-pin connection. If you have a single 5-pin power/tray connector plug the ribbon cable into the 21-pin connection (as shown to right).
- Page 16 Optional External Power Cable We have included with your MODE a power cable that can be used on all Saturn models (with the exception of the earliest Saturn with the PSU in the lid) to provide additional power to the MODE.
- Page 17 • If you are using the optional power cable move the switch position to external power on the MODE PCB. By default it is set to internal power. All original connectors must still be plu- gged into MODE even when using external power.
-
Page 18: Dreamcast Install Instructions
Dreamcast Install Instructions... - Page 19 General Dreamcast Install Instructions • Remove Modem or BBA adapter. • Remove four screws from each corner of the underside of the Dreamcast. Flip the Dreamcast over and remove the lid.
- Page 20 • Remove the 2 screws holding it in place and gently lift the PSU out. • Remove screws (3) holding down GD-ROM assembly. • Remove GD-ROM assembly. Please note that if your Dreamcast has a ribbon cable coming off of the GD-ROM assembly you likely have a VA2 Dreamcast and MODE is not compatible.
- Page 21 • You should now see a beige connector underneath where your GD-Rom assembly was located. MODE attaches to this point. • Insert the four sticky feet into the MODE PCB screw holes. Then remove the film from the bottom of the sticky feet and install MODE onto the metal plate.
- Page 22 General Dreamcast Install Instructions • Remove the film from the bottom of the sticky feet and install MODE onto the metal plate. • Reinstall the PSU. • Close up the Dreamcast if you are not planning to perform advanced installations (noted further down in this guide).
-
Page 23: Setting Up Your Storage Device
Example: You can have a 2 terabyte hard disk with both Saturn and Dreamcast folders full of their respective console’s games and they will work indepen- dently of each other. MODE will only display the contents of the folder that matches up with the console that it’s installed in. Saturn games will not show up on the Dreamcast and vice versa. -
Page 24: Mode Menu And Interface
We will detail those shortly when going into the options menu. By default MODE ships in the list view interface which is a simple list of your games with no additional artwork. This is a minimalist view with no frills. - Page 25 “On” may improve compatibility with games in exchange for slower loading. Starting Video Mode (Saturn Only) - NTSC or PAL. Sets the video output to either PAL or NTSC at boot. (Requires the optional Region wire to be connected to MODE as per the Advanced Installation details.)
- Page 26 Reset Output Signal - Disabled or Pulse on BTM. When enabled, the reset output signal makes the SYS_RESET signal pulse low when trying to go to the menu by holding the SW2 button for a few seconds. So if wired you can make MODE reset the console and go to the menu. At the same time, this wire can be used to monitor the reset button in Saturn for the previous option.
- Page 27 Place this file on the root of one of your storage devices. Power your console back up and enter the options menu and change the Game List Mode option from List to Covers. Once back to the menu, press and hold down the A button until a contextual...
- Page 28 MODE Menu and Interface - Advanced Cover Art Menu At this point MODE will scan for the database and populate all of the artwork and game information into the Covers menu. This only needs to happen once unless you add more games to your storage devices and/or download an updated database file. Database scan can take several minutes, depending on the amount of games in your device, so be patient.
-
Page 29: Multi Disc Games
1. You can place all games image files in one folder and MODE will intelligently queue them up together during game play. 2. Or you can leave multi disc games in separate folders and on the MODE menu, press and hold the A button to bring up the contextual menu. -
Page 30: Updating The Firmware
To update the Firmware on MODE, you must first register your device. After registering it head to the Downloads section and download the most recent firmware. It will be a file that ends in UPD. Depending on what storage devices you use, the firmware update is slightly different. -
Page 31: Limitations And Frequently Asked Questions
Question: Can I copy games from the microSD card to the USB or SATA while inside MODE? Answer: MODE currently does not have a way to transfer data from SD Card to USB or SATA and vice versa. Question: The advanced cover art menu system on the Sega Saturn is slow. Why is that? Answer: This is due to limitations with the Sega Saturn CD bus. - Page 32 Question: Does MODE need to have the 12v regulator removed for Dreamcast? Answer: No. MODE was designed to load the 12v rail properly. If your 12v regulator is removed, it will cause no issues. If your 12v regulator is still installed it will similarly not cause issues.
Need help?
Do you have a question about the Terraonion and is the answer not in the manual?
Questions and answers
What do error codes 3 and ****mean?