Table of Contents
Advertisement
Quick Links
1. Setting up .................................................................................................................................... 1
1.1 Free Standing ........................................................................................................................ 1
1.2 With base stand .................................................................................................................... 1
1.3 With wall bracket .................................................................................................................. 2
2. Connecting to the Seesharp ePoster ............................................................................................ 2
2.1 Connect with USB cable ......................................................................................................... 2
2.2 Connect through the Built-in WiFi Access Point ..................................................................... 2
2.3 Connect through WiFi Router ................................................................................................ 3
2.4 Connect through Ethernet ..................................................................................................... 3
3. Software Instructions .................................................................................................................. 3
3.1 Windows Software ................................................................................................................ 3
3.2 iPhone App ......................................................................................................................... 10
4 Specification .............................................................................................................................. 12
5.Trouble Shooting........................................................................................................................13
Seesharp ePoster User's Manual
Table of Content
Advertisement
Table of Contents

Summary of Contents for Seesharp ePoster SEP560-1.9
-
Page 1: Table Of Contents
1.1 Free Standing ........................1 1.2 With base stand ........................1 1.3 With wall bracket ........................2 2. Connecting to the Seesharp ePoster .................... 2 2.1 Connect with USB cable ......................2 2.2 Connect through the Built-in WiFi Access Point ..............2 2.3 Connect through WiFi Router .................... -
Page 2: Setting Up
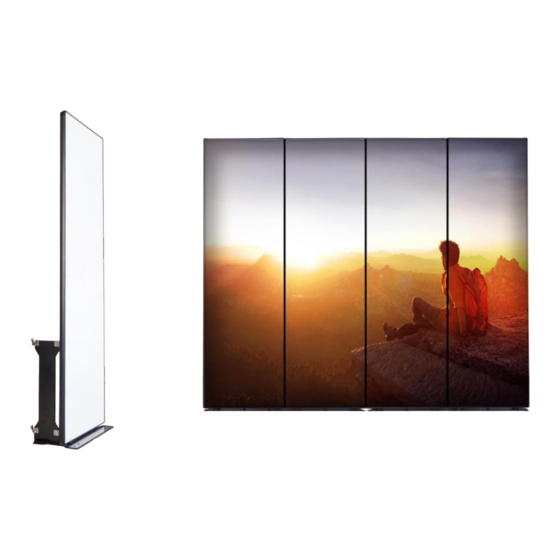
1. Setting up 1.1 Free Standing Place the device on a flat floor, fully Pull out the kick stand 1.2 With base stand Assemble the side plates onto the base plates with the screws provided. Assemble the tool-less bolts onto the ePoster. Single-side installation position Double-side installation position See Sharp Visual Inc... -
Page 3: With Wall Bracket
2.2 Connect through the Built-in WiFi Access Point The Seesharp ePoster has built-in WiFi and it’s turned on by default. In this mode, the Seesharp ePoster works as a Wireless router, computers or smart phones can be connected to it through this WiFi. -
Page 4: Connect Through Wifi Router
3.1 Windows Software Download the software from www.seesharpvisual.com, and open the software. Connect the ePoster with USB Type A - Type B cable or through other connection method. The connected Seesharp ePosters will show up in the Devices list. 3.1.1 Menu Introduction 3.1.1.1 Device, Device menu includes 3 functions... - Page 5 3.1.1.2 Program , 3.1.1.2.1 Program management will lead to the programs window, with options to select previously uploaded program, add new program, or import program. 3.1.1.2.1.1 Select a program from the programs list to upload content to the ePoster. Right click on the program to edit, delete, export the program, or export the program to USB Drive.
- Page 6 3.1.1.2.1.3 Add New. Name the program, then select target device from the dropdown list. Target devices are the ePoster models. Once target device is selected, its resolution will be shown in the Width (xxx) Height(xxx) section. By default, the content will be applied to 1 ePoster.
- Page 7 WIFI Hotspot, each ePoster has a built in WIFI hotspot which can be used as a WIFI access point for other ePosters. SSID is the serial number of the ePoster that is functioning as a hotspot for other ePosters. Password is 123456789 by default. Password can be changed or might have been changed under “network settings.”...
- Page 8 3.1.3.4 Resolution The device’s resolution 3.1.4 Brightness Display and change the device’s brightness, the range is 0-100% To change the brightness, drag the slider and move to the new position, the new brightness will take effect when you release the mouse button. 3.1.5 Input Source Input Source controls the media content displayed on the device...
- Page 9 To create a new program, click “Add New” button, a “New Program” window will popup Name the program. Default program name will be “Program 1/2/3..”, then select target device from the dropdown list. Target device should be the ePoster model. Once target device is selected, its resolution will be shown in the Width (xxx) Height(xxx) section.
- Page 10 “Save”: to save the program in the software on this computer, the program will go into the program list here. You could select this program to upload to the ePoster later when needed. Select the program and right click, a context menu will popup Select Delete to delete the program.
- Page 11 SSID is set to be the serial number by default. SSID can be changed here. Password is set to be 123456789 by default. Password can be changed here. Channel, Channel selection ranges from 1 to 11. 3.1.6.4.2 WIFI. SSID is the target WIFI router number. Password is the target WIFI router password 3.1.6.4.3 Local Area Network Automatically Obtain IP Address, when ePoster is connected by ethernet, the IP address can be Automatically obtained.
- Page 12 3.1.7.1.2 Content Offset is used to shift the content displayed on the ePoster when the content is larger than the ePoster. The starting point (0,0) is at the left top point. The grey block presents the complete picture, by dragging and moving the grey block, the picture will be shifted on the device.
-
Page 13: Iphone App
(see 3.1.6 network setting for ways to connect), the devices will be listed on the front page of the Seesharp ePoster app. Click on the device, the device control page will show up. 3.2.1 General. General information of the device 3.2.1.1 Name, name of the device. - Page 14 3.2.2.1.1.1 Click “+” to add more program. 3.2.2.1.1.1.1 Program name. Enter a name for the program here. 3.2.2.1.1.1.2 Width. Select how many ePosters on the width the content is to be displayed with. Select OK to go to the content upload page 3.2.2.1.1.1.3 “...
-
Page 15: Specification
3.2.4.3 Color Temperature. Color temperature from cold to warm of the ePoster can be changed by dragging the slider. Default value is 6500K. 3.2.4.4 Test mode. By clicking test mode, patterns of White, Red, Green, Blue and rotating of White, Red Green and blue will be available for selection. - Page 16 1. The data cable from the HUB Re-connect or replace the data board to this module is loose or cable disfunctioning 2.the module is defective Repalce the module One module of the ePoster displays nothing while the 3.the data input port on the module power is on Replace the module module is defective...
- Page 17 4.the top HUB / Receiver card is replace the top HUB / RV card defective 5.the Y position of the playing setup the Y position of the playing window is NOT zero window to zero 6.the RJ-45 port on the top HUB is replace the top HUB defective 7.the RJ-45 port on the centre HUB...
Need help?
Do you have a question about the ePoster SEP560-1.9 and is the answer not in the manual?
Questions and answers