Table of Contents
Advertisement
Quick Links
Quick
Step
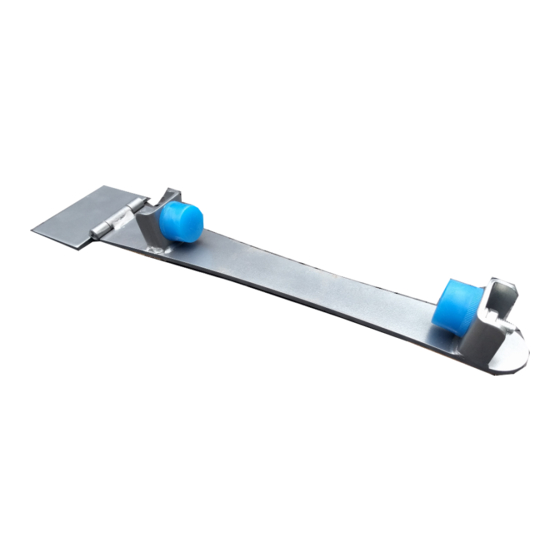
UniFix Repair Tool Instructions
®
•
Please read all instructions before you begin. For additional instructions,
please watch the installation DVD provided with the UniFix Repair Tool.
Before you begin,
you will need:
Quick
Step UniFix
•
Repair Tool
Clean the floor using the Quick
any dust or dirt. (Dust or dirt may prevent the UniFix Repair Tool from adhering to
the surface of the planks).
7"
Cut one piece of UniFix Double-faced Tape
(approximately 7'' long) and wrap it around
the hinged end of the UniFix Repair Tool.
Adhere the UniFix Repair Tool to the plank closest to Wall "C" (plank 1), on the
same row with the marked plank, by placing one foot on top of the hinged section,
and tap the tool so that the plank slides towards the wall until it unclicks from the
plank beside it. To remove the tool from the plank, raise the tool on the hinge and,
carefully, twist it from one side to the other and pull up.
Quick
Step UniFix
•
Double-Faced Tape (included)
Step 1
Step Cleaning Kit thoroughly to remove
•
Step 3
Wall B
Step 5
Hammer
(such as a Ball Pein or Dead Blow)
Mark the plank(s) you want to replace using a piece of tape.
Regular Planks
Remove the protective paper from the tape
(For narrower planks leave a strip of protective paper on the left and right edge
of the tool to prevent the tool from adhering to more than one plank).
Continue in the same method, unlocking planks on that row,
until you reach the damaged plank.
TIP: When positioning the UniFix Repair Tool, the tool works best when
placed near the joint that you are attempting to separate or connect.
Step 2
Narrower Planks
Step 4
Wall B
Step 6
Advertisement
Table of Contents

Summary of Contents for Quick-Step UniFix
- Page 1 Step Cleaning Kit thoroughly to remove Mark the plank(s) you want to replace using a piece of tape. • any dust or dirt. (Dust or dirt may prevent the UniFix Repair Tool from adhering to the surface of the planks). Regular Planks Narrower Planks 7”...
- Page 2 N E W perimeter. • Quick Step has selected the best available double-faced tape • for use with the UniFix Repair Tool. Any residue left on the surface of the floor, may be removed with Quick Step Force • Step 11 or rubbing alcohol.
Need help?
Do you have a question about the UniFix and is the answer not in the manual?
Questions and answers