
Summary of Contents for Nomics Brizzy+
- Page 1 Sleep & Breathing Liège Science Park 4, Rue des chasseurs Ardennais 4031 Angleur (Belgium) User Guide ©nomics s.a. Tous droits réservés MU_Somnolter_NS22_REV 5_FR / 06-2017...
-
Page 3: Table Of Contents
Installation of the nasal cannula ..................14 Installation of the oxymetry sensor .................15 Connections ........................15 Follow-up of a CPP treatment ..................17 Making a recording ......................18 "AUTOMATIC" mode ......................18 "Scheduled" mode ......................18 ©nomics s.a. All rights reserved MU_Brizzy _NS26_REV 1_EN /09-2019 1/57... - Page 4 Setting time of the recorder ....................45 Calibrating the recorder .......................45 MAINTENANCE ...................................... 47 Service ..........................47 Cleaning ..........................47 Environnement ........................47 Disposal..........................47 TROUBLESHOOTING ..................................48 GUARANTEE ......................................52 TECHNICAL SPECIFICATIONS ................................53 ©nomics s.a. All rights reserved MU_Brizzy _NS26_REV 1_EN /09-2019 2/57...
-
Page 5: General Information
• wether the patient suffers from sleep disordered breathing, • wether the treatment delivered to such a patient needs to be adjusted. ©nomics s.a. All rights reserved MU_Brizzy _NS26_REV 1_EN /09-2019 3/57... -
Page 6: Certification
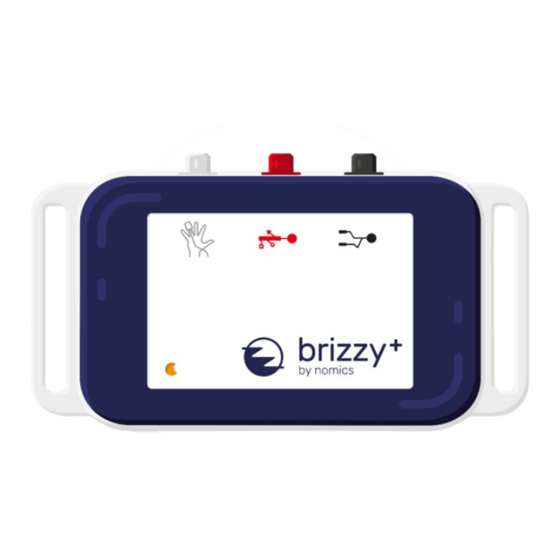
CERTIFICATION Brizzy is manufactured by Nomics. The manufacturer is certified according to European Medical Device Directive (MDD) 93/42/EEC and is authorized to apply the CE mark to the product. Description of symbols: Warning / Caution Port for the mandibular movement (JAWAC) sensor... -
Page 7: Overview And Functional Description
BRIZZY consists of a recording device, of sensors as illustrated above, and of the APIOS analysis software. A USB cable especially designed by Nomics to transfer the recordings onto a computer, as well as several accessories, completes the set. ©nomics s.a. All rights reserved... - Page 8 The table hereafter lists the different items composing the system as well as accessories and replacement parts which are available: Nomics Ref Items NS22 NS26-MUP Patient leaflet (available on the Nomics website) √ NS26-MU User guide (available on the Nomics website) √ NS126...
-
Page 9: Sensor For Measurement Of Mandibular Movement
Only oximetry sensors from Nonin should be connected to the module. BODY POSITION SENSOR The recorder is equipped with an integrated position sensor. This sensor measures the patient's position via a 3-axis accelerometer. ©nomics s.a. All rights reserved MU_Brizzy _NS26_REV 1_EN /09-2019 7/57... -
Page 10: Function Of The Recorder
• manually make or change markings • generate an analysis report and insert conclusions • set the time on the device • calibrate the device ©nomics s.a. All rights reserved MU_Brizzy _NS26_REV 1_EN /09-2019 8/57... -
Page 11: Warnings And Safety Notices
Please note that Nomics is not responsible for any loss or damage arising from the use of accessories or equipment that has not been approved. - Page 12 15 minutes) and contact a doctor. Wash your clothes if they have been contaminated. Only use the special USB cable provided by Nomics in order to recharge the battery. ▪ Only plug this cable into the USB port of a computer or of a USB charger.
-
Page 13: Installing The Software
You can use the search tool to locate a folder or create a new folder. The default root folder is the one where the records of the unit will be imported. ©nomics s.a. All rights reserved MU_Brizzy _NS26_REV 1_EN /09-2019... -
Page 14: Operating The Recorder
Make sure that each item has been cleaned/disinfected according to the instructions given in the corresponding directions for use. Each item must be clean and dry. • Make sure that the recorder works by making a starting test. ©nomics s.a. All rights reserved MU_Brizzy _NS26_REV 1_EN /09-2019 12/57... -
Page 15: Carrying Bag
A more detailed study under CPP with Brizzy is possible by replacing the flow sensor (Nomics reference NS962) by a pneumotachograph module (Nomics reference NS960). For more information, Refer to the instruction manual of the pneumotachograph sensor. RECOMMANDATIONS TO BE GIVEN TO THE PATIENT... -
Page 16: Installing The Recorder
(of hypoallergenic type). The nasal cannulas are for single use only. They are not intended to be cleaned and reused, and must be disposed of. ©nomics s.a. All rights reserved MU_Brizzy _NS26_REV 1_EN /09-2019... -
Page 17: Installation Of The Oxymetry Sensor
The auxiliary flow sensor is connected to the red input symbolized by the pictogram opposite Install (screw) the nasal cannula on the tip of the flow sensor intended for pressure measurement ©nomics s.a. All rights reserved MU_Brizzy _NS26_REV 1_EN /09-2019 15/57... - Page 18 Once notch and bump are aligned, push the connector in until locked in place. Always handle accessories with care, by firmly holding the connector between your fingers, never pull on the wires. ©nomics s.a. All rights reserved MU_Brizzy _NS26_REV 1_EN /09-2019 16/57...
-
Page 19: Follow-Up Of A Cpp Treatment
FOLLOW-UP OF A CPP TREATMENT For following-up the treatment under CPP, the nasal cannula should be replaced with a tube of pressure from the Luer-Lock connector of the flow sensor (Nomics reference NS962) to the CPP mask, as shown in the figure below: When connecting the pneumotachograph auxiliary sensor for flow rate measurement, refer to the sensor's operating manual. -
Page 20: Making A Recording
Programming a recording is done with the APIOS software (see "Preparing to Record"). At the end of recording, the device turns off automatically and returns, by default, to automatic mode. ©nomics s.a. All rights reserved MU_Brizzy _NS26_REV 1_EN /09-2019... - Page 21 The recording stops by itself when the battery charge becomes insufficient to ensure proper operation of the device. Always make sure that the battery is sufficiently charged when you launch a recording. • The memory can contain several recordings. ©nomics s.a. All rights reserved MU_Brizzy _NS26_REV 1_EN /09-2019 19/57...
-
Page 22: Indicator Light
USB connected Normal conditions Yellow light is ON continuously. Battery charging in process Yellow light flashes regularly. Calibration in process Green light flashes rapidly. ©nomics s.a. All rights reserved MU_Brizzy _NS26_REV 1_EN /09-2019 20/57... -
Page 23: Operating The Software
Some operations execute through the USB cable especially designed by Nomics to connect the recorder to a PC. For safety reasons, it is strictly forbidden to connect the device to a computer while the patient wears the device. -
Page 24: Apios Software Start Screen
The buttons are active only if a device is detected by the computer. If the device is not recognized by APIOS, click on the refreshment icon: As soon as the device is recognized, the following message appears: ©nomics s.a. All rights reserved MU_Brizzy _NS26_REV 1_EN /09-2019... -
Page 25: Recording Visualization
The button with the magnifying glass icon in the lower right corner of the "Record Window" allows searching for records that would be found in a folder other than the "Default Root Folder": To open a recording of the list, double click on it. ©nomics s.a. All rights reserved MU_Brizzy _NS26_REV 1_EN /09-2019 23/57... -
Page 26: Downloading Of A Recording
The field "Patient Code" can be freely fulfilled (e.g. with the patient code of the hospital). • Then Click on "Import". The data transfer takes a few seconds. APIOS software opens automatically the recording once the transfer is complete. ©nomics s.a. All rights reserved MU_Brizzy _NS26_REV 1_EN /09-2019 24/57... -
Page 27: Prepare New Record
• Open APIOS software and click on "Prepare new record". Note that the "Plan record" function of the "File" menu allows access to the device configuration: ©nomics s.a. All rights reserved MU_Brizzy _NS26_REV 1_EN /09-2019 25/57... - Page 28 The first step is to pre-register the patient data in the "Patient Data" window. When importing the record, this data will automatically be included in the report. Once the fields have been filled in, click on "Next": ©nomics s.a. All rights reserved MU_Brizzy _NS26_REV 1_EN /09-2019...
- Page 29 "Scheduled", with automatic start and stop of the record ✓ Check "Programmed Mode" ▪ Then choose the starting time and date, and the duration of the record and ▪ click on “Next”: ©nomics s.a. All rights reserved MU_Brizzy _NS26_REV 1_EN /09-2019 27/57...
- Page 30 “Next”: • The fourth step is to choose the auxiliary sensor that will be connected to the device. Choose the sensor in the list and click on “Save”: ©nomics s.a. All rights reserved MU_Brizzy _NS26_REV 1_EN /09-2019 28/57...
- Page 31 Check that the programmed data is correct and wait for the data to be recorded in the device: • The message “Device programming successful” is dispayed if everything went well: If data have to be modified, restart the process… ©nomics s.a. All rights reserved MU_Brizzy _NS26_REV 1_EN /09-2019 29/57...
-
Page 32: Signals Display
It is possible to configure the displayed signals, their position, colour and dimension (Tools / Options or F12) as described in in the chapter "customizing the display". Any successive recording will display in accordance with the chosen parameters. ©nomics s.a. All rights reserved MU_Brizzy _NS26_REV 1_EN /09-2019 30/57... - Page 33 Manually move the horizontal line of the jawac's zero point to center it on the signal. Note: You can also let the analyzer define exclusion zones and manually reset only the zero point of the jawac. ©nomics s.a. All rights reserved MU_Brizzy _NS26_REV 1_EN /09-2019...
-
Page 34: Navigator
Hide Navigator: You can hide the Navigator. To display it again when it has been hidden, go to the 'View' menu and select “Navigator”. Note that F10 hides the navigator. ©nomics s.a. All rights reserved MU_Brizzy _NS26_REV 1_EN /09-2019 32/57... -
Page 35: Individual Pane
This option increases the pane so that he is the only [CTRL+T]: displayed signal. To display all panes, choose "All panes"/ “Show" in the same menu, or double click on the header of the signal or press the F4 key. ©nomics s.a. All rights reserved MU_Brizzy _NS26_REV 1_EN /09-2019 33/57... -
Page 36: Zoom Options
Other keys or key combinations let you jump different lengths inside the recording. These keyboard shortcuts are described in a document that you can find in the 'Help' menu. ©nomics s.a. All rights reserved MU_Brizzy _NS26_REV 1_EN /09-2019 34/57... -
Page 37: Keyboard Shortcuts
"Help" menu of APIOS software. Some parameters of the automatic analysis may be set by the user via the ' Analysis parameters ' item of the 'Tools' menu: ©nomics s.a. All rights reserved MU_Brizzy _NS26_REV 1_EN /09-2019... - Page 38 SpO2. The complete list of possible markings is given in the document which describes the keyboard shortcuts (document to be found in the ' Help' menu). ©nomics s.a. All rights reserved MU_Brizzy _NS26_REV 1_EN /09-2019...
- Page 39 The report is generated according to the parameters defined in the previous analysis. It is always possible to modify the parameters before generating a report or to re-generate a report after having changed the parameters. ©nomics s.a. All rights reserved MU_Brizzy _NS26_REV 1_EN /09-2019...
-
Page 40: Manual Scoring
A list of available marking appears automatically, select one. Or assign a marking type to this area by pressing the corresponding key on the keyboard (see below). ©nomics s.a. All rights reserved MU_Brizzy _NS26_REV 1_EN /09-2019 38/57... - Page 41 The user just has to generate the report again (see hereunder) in order to integrate the manual changes into the calculation of the results given in the report. ©nomics s.a. All rights reserved MU_Brizzy _NS26_REV 1_EN /09-2019 39/57...
-
Page 42: Analysis Report
The 'Report personalization' tab allows you to insert your contact information and/or your logo and to activate them so that they are automatically inserted into the analysis reports. Note that, to come into application, some changes require that the software be restarted. ©nomics s.a. All rights reserved MU_Brizzy _NS26_REV 1_EN /09-2019... -
Page 43: Customizing The Display
In the "General" tab of the “Tools/Options” menu, the user can choose: • The default signal displayed in the navigator and the default duration of page • the displayed signals • their order of appearence • their height and colour. ©nomics s.a. All rights reserved MU_Brizzy _NS26_REV 1_EN /09-2019 41/57... - Page 44 Signals can also be resized by using the double arrow tool when signals are displayed • Including or excluding a signal in the display Enabling automatic zoom in a clic ©nomics s.a. All rights reserved MU_Brizzy _NS26_REV 1_EN /09-2019 42/57...
-
Page 45: Printing
You may also use the button with the printer icon located just above the report. You can obtain a PDF version of your report by clicking on the "File" menu, then "Save as PDF” ©nomics s.a. All rights reserved MU_Brizzy _NS26_REV 1_EN /09-2019 43/57... -
Page 46: Managing The Recordings
A full charge takes between 3 and 4 hours. When fully charged, the yellow light stays ON permanently. It is advisable not to unplug the unit while charging is in progress. ©nomics s.a. All rights reserved MU_Brizzy _NS26_REV 1_EN /09-2019... -
Page 47: Setting Time Of The Recorder
Connect the recorder to the computer, • Go to "Tools " menu of the APIOS software and click on "Manage devices", • Select the device, • Click on the button "Calibrate", and follow instructions displayed. ©nomics s.a. All rights reserved MU_Brizzy _NS26_REV 1_EN /09-2019 45/57... - Page 48 (ex: computer). If you put the calibration tool down on a table, pay particular attention to the material (possibly metallic) from which is made the structure supporting the table. ©nomics s.a. All rights reserved MU_Brizzy _NS26_REV 1_EN /09-2019...
-
Page 49: Maintenance
If the device is damaged, do not use it. Indeed, the internal battery itself could be damaged and cause leak, overheating, or fire. If you notice damage to the device, contact your local distributor or Nomics technical services (see the “Troubleshooting” chapter). See also the section "Calibrating the Recorder”. -
Page 50: Troubleshooting
TROUBLESHOOTING Please consult the following table in the event of a problem. Contact your local distributor or Nomics technical services if the problem does not appear in the list below or if the proposed solutions do not solve the problem. - Page 51 If the sensor is damaged, contact Nomics or your local distributor The battery is empty. Recharge the battery. Connect the device to the The memory is full.
- Page 52 Replug the sensor and start a sensor got disconnected from new calibration. the device during calibration. The mandibular movement Replace the sensor. Recalibrate sensor is damaged or faulty. the device with the new sensor. ©nomics s.a. All rights reserved MU_Brizzy _NS26_REV 1_EN /09-2019 50/57...
- Page 53 The plugged oximetry sensor To ensure compatibility with the on the Nonin XPOD is not a Xpod module use only brand Nonin branded. Nonin sensors. ©nomics s.a. All rights reserved MU_Brizzy _NS26_REV 1_EN /09-2019 51/57...
-
Page 54: Guarantee
This guarantee will be declared null and void and Nomics will not in any way be held liable if the product or its accessories have been misused, have been the object of abusive use or handling errors, have been opened by an unlicensed staff member, have been modified or taken apart. -
Page 55: Technical Specifications
When charging (from USB): 3.5W Memory 32MB, i.e. up to 40h of recording Data transfer Via USB to PC Respiratory movement sensor Technology 3D accelerometer Sampling frequency 10Hz Conditioning Band-Pass filter 0,02Hz-2Hz ©nomics s.a. All rights reserved MU_Brizzy _NS26_REV 1_EN /09-2019 53/57... - Page 56 The effective resolution is defined as the maximum of numerical resolution and rms noise value. It depends on the distance between the two sensor probes: Sampling frequency 10Hz Conditioning Low-pass filtering with 1Hz cutoff frequency ©nomics s.a. All rights reserved MU_Brizzy _NS26_REV 1_EN /09-2019 54/57...
- Page 57 Pulse rate Measurement range: 18 to 300bpm Accuracy (for adults using the 8000AA Finger Clip Sensor, no motion): ±3bpm Sampling frequency: 3Hz Conditioning: 4-beat Average Plethysmographic Sampling frequency: 75Hz wave ©nomics s.a. All rights reserved MU_Brizzy _NS26_REV 1_EN /09-2019 55/57...
- Page 58 0.15 MHz – 80 MHz Magnetic field (50/60 Hz) 30 A/m CEI 61000-4-8 50Hz Voltage dips, short interruptions and voltage variations on power supply input lines Not applicable CEI 61000-4-11 ©nomics s.a. All rights reserved MU_Brizzy _NS26_REV 1_EN /09-2019 56/57...
- Page 59 However, Nomics does not guarantee that this information is free of error. Nomics reserves the right to make, at any time and with no prior notice, changes or improvements to this document and/or to the product, accessories and/or software this document describes.