Table of Contents
Advertisement
Quick Links
Advertisement
Table of Contents

Related Manuals for Ress SK7


Summary of Contents for Ress SK7
- Page 1 RESS Manual Camera SK7...
-
Page 2: Table Of Contents
Summary of the contents Camera SK7 - Commissioning / Safety Notes page 3 - Start-up page 4 - Start-up page 5 Carrying strap - Start-up page 6 - Working with the device page 7 Basic function / Power supply - Control buttons... -
Page 3: Camera Sk7
- The video inspection system is not for use in the medical field! - Any kind of reparations on inside of the unit, must be carried out, exclusively by qualified staff! (If required, contact the RESS-customer service) - The connection and disconnection, the respective components of the system, must always... -
Page 4: Start-Up
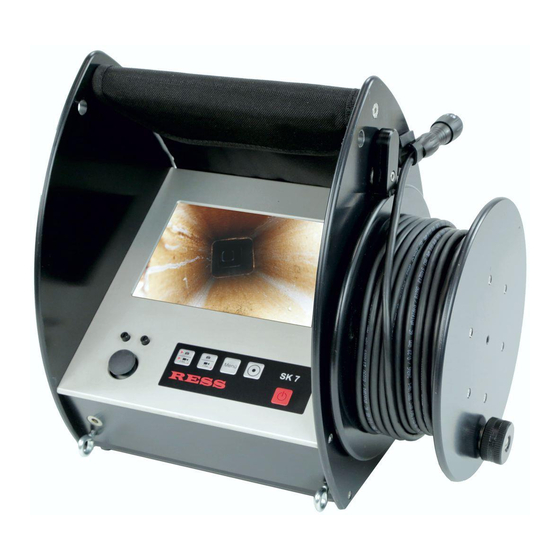
8 Joystick control 9 Charging socket 10 Trimmer for basic position of the Rotary-Ball-Camera 11 Voltage display/Meter counter 12 No special function 13 Gap to connect the carrying strap 14 SD-Cardslot 15 Buttons to open the compartment RESS Camera systems - SK7... -
Page 5: Start-Up Carrying Strap
Otherwise it can disturb the correct function of the sun protection. Shoulder strap The shoulder strap can be connected with the upper buckles. So both strap-systems can be changed as needed. RESS Camera system - SK7... -
Page 6: Start-Up
Turn the trimmer until the desired setting is achieved. For a detailed description, see page 11. Stabilizer for the basic setting of the Rotary-Ball-Camera. RESS Camera systems - Carrier Device... -
Page 7: Working With The Device
The green light indicates, that the charger is on. If the light is red, the battery is being charged. Charging is completed when the red light switches off. The charger will switch off automatically, so an overcharging is impossible. charging socket RESS Camera system - SK7... -
Page 8: Control Buttons
Exit the menu, by pressing button no.3 or by selecting EXIT in the menu and press no.1 or 5. It will switch back to the live image automatically, if there is no selection within 10 seconds. RESS Camera systems - SK7... -
Page 9: Memory Card / Technical Data
1 photo 32 kb (720x576 pixel) 120 second video 42 MB Power supply NiMh 12 V/3200 mAh Voltage monitoring LC-Display Operating time ca. 3 hours (depending on the camera head that is being used) Charging time ca. 5 hours RESS Camera systems - Monitor Case... -
Page 10: Start-Up
- The video inspection system is not for use in the medical field! - Any kind of reparations on inside of the unit, must be carried out, exclusively by qualified Staff! (If required, contact the RESS-customer service) - The connection and disconnection, the respective components of the system, must always... -
Page 11: Working With The Device / Technical Data
Operating voltage: 10,5 – 12,5 Volt 10,5 - 12,5 Volt 10,5 - 12,5 Volt Light sensitivity: 0,8 Lux 0,8 Lux 0,3 Lux Specifics: Pan range: 0° - 90° Rotation range: endless Field of view: 135° RESS Camera systems - Camera heads... - Page 12 - The video inspection system is not for use in the medical field! - Any kind of reparations on inside of the unit, must be carried out, exclusively by qualified Staff! (If required, contact the RESS-customer service) - The connection and disconnection, the respective components of the system, must always be...
-
Page 13: Start-Up
To guarantee a precise meter counter, the GFK-rod has to be rolled up completely to the viper (no absolute 100% accuracy). There is a slight tolerance deviation, depending on how good the GFK-rod was rolled up. RESS Camera systems - Camera Vipers... -
Page 14: Working With The Device / Technical Data
_____ -20° C bis +50° C ______ Operating temperature : _____ 0 ° C bis +50° C ______ Integrated signal lines: 4 x 0,3 mm² 6 x 0,5 mm² Meter counter: Reflective sensors and microcontrollers RESS Camera systems - Camera Vipers... -
Page 15: Additional Lighting
The short velcro ist for the adapter cable und the long velcro for the rotary ball camera. Pull the end of the velcro through the metal ring to close. RESS Camera systems - Additional lighting... -
Page 16: Centering Spring
Hold the spring with one hand. By turning the knurled screw, the spring can be brought into the position you need. Let the big ring slowly slide up. RESS Camera systems - Centering Spring... -
Page 17: Protection Basket
Simply fix behind the camera head. The camera system cable is connected like usual. RESS Camera systems - Centering Spring / Screw... -
Page 18: Viper Connector
Unscrew and then tighten the cable jack. Connect the viper connector with the M10 thread to a reel or a rod. Do not keep the cable to long. Screw the protecting cap on to the viper connector. RESS Camera systems - Viper connector... -
Page 19: Camera Rod / Repair Kit Ball & Rotary-Ball-Camera
20 meter, Ø 6 mm, 12-pin camera head connector for min camera reel Art.-Nr. 25567 Repair-Kit Suitable for the ball camera, the rotary ball camera and miniature camera head RS29.2 Silicone glue, 2x glass panels Art.-Nr. 2542 Protection For miniature camera head RS29.2 Art.-Nr. 2599 RESS Camera systems - accessories... -
Page 20: Camera Cable / Meter-Marker / Roller Stands
1 x 1 up to 40 m Art.-Nr. 25941-J 9 10 11 12 13 14 15 16 17 18 19 20 Chimney roller guide For chimney-door, angled Art.-Nr. 0042-B For chimney head, flat Art.-Nr. 0043-B RESS Camera systems - accessories... -
Page 21: Camera Suitcases
Overall dimension : 495 x 235 x 345 mm Art.-Nr. 5364 ® Cordura -Bag Overall dimension : 480 x 290 x 300 mm Art.-Nr. 5307 ® Cordura -Backpack Overall dimension : 430 x 500 x 260 mm Art.-Nr. 5305 RESS Camera systems - accessories... -
Page 22: Reflector / Charger
A roller-stand can come in quite handy in this situation. It is available as an accessories (chimney door Art.-No.: 0042 / chimney cap Art.-No.: 0043) RESS Camera systems - accessories... -
Page 23: Troubleshooting / Maintenance / Service
- By reeling the rod back in, it should be cleaned using a damp, clean cloth to prevent dirtying the drum. Attention: Warranty is void when camera head or monitor has been open manually. SERVICE-Hotline: +49 5208/9127-0 RESS Camera systems - troubleshooting... - Page 24 RESS GmbH & Co. KG Am Hasselbruch 28 D-32107 Bad Salzuflen Germany Tel. ++49 5208/91270 Fax ++49 5208/8030 info@ress.de 01.04.2015 www.ress.de...
Need help?
Do you have a question about the SK7 and is the answer not in the manual?
Questions and answers