Table of Contents
Advertisement
Available languages
Available languages
Quick Links
Advertisement
Chapters
Table of Contents

Summary of Contents for JVC KENWOOD M-822DAB
- Page 1 Kompaktes Stereo-System M-822DAB BEDIENUNGSANLEITUNG...
-
Page 2: Table Of Contents
Vor der Inbetriebnahme Inhalt Vor Einschalten der Spannungsversorgung Sicherheitshinweise Vor der Inbetriebnahme Anschließen Handhabung von CDs Wissenswertes über USB-Geräte Komponentennamen und –funktionen Grundfunktionen Anschalten des Systems Ausschalten in Standby Lautstärkeregler Einstellen des Klangs Verwendung von CD und USB Vorbereitung Wiedergabe von CD oder Audiodatei (USB, CD) Auswählen eines Ordners (nur Audiodateien) Programmieren von Titeln und Dateien - Vorgehensweise bei Audio-CD... -
Page 3: Vor Einschalten Der Spannungsversorgung
Vor Einschalten der Spannungsversorgung WICHTIGE SICHERHEITSANWEISUNGEN Achtung: Lesen Sie diese Seite aufmerksam durch, um den sicheren Betrieb des Gerätes zu gewährleisten. Hinweise aufmerksam lesen! – Befolgen Sie alle Sicherheits- und Bedienungsanweisungen, wenn Sie dieses Produkt in Betrieb nehmen. Hinweise sorgfältig aufbewahren! –... - Page 4 8. Überlastung – Überlasten Sie niemals Netzsteckdosen, Verlängerungskabel oder Mehrfachsteckdosen, weil sonst die Gefahr von Feuer oder elektrischen Schlägen besteht. 9. Eindringen von Fremdmaterial und Flüssigkeit – Achten Sie darauf, dass niemals Fremdmaterial oder Flüssigkeit durch die Belüftungsöffnungen in dieses Gerät eindringt, da es anderenfalls zu Kontakt mit unter hoher Spannung stehenden Bauteilen bzw.
- Page 5 15 Minuten in den Standby-Modus, wenn die Wiedergabe mit einer sehr geringen Laut- stärke erfolgt bzw. das Radio stummgeschaltet ist. Diese Einstellung kann nicht verändert werden. EU-Konformitätserklärung Hiermit erklärt die JVCKENWOOD Corporation, dass der Funkanlagentyp M-822DAB der Richtlinie 2014/53/EU entspricht. Der vollständige Text der EU-Konformitätserklärung ist unter der folgenden Internetadresse verfügbar: https://www.kenwood.com/euukdoc/...
-
Page 6: Vor Der Inbetriebnahme
Vor der Inbetriebnahme Auspacken Packen Sie das Gerät vorsichtig aus und achten Sie darauf, dass alle Zubehörteile vorhanden sind: 2 x Lautsprecher / Fernbedienung / UKW/DAB-Wurfantenne / 2x Batterie R03/AAA 1,5 Volt Anschließen • Öffnen Sie das Batteriefach der Fernbedienung und setzen Sie die Batterien polungsrichtig ein. Die vorgegebene Polarität (+/-) ist im Batteriefach gekennzeichnet. -
Page 7: Handhabung Von Cds
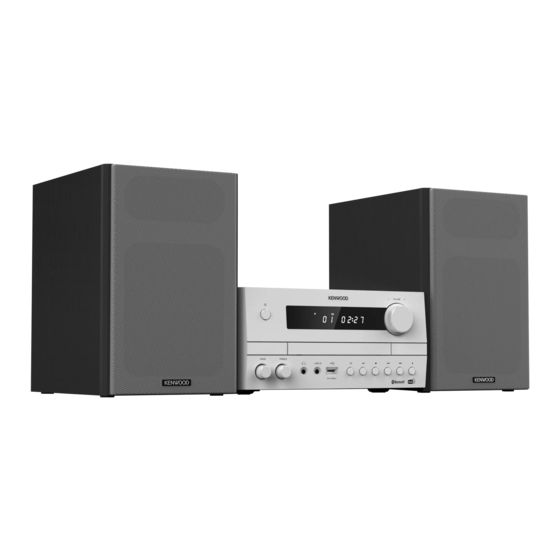
Erstmaliger Gebrauch Bei erstmaligem Einschalten des Gerätes wird ein automatischer DAB+ Sendersuchlauf gestartet. Bitte warten Sie, bis dieser Vorgang komplett abgeschlossen ist. Für weitere Informationen dazu, schauen Sie bitte in den Abschnitt „Verwendung des DAB+ Radios“. Handhabung von CDs Vorsichtshinweise für die Handhabung Halten Sie die CD so, dass Sie die Signaloberfläche nicht berühren. - Page 8 Komponenten und Funktionen Vorderseite Rückseite 9 10 11 12 13 14 10 - Wiedergabe / Pause 1 - Standby / Ein 11 - Stop 2 - CD-Schublade 12 - Vorherige (Titelsprung rückwärts) 3 - Bass-Regler 13 - Nächste (Titelsprung vorwärts) 4 - Höhen-Regler 14 - Öffnen / Schliessen (Eject) 5 - Display...
-
Page 9: Grundfunktionen
Grundfunktionen Anschalten des Systems: Drücken Sie die Taste <STANDBY> auf der Fernbedienung oder am Hauptge- rät. Im Display erscheint “WELCOME”. Ausschalten in Standby: Drücken Sie die Taste <STANDBY> auf der Fernbedienung oder am Hauptge- rät. Im Display erscheint “STANDBY” und das Gerät schaltet in den Standby-Modus. Lautstärkeregler Auf der Fernbedienung: Drücken Sie die Tasten <VOL+>... - Page 10 Anschluss von USB-Geräten 1. Drücken Sie die Taste <STANDBY> zum Auswählen des Standby-Modus. 2. Schließen Sie das USB-Gerät an den USB- Anschluss auf der Vorderseite an. Abnehmen des USB-Gerätes 1. Drücken Sie die Taste <STANDBY> zum Auswählen des Standby-Modus. 2. Entnehmen Sie das USB-Gerät aus dem USB-Anschluss. •...
-
Page 11: Programmieren Von Titeln Und Dateien
Titel kurz anspielen: Halten Sie die Taste <INTRO> auf der Fernbedienung gedrückt, um die Titel 10 Sekunden lang anzuspielen. Erneutes Drücken stoppt den Modus. Programmieren von Titeln und Dateien Sie können mit Hilfe der Fernbedienung Titel einer Audio-CD oder Dateien in einer von Ihnen gewünschten Reihenfolge programmieren. -
Page 12: Vorgehensweise Bei Audio-Cd
Zufallswiedergabe und Wiederholfunktion Vorgehensweise bei Audio-CD • Drücken Sie auf der Fernbedienung die Taste <SHUFFLE> um die Zufallswiedergabe zu starten. Im Display erscheint „SHUF“ und die Wiedergabe kann gestartet werden. Zweifaches Drücken der Taste <SHUFFLE> oder Drücken der Taste <STOP> hebt die Zufallswiedergabe auf. •... -
Page 13: Anwählen Eines Dab+ Senders
Erneutes Starten des automatischen Sendersuchlaufs • Drücken Sie die Taste <MENU> um das DAB Menü aufzurufen. Im Display steht „FULL SCAN“. Starten Sie den Suchlauf mit der Taste <OK>. • Während des Suchlaufs zeigt das Display die Zahl bisher gefundenen Sender an. •... -
Page 14: Erweiterte Dab+ Informationen
Erweiterte DAB+ Information Bei DAB+ werden neben dem Musiksignal auch Zusatzinformationen übertragen. Diese können wie folgt abgerufen werden. Drücken Sie auf der Fernbedienung die Taste <INFO> um nacheinander folgende Informationen abzufrufen: • Signalpegel: Im Display wird anhand von Symbolen von links nach rechts angezeigt. Je mehr Symbole angezeigt werden, desto besser ist der Empfang. -
Page 15: Speichern Von Stationen Im Senderspeicher
Verwendung von Radio Data System (RDS) RDS ist ein Sendesystem, bei dem UKW-Sender zusammen mit dem eigentlichen Sendesignal weitere nütz- liche Informationen übertragen. Diese können aus dem normalen Sendesignal extrahiert und für eine Reihe von Zusatzfunktionen genutzt werden. Wird ein RDS-Signal empfangen, so leuchtet im Display unterhalb der Frequenzanzeige “RDS”... -
Page 16: Verwendung Von Bluetooth
1. Öffnen Sie auf Ihrem BLUETOOTH Gerät die Koppelungsfunktion und suchen Sie nach „M-822DAB“. 2. Wählen Sie „M-822DAB“ zur Koppelung aus und warten Sie, bis im Display „BT“ erscheint und eine Tonfolge zu hören ist. Die Koppelung ist nun abgeschlossen. - Page 17 Einstellen von Uhrzeit und Datum Beim Empfang eines DAB+ oder UKW Senders in ausreichender Qualität wird die Uhrzeit automatisch eingestellt. Je nach Empfangsstärke dauert dieser Vorgang einige Zeit. Sollte kein entsprechender Sender zur Verfügung stehen, können Sie die Uhrzeit auch manuell einstellen: 1.
-
Page 18: Störungsbehebung
Störungsbehebung Bitte überprüfen Sie bei Fehlfunktionen die folgenden Punkte: Führen Sie einen Reset in den Werkszustand aus: „MENU“ -> „SYSTEM“ -> „RESET“ -> „YES“ Kein Ton Stecken Sie den Netzstecker ordnungsgemäß ein. Stellen Sie die Lautstärke auf den richtigen Pegel. ... -
Page 19: Entsorgung
Entsorgung Entsorgung von gebrauchten elektrischen und elektronischen Geräten und Batterien. Das Symbol (durchgestrichene Mülltonne) auf dem Produkt oder seiner Verpackung weist darauf hin, dass dieses Produkt an seinem Lebensende nicht als normaler Haushaltsabfall behandelt werden darf, sondern bei einer Sammelstelle eines öffentlich-rechtlichen Entsorgungsträgers oder bei einer von Herstellern oder Vertreibern eingerichteten Rücknahmestelle unentgeltlich abgegeben werden muss. -
Page 20: Technische Daten
Technische Daten M-822DAB Spannungsversorgung Wechselspannung ~ 100 – 240 V 50/60 Hz Aufnahmeleistung 40 Watt Aufnahmeleistung im Standby-Modus < 1 Watt CD-Betrieb ≥ 70 dB Signal-Rauschabstand (A-Filter) ≥ 60 dB Dynamikumfang Tuner UKW/DAB+ DAB-Abstimmbereich BAND III 174,928 MHz – 239,200 MHz UKW-Abstimmbereich 87,50 MHz –... -
Page 21: Garantie
Garantie Sehr geehrter Kunde, wir danken Ihnen für den Kauf dieses Kenwood-Produkts. Sollte dieses Produkt unter normalen Betriebsbedingungen Material- oder Verarbei- tungsmängel aufweisen, werden wir diese in Übereinstimmung mit den nachfolgenden Garantiebestimmungen kostenlos beseitigen, bzw. das Gerät umtauschen. Bitte bewahren Sie diese Garantiekarte sorgfältig auf. Kenwood gewährt auf dieses Gerät eine Garantie von zwei Jahren ab Kaufdatum laut Rechnung oder Kaufbeleg des Kenwood-Händlers. - Page 23 Compact Stereo System M-822DAB OPERATING MANUAL...
- Page 24 Before initial operation Contents Before switching on the power supply Safety instructions Before initial operation Connecting Handling CDs Useful information about USB-devices Component names and functions Basic functions Turning on the system Switch off in standby Volume control Adjusting the sound Using CD and USB Preparation Playback of CD or audio files (USB, CD)
-
Page 25: Before Switching On The Power Supply
Before switching on the power supply IMPORTANT SAFETY INSTRUCTIONS Attention: Please read through this sheet carefully in order to ensure safe operation of the device. Read notes carefully! - Please comply with all safety and operation instructions when you put this product into operation. Keep these instructions in a safe place! –... - Page 26 10. Service – Never attempt to service this device yourself since if covers are opened or removed, live parts may be exposed, touching which can be a source of risk. Please refer all servicing to qualified customer service personnel. 11. Damage which requires repair –...
- Page 27 EU Declaration of Conformity The JVCKENWOOD Corporation hereby declares that the radio equipment type M-822DAB is in compliance with the 2014/53/EU guidelines. The complete text of the EU Declaration of Conformity is available under the following internet address: https://www.kenwood.com/euukdoc/...
-
Page 28: Before Initial Operation
Before initial operation Unpacking Carefully unpack the device and take care that all accessories are present: Operating manual / Remote control / FM/DAB antenna / 2x R03/AAA 1.5 Volt Battery Connect • Open the battery compartment of the remote control and insert the batteries w. correct polarity. The specified polarity (+/-) is marked in the battery compartment. -
Page 29: Handling Cds
First use When you use the device for the first time, an automatic DAB+ station scan is started. Please wait un- til this procedure has completely finished. For further information on this, please refer to the “Using the DAB+ radio” section. Handling CDs Precautions when handling Hold the CD in such a way that you are not touching the signal surface. - Page 30 Components and functions Control elements 9 10 11 12 13 14 10 - Playback / Pause 1 - Standby / On 11 - Stop 2 - CD tray 12 - Previous (skip backward) 3 - Bass control 13 - Next (skip forward) 4 - Treble control 14 - Open / Close 5 - Display...
-
Page 31: Basic Functions
Basic functions Turning on the system: Press the button <STANDBY> on the remote control or on the main device. “WELCOME” appears in the display. Switch off in standby: Press the button <STANDBY> on the remote control or on the main device. “STANDBY”... -
Page 32: Playback Of Cd Or Audio Files (Usb, Cd)
Connection of USB devices 1. Press the <STANDBY> button to select standby mode. 2. Connect the USB device to the USB port on the front panel. Removal of the USB device 1. Press the <STANDBY> button to select standby mode. 2. -
Page 33: Programming Tracks And Files
Play tracks briefly: Press and hold the <INTRO> button on the remote control to play the tracks for 10 seconds. Pressing again stops the mode. Programming tracks and files Using the remote control, you can programme tracks from an audio CD or files to play in the order you desire. -
Page 34: Shuffle Play And Repeat Function
Shuffle play and repeat function Procedure with audio CD • Press the <SHUFFLE> button on the remote control to start shuffle play. “SHUF” will appear in the display and playback will start. Pressing the <SHUFFLE> button twice or pressing the <STOP> button cancels random play. •... -
Page 35: Saving Stations In Station Memory
Starting the automatic station search again • Press the <MENU> button to retrieve the DAB menu. “FULL SCAN” will show on the display. Start the search with the <OK> button. • During the search the display will show the number of stations found so far. •... -
Page 36: Expanded Dab+ Information
Expanded DAB+ information With DAB+, supplemental information is transmitted in addition to the music signal. This can be retrieved as follows. Press the <INFO> button on the remote control to retrieve successively the following information: • DLS (Dynamic Label Segment): Text information accompanying the programme, such as performer, song title, album name etc. -
Page 37: Saving Stations In Station Memory
Use of Radio Data System (RDS) RDS is a transmission system whereby FM station transmit other useful information along with the actual transmitter signal. This can be extracted from the normal transmitter signal and used for a range of additional functions. If an RDS signal is received, then ”RDS” appears in the display below the frequency display and after a while the station name is displayed instead of the frequency. -
Page 38: Using Bluetooth
To couple appropriate devices (e.g. smartphones) please proceed as follows: 1. Open the pairing function on your BLUETOOTH device and look for “M-822DAB”. 2. Select “M-822DAB” for pairing and wait until “BT” stops flashing on the display and a sequence of tones is heard. Pairing is now complete. - Page 39 Setting the time and date When receiving a DAB+ or FM station in sufficient quality, the time is set automatically. Depending on the reception strength, this process takes some time. If no corresponding station is available, you can also set the time manually. 1.
-
Page 40: Troubleshooting
Troubleshooting In the event of malfunctions, please check the following points: Perform a factory reset: “MENU” -> “SYSTEM” -> “RESET” -> “YES”. No sound Insert the mains plug in properly. Adjust the volume to the correct level. ... -
Page 41: Disposal
Disposal Disposal of used electrical and electronic devices and batteries. The (crossed-out wheeled bin) symbol on the product or its packaging indicates that this product must not be handled as normal household waste, but handed in to a collection point managed by public waste management authorities or to a collection point set up by the manufacturer or distribu- tor, free of charge. - Page 42 M-822DAB technical specifications Power supply AC ~ 100 – 240 V 50/60 Hz Power consumption 40 Watt Power consumption in standby mode < 1 Watt CD operation ≥ 70 dB Signal to Noise Ratio (A-Filter) ≥ 60 dB Dynamic Range...
-
Page 43: Warranty
Warranty Dear Customer, We would like to thank you for purchasing this Kenwood product. If this product is found to be defective in material or workmanship under normal operating conditions, in accordance with the provisions of the following warranty, we will rectify these faults free of charge or replace the device. - Page 45 Système stéréo compact M-822DAB NOTICE D’EMPLOI...
- Page 46 Avant la mise en service Sommaire Avant la mise sous tension Consignes de sécurité Avant la mise en service Branchement Manipulation des CD Informations intéressantes au sujet des appareils USB Désignations et fonctions des éléments Fonctions de base Mise en marche du système Arrêt du système Régulateur de volume Réglage du son...
-
Page 47: Avant La Mise Sous Tension
Avant la mise sous tension CONSIGNES DE SÉCURITÉ IMPORTANTES Attention : Lisez attentivement cette page afin d’assurer l’utilisation sûre de l’appareil ! Lire attentivement ces consignes ! – Respectez toutes les consignes de sécurité et d’action lorsque vous mettez ce produit en service. Conserver soigneusement ces consignes ! –... - Page 48 8. Surcharge – N’exposez jamais les prises secteur, rallonges ou multiprises à une surcharge, puisque cela génère un risque d’incendie ou d’électrisation. 9. Pénétration de corps étrangers et de liquides – Veillez à ce qu’aucun corps étranger ou liquide ne puisse pénétrer dans l’appareil par les orifices de ventilation.
- Page 49 Déclaration de conformité UE Par la présente, la société JVCKENWOOD Corporation déclare que le type de dispositif radio M-822DAB satisfait aux exigences de la directive 2014/53/UE. Le texte complet de la déclaration de conformité UE est disponible via l’adresse Internet suivante : https://www.kenwood.com/euukdoc/...
-
Page 50: Avant La Mise En Service
Avant la mise en service Déballage Déballez avec précaution l’appareil en veillant à ce que tous les accessoires soient présents. 2 x enceintes / télécommande / Antenne filaire FM/DAB / 2 x piles R03/AAA 1,5 V Branchement • Ouvrez le compartiment à piles de la télécommande et insérez les piles en veillant à leur polarité. La polarité... -
Page 51: Manipulation Des Cd
Première utilisation Lors de la première mise en service de l’appareil, il exécute une recherche automatique des stations DAB+. Veuillez patienter jusqu’à ce que ce processus soit entièrement terminé. Vous trouverez de plus amples informations à ce sujet dans la section « Utilisation de la radio DAB+ » Manipulation des CD Mesures de précaution pour la manipulation Tenez le CD de sorte à... - Page 52 Éléments et fonctions Face avant Face arrière 9 10 11 12 13 14 10 – Lecture / Pause 1 – Veille / Marche 11 – Arrêt 2 – Tiroir CD 12 – Précédent (Titre précédent) 3 – Régulateur de basses 13 –...
-
Page 53: Fonctions De Base
Fonctions de base Pour allumer le système : Appuyez sur la touche <STANDBY> de la télécommande ou de l’appareil principal. L’écran affiche « WELCOME ». Arrêt du système: Appuyez sur la touche <STANDBY> de la télécommande ou de l’appareil principal. L’écran affiche « VEILLE » et l’appareil commute en mode Veille. Régulateur de volume Sur la télécommande : Appuyez sur les touches <VOL+>... -
Page 54: Lecture D'un Cd Ou Fichier Audio (Usb, Cd)
Branchement d’appareils USB. 1. Appuyez sur la touche <STANDBY> pour sélectionner le mode Veille. 2. Branchez l’appareil USB au port USB situé sur la face avant. Retrait de l’appareil USB 1. Appuyez sur la touche <STANDBY> pour sélectionner le mode Veille. 2. -
Page 55: Programmation De Titres Et Fichiers
Lecture brève des débuts de titres : Appuyez de manière prolongée sur la touche <INTRO> de la télécommande pour écouter brièvement (10 secondes) les débuts des titres. Un nouvel actionnement interrompt ce mode. Programmation de titres et fichiers À l’aide de la télécommande, vous pouvez programmer les titres d’un CD audio ou les fichiers dans l’ordre souhaité. -
Page 56: Lecture Aléatoire Et Fonction De Lecture En Boucle
Lecture aléatoire et fonction de lecture en boucle Mode opératoires pour CD audio • Appuyez sur la touche <SHUFFLE> de la télécommande pour démarrer la lecture aléatoire. L’écran affiche « SHUF » et la lecture peut être démarrée. Si vous appuyez deux fois sur la touche <SHUFF- LE>... -
Page 57: Sélection D'une Station Dab
Relancement de la recherche de stations • Appuyez sur la touche <MENU> pour afficher le menu DAB. L’écran affiche « FULL SCAN ». Démarrez la recherche de stations à l’aide de la touche <OK>. • Pendant la recherche de stations, l’afficheur affiche le nombre de stations déjà trouvées. •... -
Page 58: Informations Dab+ Étendues
Informations DAB+ étendues Pour DAB+, des informations complémentaires sont transmises en plus du signal musical. Ces informations peuvent être affichées comme suit : Appuyez sur la touche <INFO> de la télécommande pour afficher les unes après les autres les informations suivantes : •... -
Page 59: Enregistrement Des Stations Dans La Mémoire De Stations
Utilisation du Radio Data System (RDS) RDS est un système de transmission avec lequel les stations FM transmettent des informations utiles conjointement au signal de transmission de base. Ces informations peuvent être extraites du signal de transmission normal et utilisées pour un certain nombre de fonctions complémentaires. Si un signal RDS est trouvé, « RDS »... -
Page 60: Utilisation De Bluetooth
Procédez comme suit pour apparier des appareils adaptés (par ex. les smartphones) : 1. Affichez sur votre appareil BLUETOOTH la fonciton d’appariage et cherchez « M-822DAB ». 2. Sélectionnez « M-822DAB » pour l’appariage et attendez jusqu’à ce que l’écran affiche « BT » et qu’une séquence de signaux sonore retentisse. - Page 61 Réglage de la date et de l’heure Lors de la réception d’une station DAB+ ou FM d’une qualité suffisante, l’heure est réglée automatiquement. En fonction de la qualité de la réception, ce processus peut prendre un certain temps. Si aucune station appropriée n’est disponible, vous pouvez aussi régler l’heure manuellement : 1.
-
Page 62: Élimination Des Défaillances
Élimination des défaillances En cas de dysfonctionnements, veuillez vérifier les points suivants : Réinitialisez l’appareil aux paramètres d’usine : « MENU » -> « SYSTEM » -> « RESET » -> « YES » Absence de son Branchez correctement la fiche d’alimentation. Réglez le volume à un niveau adéquat. ... -
Page 63: Mise Au Rebut
Mise au rebut Mise au rebut d’appareils électriques et électroniques usagés et de piles Le symbole (poubelle barrée) sur le produit ou son emballage indique qu’en fin de vie, ce produit ne doit pas être jeté aux ordures ménagères, mais doit être remis gratuitement à un point de collecte installé... -
Page 64: Caractéristiques Techniques
Caractéristiques techniques – M-822DAB Alimentation électrique Tension alternative ~ 100 – 240 V 50/60 Hz Puissance absorbée 40 Watt Puissance absorbée en mode Veille < 1 Watt Mode CD ≥ 70 dB Distance de bruit de signal (filtre A) ≥ 60 dB Étendue dynamique... -
Page 65: Garantie
Garantie Cher client, Nous vous remercions d’avoir opté pour ce produit Kenwood. Si ce produit devait présenter des défauts de pièces ou de main d'œuvre sous des conditions d’utilisation normales, nous les éliminerons gratuitement ou remplacerons l’appareil à nos frais, conformément à nos conditions de garantie. - Page 67 Sistema stereo compatto M-822DAB MANUALE DI ISTRUZIONI...
- Page 68 Prima della messa in servizio Contenuto Prima di attivare la tensione di alimentazione Indicazioni di sicurezza Prima della messa in servizio Collegamento Come maneggiare i CD Informazioni utili sui dispositivi USB Nomi e funzioni dei componenti Funzioni di base Accensione del sistema Spegnimento in Standby Regolatore del volume Regolazione dell'audio...
-
Page 69: Prima Di Attivare La Tensione Di Alimentazione
Prima di attivare la tensione di alimentazione IMPORTANTI ISTRUZIONI DI SICUREZZA Attenzione: Leggere attentamente questa pagina per garantire un funzionamento sicuro dell'unità. Leggere attentamente queste istruzioni! – Seguire tutte le istruzioni di sicurezza e d'uso durante l'utilizzo di questo prodotto. Conservare le note in un luogo sicuro! –... - Page 70 8. Sovraccarico – Non sovraccaricare mai le prese di alimentazione, le prolunghe o le prese multiple, in quanto sussis- te il rischio di incendio o scossa elettrica. 9. Penetrazione di materiale estraneo e liquido – Non permettere che materiali estranei o liquidi entrino nell'apparecchio attraverso le aperture in dotazione, poiché...
- Page 71 è silenziata. Questa impostazione non può essere modificata. Dichiarazione di conformità UE JVCKENWOOD Corporation dichiara che l'apparecchiatura radio tipo M-822DAB è conforme alla Direttiva 2014/53/UE. Il testo integrale della dichiarazione di conformità UE è disponibile al seguente indirizzo Internet: https://www.kenwood.com/euukdoc/...
-
Page 72: Prima Della Messa In Servizio
Prima della messa in servizio Sconfezionamento Sconfezionare delicatamente il dispositivo e assicurarsi che tutti gli accessori siano presenti: 2 x altoparlante / telecomando / antenna di lancio FM/DAB / 2x batteria R03/AAA 1,5 volt Collegamento • Aprire il vano batterie del telecomando e inserire le batterie con la polarità corretta. La polarità... -
Page 73: Come Maneggiare I Cd
Primo utilizzo Quando l'unità viene accesa per la prima volta, viene avviata una ricerca automatica delle stazioni DAB+. Attendere il completamento di questa procedura. Per ulteriori informazioni, consultare la sezione "Uso della radio DAB+". Come maneggiare i CD Precauzioni per la manipolazione Tenere il CD in modo da non toccare la superficiedel segnale. - Page 74 Componenti e funzioni Lato anteriore Lato posteriore 9 10 11 12 13 14 10 - Play/Pausa 1- Stand-by / On 11 - Stop 2- Vassoio CD 12 - Precedente (brano indietro) 3 - Controllo dei bassi 13 - Avanti (brano avanti) 4 - Controllo degli acuti 14 - Apertura / Chiusura (Espulsione) 5 - Display...
-
Page 75: Funzioni Di Base
Funzioni di base Accensione del sistema: Premere il tasto <STANDBY sul telecomando o sul displaydel dispositivo principale. Il display visualizza "BENVENUTO". Spegnimento in Standby: Premere il tasto <STANDBY sul telecomando o sull'unità principale. Il display appare "STANDBY" e l'unità passa in modalità standby. Regolatore del volume Sul telecomando: Premere i tasti <VOL+>... - Page 76 Collegamento di dispositivi USB 1. Premere il tasto <STANDBY> per selezionare la modalità standby. 2. Collegare il dispositivo USB alla porta USB posta sul lato anteriore. Scollegamento del dispositivo USB 1. Premere il tasto <STANDBY> per selezionare la modalità standby. 2.
-
Page 77: Programmazione Di Brani E File
Riprodurre brevemente il brano: Tenere premuto il tasto <INTRO> sul telecomando per riprodurre i brani per 10 secondi. Premendo nuovamente si interrompe la modalità. Programmazione di brani e file Con il telecomando è possibile programmare i brani di un CD audio o i file nella sequenza desiderata. Per questo è... -
Page 78: Riproduzione Casuale E Funzione Di Ripetizione
Riproduzione casuale e funzione di ripetizione Procedura per CD audio • Sul telecomando premere il tasto <SHUFFLE> per avviare la riproduzione casuale. Il display visualizza "SHUF" e la riproduzione può essere avviata. Premere due volte il pulsante <SHUFFLE> opremendo il tasto <STOP> annulla la riproduzione casuale. •... -
Page 79: Selezione Di Una Stazione Dab
Riavvio della ricerca automatica delle stazioni • Premere il tasto <MENU> per accedere al menu DAB. Il display visualizza "FULL SCAN". Avviare la ricerca con il tasto <OK>. • Durante la ricerca, il display mostra il numero di stazioni trovate finora. •... -
Page 80: Informazioni Dab+ Avanzate
Informazioni DAB+ avanzate Con DAB+, oltre al segnale musicale, vengono trasmesse informazioni aggiuntive. Esse possono essere recuperati come segue. Premere il tasto <INFO> sul telecomando per richiamare le seguenti informazioni in successione: • Livello del segnale: Il display visualizza i simboli da sinistra a destra. Più... -
Page 81: Memorizzazione Delle Stazioni Nella Memoria Delle Stazioni
Uso del Radio Data System (RDS) RDS è un sistema di trasmissione in cui i trasmettitori VHF trasmettono ulteriori informazioni utili insieme al segnale di trasmissione effettivo. Queste possono essere estratte dal normale segnale di trasmissione e utilizzate per una serie di funzioni aggiuntive. Se viene ricevuto un segnale RDS, il display visualizza "RDS"Si accende sotto il display della frequenza e dopo un po' viene visualizzato il nome della stazione al posto della frequenza. -
Page 82: Uso Di Bluetooth
1. Sul dispositivo BLUETOOTH, aprire la funzione di accoppiamento e cercare i seguenti elementi "M-822DAB". 2. Selezionare "M-822DAB" per l'accoppiamento e attendere che il display visualizzi "BT" appare sul display e si sente una sequenza di toni. Il collegamento è ora completo. - Page 83 Impostazione della data e dell'ora Quando si riceve il segnale di una stazione DAB+ o VHF di qualità sufficiente, l'ora viene impostata automaticamente. A seconda dell'intensità di ricezione, questo processo può richiedere del tempo. Se non è disponibile una stazione corrispondente, è possibile impostare l'ora anche manualmente: 1.
-
Page 84: Risoluzione Dei Problemi
Risoluzione dei problemi In caso di malfunzionamenti, verificare i seguenti punti: Eseguire un reset di fabbrica: "MENU" -> SYSTEM -> RESET -> YES Nessun suono Inserire correttamente la spina di rete. Impostare il volume al livello corretto. ... -
Page 85: Smaltimento
Smaltimento Smaltimento delle apparecchiature elettriche ed elettroniche e delle batterie usate. Il simbolo (pattumiera barrata) presente sul prodotto o sulla sua confezione indica che questo prodot- to non deve essere trattato come un normale rifiuto domestico a fine vita, ma deve essere conseg- nato gratuitamente presso un punto di raccolta di un'autorità... -
Page 86: Dati Tecnici
Dati tecnici M-822DAB Alimentazione della tensione Tensione alternata ~ 100 – 240 V 50/60 Hz Potenza assorbita 40 Watt Potenza assorbita in modalità standby <1 Watt Funzionamento con CD ≥ 70 dB Distanza segnale/rumore (filtro A) ≥ 60 dB Intervallo dinamico... -
Page 87: Garanzia
Garanzia Gentile Cliente, grazie per aver acquistato questo prodotto Kenwood. Se il prodotto presenta difetti di materiale o di lavorazione in normali condizioni di funzionamento, provvederemo ad eliminarli gratuitamente o a sostituire l'apparecchio secondo le seguenti disposizioni di garanzia. Si prega di conservare questa scheda di garanzia in un luogo sicuro. Kenwood garantisce questo prodotto per due anni dalla data di acquisto come da fattura o prova d'acquisto del rivenditore Kenwood. - Page 89 Compact stereosysteem M-822DAB GEBRUIKSAANWIJZING...
- Page 90 Vóór de ingebruikname Inhoud Vóór het inschakelen van de spanningsvoorziening Veiligheidsinstructies Vóór de ingebruikname Aansluiten Hantering van CD’s Wetenswaardigheden over USB-apparaten Componentnamen en -functies Basisfuncties Inschakelen van het systeem Uitschakelen in stand-by Volumeregelaar Instellen van de klank Gebruik van CD en USB Voorbereiding Weergave van CD of audiobestand (USB, CD) Selecteren van een map (alleen audiobestanden)
-
Page 91: Vóór Het Inschakelen Van De Spanningsvoorziening
Vóór het inschakelen van de spanningsvoorziening BELANGRIJKE VEILIGHEIDSINSTRUCTIES Let op: Lees deze pagina aandachtig door om de veilige werking van het apparaat te garanderen. Opmerkingen aandachtig lezen! – Geef gevolg aan alle veiligheids- en bedieningsinstructies wanneer u dit product in gebruik neemt. Instructies zorgvuldig bewaren! –... - Page 92 8. Overbelasting – Overbelast nooit wandcontactdozen, verlengsnoeren of meervoudige contactdozen, omdat anders het gevaar voor brand of elektrische schokken bestaat. 9. Binnendringen van vreemd materiaal en vloeistof – Let erop dat er nooit vreemd materiaal of vloeistof door ventilatieopeningen dit apparaat binnendringt, omdat het anders tot contact met onder hoe spanning staande componenten dan wel tot een kortsluiting met de daaruit voortvloeiende brand of elektrische schok kan komen.
- Page 93 Deze instelling kan niet gewijzigd worden. EU-conformiteitsverklaring Hiermee verklaart de JVCKENWOOD Corporation dat de radio-installatie van het type M-822DAB aan de richtlijn 2014/53/EU voldoet. De volledige tekst van de EU-conformiteitsverklaring is op volgende website beschikbaar: https://www.kenwood.com/euukdoc/...
-
Page 94: Vóór De Ingebruikname
Vóór de ingebruikname Uitpakken Pak het apparaat voorzichtig uit en let erop dat alle accessoires aanwezig zijn: 2 x luidspreker / afstandsbediening / UKW/DAB-werpantenne / 2x batterij R03 / AAA 1,5 volt Aansluiten • Open het batterijvak van de afstandsbediening en breng de batterijen met de juiste polariteit aan. De vooropgestelde polariteit (+/-) is in het batterijvak aangegeven. -
Page 95: Hantering Van Cd's
Eerste gebruik Wanneer het apparaat voor het eerst ingeschakeld wordt, wordt een automatische DAB+ afstemming van de zenders gestart. Gelieve te wachten totdat dit proces compleet voltooid is. Gelieve voor bijkomende informatie daarover het gedeelte "Gebruik van de DAB+ radio" te raadplegen. Hantering van CD’s Waarschuwingsinstructies voor de hantering Houd de CD zodanig vast, dat u het signaaloppervlak niet aanraakt. -
Page 96: Componentnamen En -Functies
Componenten en functies Voorzijde Achterzijde 9 10 11 12 13 14 10 – Weergave / pauze 1 – Stand-by / Aan 11 – Stop 2 – CD-schuiflade 12 – Vorige (titelsprong achterwaarts) 3 – Bass regelaar (woofer) 13 – Volgende (titelsprong voorwaarts) 4 –... -
Page 97: Basisfuncties
Basisfuncties Inschakelen van het systeem: Druk op de toets <STAND-BY> op de afstandsbediening of aan het hoofdapparaat. Op het display verschijnt "WELCOME". Uitschakelen in stand-by: Druk op de toets <STAND-BY> op de afstandsbediening of aan het hoofdapparaat. Op het display verschijnt "STAND-BY" en het apparaat schakelt naar de stand-by modus om. -
Page 98: Weergave Van Cd Of Audiobestand (Usb, Cd)
Aansluiting van USB-apparaten 1. Druk op de toets <STAND-BY> voor het selecternb van de stand-by modus. 2. Sluit het USB-apparaat op de USB-aansluiting aan de voorzijde aan. Afnemen van het USB-apparaat 1. Druk op de toets <STAND-BY> voor het selecternb van de stand-by modus. 2. -
Page 99: Programmeren Van Titels En Bestanden
Titel even afspelen: Houd de toets <INTRO> op de afstandsbediening ingedrukt om de titels 10 seconden lang af te spelen. Door de toets opnieuw in te drukken, stopt de modus. Programmeren van titels en bestanden U kunt met behulp van de afstandsbediening titels van een audio-CD of bestanden in een door u gewenste volgorde programmeren. -
Page 100: Willekeurige Weergavefunctie En Herhalingsfunctie
Willekeurige weergavefunctie en herhaalfunctie Werkwijze bij audio-CD • Druk op de afstandsbediening op de toets <SHUFFLE> om de willekeurige weergave te starten. Op het display verschijnt "SHUF" en de weergave kan gestart worden. Door twee keer te drukken op de toets <SHUFFLE> ofdoor te drukken op de toets <STOP> wordt de willekeurige weergave tenietgedaan. -
Page 101: Selecteren Van Een Dab+ Zender
Opnieuw starten van de automatische afstemming van zenders • Druk de toets <MENU> in om het DAB menu op te roepen. Op het display staat "FULL SCAN". Start de automatische afstemming met de toets <OK>. • Tijdens de automatische afstemming geeft het display het aantal tot op dat moment gevonden zenders aan. -
Page 102: Uitgebreide Dab+ Informatie
Uitgebreide DAB+ informatie Bij DAB+ wordt er naast het muzieksignaal ook bijkomende informatie overgedragen. Deze kan als volgt opgevraagd worden. Druk op de afstandsbediening op de toets <INFO> om achtereenvolgens volgende informatie op te vragen: • Signaalniveau: Op het display volgt de weergave aan de hand van symbolen van links naar rechts. Hoe meer symbolen er aangegeven worden, hoe beter de ontvangst is. -
Page 103: Gebruik Van De Fm-Radio
Gebruik van Radio Data System (RDS) RDS is een zendsysteem, waarbij FM-zenders samen met het eigenlijke zendsignaal nog andere nuttige informatie overdraagt. Deze kan uit het normale zendsignaal geëxtraheerd en voor een aantal bijkomende functies gebruikt worden. Wordt er een RDS-signaal ontvangen, flitst op het display onder het frequentiedisplay "RDS"... -
Page 104: Gebruik Van Bluetooth
1. Open op uw BLUETOOTH apparaat de koppelingsfunctie en zoek naar "M-822DAB". 2. Selecteer "M-822DAB" voor de koppeling en wacht totdat op het display "BT" verschijnt en er een aantal opeenvolgende geluiden te horen is. De koppeling is nu voltooid. -
Page 105: Tijd/Datum, Sleeptimer, Wekker
Instellen van tijd en datum Bij de ontvangst van een DAB+ of FM-zender in voldoende kwaliteit wordt het uur automatisch ingesteld. Afhankelijk van de ontvangststerkte neemt dit proces enige tijd in beslag. Indien er geen passende zender ter beschikking staat, kunt u het uur ook handmatig instellen: 1. -
Page 106: Oplossing Van Storingen
Oplossing van storingen Gelieve bij functiestoringen de volgende punten te controleren: Voer een reset in de fabriekstoestand uit: "MENU" -> "SYSTEM" -> "RESET" -> "YES" Geen klank Steek de netstekker naar behoren in. Zet het volume op het juiste niveau. ... -
Page 107: Afvalverwerwijdering
Afvalverwerwijdering Afvoer van gebruikte elektrische en elektronische apparaten en batterijen. Het symbool (doorgestreepte vuilnisbak) op het product of op de verpakking daarvan wijst erop dat dit product op het einde van de levensduur daarvan niet als normaal huisvuil behandeld mag worden, maar op een inzamelpunt van een publiekrechtelijke, voor de afvalverwijdering bevoegde instantie of bij een door fabrikanten of distributeurs voorzien inzamelpunt gratis afgegeven moet worden. -
Page 108: Technische Gegevens
Technische gegevens M-822DAB Spanningsvoorziening Wisselspanning ~ 100 – 240 V 50/60 Hz Opnamecapaciteit 40 watt Opgenomen vermogen in de stand-by modus < 1 watt CD-modus ≥ 70 dB Signaal-ruisverhouding (A-filter) ≥ 60 dB Dynamiekomvang Tuner UKW/DAB+ DAB-afstembereik BAND III 174,928 MHz – 239,200 MHz FM-afstembereik 87,50 MHz –... -
Page 109: Garantie
Garantie Geachte klant, wij danken u voor de aankoop van dit Kenwood-product. Indien dit product in normale gebruiksomstandigheden materiaal- of afwer- kingsfouten vertoont, zullen wij deze in overeenstemming met de hiernavolgende garantiebepalingen kosteloos verhelpen resp. het apparaat omruilen. Gelieve deze garantiekaart zorgvuldig te bewaren. Kenwood verleent op dit apparaat een garantie van twee jaar, te rekenen vanaf de datum van aankoop, volgens factuur of kassabon van de Kenwood-dealer.
Need help?
Do you have a question about the M-822DAB and is the answer not in the manual?
Questions and answers