
Subscribe to Our Youtube Channel
Related Manuals for Remo+ DoorCam 3

Summary of Contents for Remo+ DoorCam 3
- Page 1 DoorCam™ 3 Quick Start Guide Name of the product : DoorCam™ 3 Model name : DC3U-2201...
-
Page 2: What's In The Box
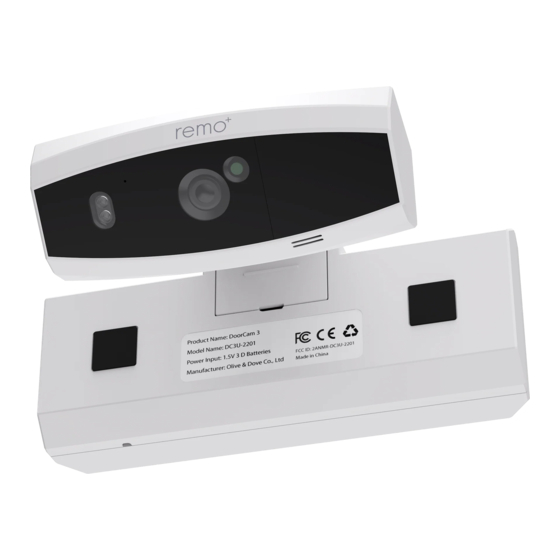
WHAT’S IN THE BOX DoorCam™ 3 Hex Wrench 3 D-Cell Batteries "Protected by Remo+" Sticker DoorCam™ 3 Quick Start Guide Name of the product : DoorCam™ 3 Model name : DC3U-2201 Quick Start Guide... - Page 3 MEET DOORCAM™ 3 Camera Lens IR LED ALS Sensor Microphone PIR Sensor Speaker Mounting Tape Body Bracket Adjustment Screws Reset Button Status Button Status LED Battery Cover...
-
Page 4: Device Registration
DEVICE REGISTRATION * Please register device before installing over the door. Download Remo+ app 1. Please download the remo + app. Use the camera on your phone to scan the QR code for product registration. 5 ~ 10 inches Parallel 2. - Page 5 Push-in Door The door that you push inward. Outside Inside Adjust it to Adjust the bracket the thickness and body to fit flat of the door. on the door. TIGHTEN THE BRACKET SCREWS Use the attached mounting tape. (see page 9) Tighten the bracket screws snuggly using the included Hex wrench.
-
Page 6: Create An Account
CREATE AN ACCOUNT 1. Make sure your mobile device is connected to your home’s 2.4GHz Wi-Fi (5GHz not supported). 2. Download the Remo+ app. Launch the Remo+ app. Remo+ : DoorCam & RemoBell 3. Click "Sign Up" at the bottom of the login page. 4. - Page 7 REGISTER DOORCAM™ 3 1. Have your Wi-Fi network password available. Make sure the device you are using to register your DoorCam 3 is already connected to your 2.4 GHz Wi-Fi network before beginning the process (5 GHz network not supported).
-
Page 8: Check Before Installation
CHECK BEFORE INSTALLATION The surface of the door where the DoorCam 3 is to be installed ● should be clean and flat and free of irregularities. Do not install in places where there is a risk of flooding due to ●... -
Page 9: Physical Installation
If there is moisture, wipe it with a dry cloth to completely remove the moisture. (It is recommended to install DoorCam 3 in the center of the door as shown in the picture below.) To let visitors know your home is protected by Remo+, you can attach the protected by Remo+ Sticker to the door as shown in the picture below. - Page 10 ADJUST DOORCAM™ 3 DoorCam 3 can install both the push-in door and the pull-in door. If you are pushing in the door, follow option A on page 9. The door that you push into. Outside Inside The device is packed in the box as shown in the picture below.
- Page 11 Option A (Push-in door) . Loosen the bracket fixing screw of the body using a Hex Wrench. Push the body toward the door until the inside of the body touches the door. Tighten the bracket fixing screw of the body using a Hex Wrench.
- Page 12 If you pull in the door, follow Option B on page 13. The door that you pull in. Outside Inside The device is packed in the box as shown in the picture below. Fix the bracket mounting screw on the body side flat to the door.
- Page 13 Option B (Pull-in door) Loosen the bracket mounting screw of the camera using a Hex Wrench. Push the camera inward until the back of the camera touches the door. Tighten the bracket mounting screw of the camera using a Hex Wrench.
-
Page 14: Power Source
POWER SOURCE DoorCam™ 3 can use battery or USB power. (Note : USB Power Adapter sold separately) IF USING BATTERIES: 1. Remove the Battery Cover. 2. Install the batteries in accordance with the engraved. The direction in which the battery is inserted. 3. - Page 15 See ADJUST DOORCAM™ 3 PAGE 10 . IF USING USB POWER: Note : USB Power Adapter sold separately) 1. Hang DoorCam 3 over the door and adjust the Bracket to fit the door’s thickness. See ADJUST DOORCAM™ 3 PAGE 10 .
- Page 16 What can I do if I keep getting the error “Connect to DoorCam 3 network to continue…”? 1. Turn OFF cellular data under your Wi-Fi settings and turn ON Airplane Mode 2. Turn OFF the following setting on your smart phone or...
- Page 17 Can I keep my videos for a longer time? If you want to extend the time your videos are available on your account, you can purchase additional 30-day Cloud storage for $3/month or $30/year. The Enhanced plan includes 90-days storage and is available for $44.95/year.
-
Page 18: Forgot Your Password
Can’t see videos of your recent activity? For Android users, allow all permissions to the Remo+ app: Settings > Applications Manager > Permissions > Storage Check your Settings on the Remo+ app: remo+ Menu > Devices > Your Devices > Turn on Motion Sensor >... - Page 19 How many users can access the DoorCam™ 3? You can view DoorCam™ 3 from up to 5 iOS/Android devices. How do I add users? 1. Have the new user download the Remo+ app. 2. Open the Remo+ app and log in using the same account email and password.
- Page 20 SUPPORT We’re happy to help! support@remoplus.co (888)-985-1849 Mon-Fri 8:30am to 5:30pm ET (except holidays) LIMITED WARRANTY 1. LISCENSOR DOES NOT WARRANT THAT THE FUNCTIONS CONTAINED IN THE LICENSED PRODUCT AND HARDWARE WILL MEET LICENSEE’S REQUIREMENTS OR THAT THE OPERATION OF THE SOFTWARE AND HARDWARE WILL BE UNINTERRUPTED OR ERROR-FREE.
- Page 21 FCC COMPLIANCE STATEMENT This device complies with part 15 of the FCC rules. Operation is subject to the following two conditions: (1) This device may not cause harmful interference, and (2) this device must accept any interference received, including interference that may cause undesired operation. FCC INTERFERENCE STATEMENT This equipment has been tested and found to comply with the limits for a Class B digital device, pursuant to part 15 of the FCC Rules.
- Page 22 Digital QSG...
Need help?
Do you have a question about the DoorCam 3 and is the answer not in the manual?
Questions and answers