
Subscribe to Our Youtube Channel
Related Manuals for Outsunny A33-028RD

Summary of Contents for Outsunny A33-028RD
- Page 1 INaab045_CA_FR Stand-Up-Paddle Board-Set OWNER’S MANUAL (All Around SUP Board) IMPORTANT, RETAIN FOR FUTURE REFERENCE: READ CAREFULLY ASSEMBLY & INSTRUCTION MANUAL...
-
Page 2: Table Of Contents
Thank you for choosing this inflatable stand up saddle board (ISUP). To get the best out of your new product you must read and fully un- derstand this user manual. Get professional instructions before you go stand up paddle boarding. Always be extremely careful when using this product. -
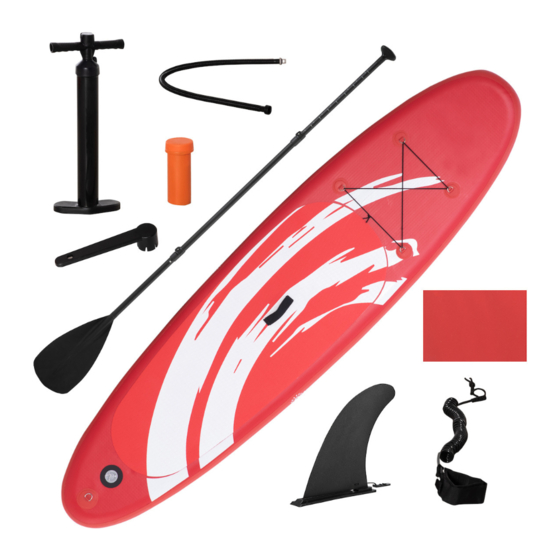
Page 3: Isup Structure Terminology
ISUP Structure Terminology Tri fin set: One centre fin and two small fins on the side. PACKING LIST ● Stand up paddle board ● Three shafted aluminium adjustable oar ● Hand pump w/ pressure gauge ● Valve wrench ● Repair kit ●... -
Page 4: Set-Up Preparation
SET-UP PREPARATION 1.Remove the board from the packaging. Choose a smooth and clean surface and unroll your board so it lays top-side up. 2.Valve operation Follow the instructions below to inflate and deflate the ISUP properly. The inflation valve is near the nose of the board. To close off the valve for inflation, ensure the centre valve pin is in the UP position. - Page 5 3.ISUP Board inflation Steps a.Unscrew the valve cap and press down on the pin to open the valve. Let the air flow naturally into the product, then press down on the pin again to close the valve (in the ‘UP’ position). b.Make sure the pump hose is connected to the ‘inflate’...
- Page 6 5. Inflation tips and precautions DO NOT use an air compressor – if your board gets damaged from over inflation, it will void your warranty. After a few days, the pressure could decrease due to temperature change – add a few more pumps of air. Before using, inflate the board for a full 24 hours to ensure the board is secure.
-
Page 7: Alu Telescopic Isup Paddle
ALU telescopic ISUP paddle Your board paddle comes in three pieces. To build the paddle, hold the button in while sliding the pieces together until they click into place. The last section (top) of the paddle is adjustable. To find the ideal height for your paddle, start by building the paddle so it is 6 inches taller than your own height. -
Page 8: Leak Detection And Repair
LEAK DETECTION AND REPAIR Air Leak Detection If the board is losing air pressure which isn’t caused by cold tempera- tures, check the board for leaks starting with the valves. A leaking valve is rare – if this does happen, we will send a replacement. To find a leak, it is recommended mixing soap and water in a spray bottle, then spray around the valve. -
Page 9: Instruction For Care And Storage
INSTRUCTION FOR CARE AND STORAGE ISUPs are easy to transport and store – just follow these steps: ● Before storing, rinse the board and let dry completely to prevent mildew. ● Do not use harsh chemicals when cleaning – it is best to clean with mild soap and fresh water. -
Page 10: For Your Safety
FOR YOUR SAFETY -10-... -
Page 11: Warning
WARNING ● Check your board and equipment before entering the water. ● Avoid going in the water alone. Make sure that somebody knows where you are going and when you plan to be back. ● Always have some sort of communication should you need help, for example a mobile phone in a dry bag. - Page 12 Planche à Pagaie Debout MANUEL D'UTILISATEUR (Planche de SUP All Around) ASSEMBLY & INSTRUCTION MANUAL...
- Page 13 Nous vous remercions d'avoir choisi cette planche à pagaie gonflable debout (ISUP). Pour en tirer le meilleur parti, vous devez lire et com- prendre parfaitement ce manuel d'utilisation. Assurez-vous de disposer d'instructions professionnelles avant de vous lancer dans la pratique du Stand Up Paddle (SUP). Soyez toujo- urs extrêmement prudent lorsque vous utilisez ce produit.
-
Page 14: Terminologie De La Structure De L'isup
Terminologie de la Structure de l’ISUP Point de chute (2600g m²) Large coussin de pied EVA sur la planche pour une meilleure adhérence et un plus grand confort. Valve haute pression encastrée pour un gonflage et un dégonflage rapides et faciles. Anneau en D à... -
Page 15: Préparation De L'installation
PRÉPARATION DE L'INSTALLATION 1.Retirez la planche de son emballage. Choisissez une surface lisse et propre et déroulez votre planche de manière à ce que la face supérieure soit orientée vers le haut. 2.Actionnement de la valve Suivez les instructions ci-dessous pour gonfler et dégonfler correcte- ment votre ISUP. - Page 16 3.Étapes de gonflage de la Planche ISUP a.Dévissez le capuchon de la valve et appuyez sur la tige pour ouvrir la valve. Laissez l'air s'écouler naturellement dans le produit, puis appuyez à nouveau sur la goupille pour fermer la valve (en haut). b.Assurez-vous que le tuyau de la pompe est connecté...
- Page 17 5.Conseils et précautions de gonflage N'utilisez PAS de compresseur d'air - votre garantie sera annulée si votre planche est endommagée par un gonflage excessif. Après quelques jours, la pression peut diminuer en raison du change- ment de température - rajoutez quelques pompes d'air. Avant de l'utiliser, gonflez la planche pendant 24 heures pour vous assurer qu'elle est bien fixée.
-
Page 18: Pagaie Télescopique Alu Isup
Pagaie télescopique ALU de l’ISUP Votre pagaie est livrée en trois pièces. Pour assembler la pagaie, maintenez le bouton enfoncée tout en faisant glisser les pièces jusqu'à ce qu'elles s'enclenchent. La dernière section (haut) de la pagaie est réglable. Pour déterminer la hauteur idéale de votre pagaie, il importe de l'ériger de manière à... -
Page 19: Détection Et Réparation Des Fuites
DÉTECTION ET RÉPARATION DE FUITES Détection des Fuites d'Air Si la planche perd de la pression d'air indépendamment du froid, véri- fiez l'étanchéité de la planche en commençant par les valves. Une valve qui fuit est rare - si cela se produit, nous vous enverrons un remplacement. -
Page 20: Instructions Relatives À L'entretien Et Au Rangement
● Placez le patch sur la déchirure - l'adhésif réagit rapidement, veillez donc à ce que le positionnement soit précis. Utilisez le rouleau pour que le patch reste plat et régulier. ● Attendez 24 heures avant de gonfler à nouveau la planche. INSTRUCTIONS RELATIVES À... -
Page 21: Pour Votre Sécurité
POUR VOTRE SÉCURITÉ (1) Aucune protection contre la noyade (2) Pression de fonctionnement nominale Attention / danger / Aucune protection (3) Nageurs seulement avertissement contre la noyade (4) Toujours surveiller les enfants dans l'eau Nageurs uniquement Instruction obligatoire (1) Ne pas utiliser en eaux vives (2) Ne pas utiliser en cas de vagues déferlantes (3) Ne pas utiliser en cas de cou-... -
Page 22: Avertissement
AVERTISSEMENT ● Vérifiez votre planche et votre équipement avant d'entrer dans l'eau. ● Évitez d'aller seul dans l'eau. Assurez-vous que quelqu'un sait où vous allez et quand vous comptez revenir. ● Ayez toujours un moyen de communication au cas où vous auriez besoin d'aide, par exemple un téléphone portable dans un sac sec.
Need help?
Do you have a question about the A33-028RD and is the answer not in the manual?
Questions and answers