Table of Contents
Advertisement
Quick Links
Advertisement
Table of Contents

Related Manuals for Coachsound TourMaster-Lite TML2500

Summary of Contents for Coachsound TourMaster-Lite TML2500
- Page 1 TourMaster-Lite Installation Guide Two Channel Audio Server Model: TML2500 V 2.0...
-
Page 2: Table Of Contents
TourMaster-Lite Installation Guide v2.0 TOURMASTER-LITE SYSTEM OVERVIEW ................. 2 HEAD UNIT ........................... 3 POWER Connection ............................3 DRIVER CONTROL PANEL (CPANEL) Port ....................4 GPS AERIAL Port .............................. 4 2.3.1 GPS Connection ............................5 AUX Port ................................5 USB Port ................................6 AUDIO OUT Connection ............................ -
Page 3: Tourmaster-Lite System Overview
TourMaster-Lite Installation Guide v2.0 1 TourMaster-Lite System Overview The Coachsound TourMaster-Lite is a single stereo / two mono channel GPS triggered commentary system that can be played through a vehicles existing radio/audio system conveying consistent journey information to passengers. GPS tracking is integrated into the unit and automatically plays the tour commentaries in the correct places every time. -
Page 4: Head Unit
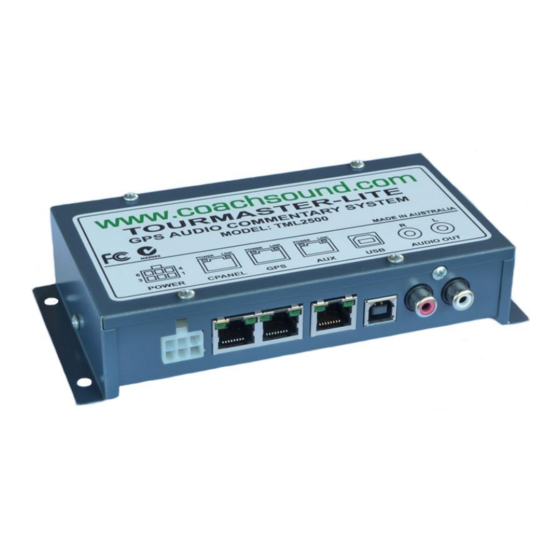
TourMaster-Lite Installation Guide v2.0 2 Head Unit The purpose of the TourMaster-Lite System Head Unit is to receive a GPS signal and play appropriate commentary over the existing audio system. Head Unit Connections and Ports Diagram Figure 1: Head Unit Connections and Ports Diagram LED status lights •... -
Page 5: Driver Control Panel (Cpanel) Port
TourMaster-Lite Installation Guide v2.0 PCON1, PCON2 (INPUT) Remote Power Control (Number 2 and 5): If a control panel is not used with the system, shorting these two connections together via a switch offer an alternative method of powering up the system remotely. Ground (Earth) (Number 3): This is the negative power source of the TourMaster-Lite unit. -
Page 6: Gps Connection
NOTE: The default pin-out of the RJ45 connector on a GPS16x-HVS aerial that has NOT been supplied by Coachsound will differ to the colour code shown above and must be rewired. RS232 communication interface to NMEA 0183 standard GPS receiver. The Tourmaster-Lite system has been tested to work with the Garmin GPS16x-HVS aerial. -
Page 7: Usb Port
“USB CONNECTED” and the PC will show the system as a disk drive called “TOURMASTER” within Windows Explorer. The USB port is used in conjunction with the Coachsound “Route Builder” software tool to update and synchronize audio tour commentary for the system. (See document: “Using the Route Builder Tool”) 2.6 AUDIO OUT Connection... -
Page 8: Installation And Dimensions
TourMaster-Lite Installation Guide v2.0 4 Installation and Dimensions 4.1 Head Unit Installation and Dimensions: Figure 4 - Head Unit Dimensions Head Unit Installation Notes: • Allow 50mm (2 inches) on the connector side for cable connections; • Install in a dry, dust free, secure environment; •... -
Page 9: Driver Control Panel Installation And Dimensions
TourMaster-Lite Installation Guide v2.0 4.2 Driver Control Panel Installation and Dimensions: Figure 5 – Driver Control Panel Dimensions – In-Dash style Figure 6 – Driver Control Panel Dimensions – Top Mount style... -
Page 10: Gps Aerial Installation And Dimensions
TourMaster-Lite Installation Guide v2.0 Driver Control Panel Installation Notes: • Allow 50mm (2 inches) at rear of panel for cable connection; • Mount panel out of direct sunlight; • Mount in dry, dust free environment (panels are not waterproof); • Mount within easy view and operation for the operator;... -
Page 11: General Installation Procedure Guide
Modifications: Any modifications made to this device that are not approved by Coachsound Pty Ltd may void the authority granted to the user by the FCC to operate this equipment.
Need help?
Do you have a question about the TourMaster-Lite TML2500 and is the answer not in the manual?
Questions and answers