
Summary of Contents for Westlicht PERFORMER
- Page 1 PER|FORMER USER MANUAL This document is written for firmware version 0.1.40...
-
Page 2: Table Of Contents
File Management User Interface Overview Navigation Page Layout List Pages Copy/Paste Pages Project Layout Track Sequence Steps Song Tempo Pattern Performer Routing Midi Output User Scale Overview Monitor Clock System Appendix Recording Divisors Run Modes Play Modes Rotation Step Conditions Scales... - Page 3 Firmware Update...
-
Page 4: Introduction
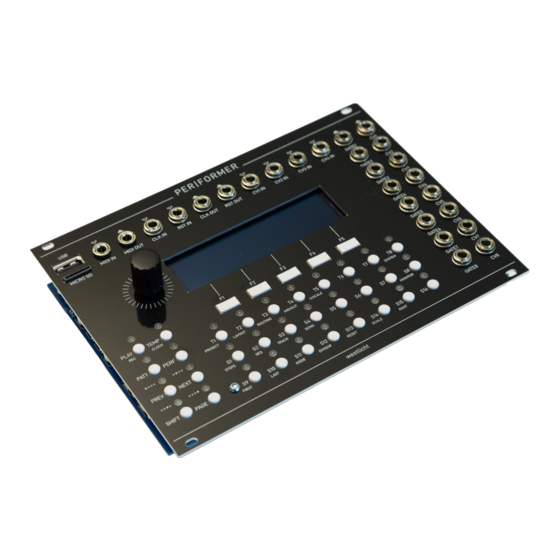
Introduction PER|FORMER is an open source and open hardware eurorack sequencer module. It packs a lot of functionality into a small form factor and was designed both as a versatile sequencer in the studio as well as for live performance. To fully take advantage of all the features available in this module, it is highly recommended to study this document carefully. - Page 5 User Interface Large and bright 256x64 pixel OLED display Encoder with push button 32 buttons with bi-color LEDs 5 function buttons with labels on display Inputs and Outputs 8 CV outputs (-5V to 5V) 8 gate outputs (5V) 4 CV inputs (-5V to 5V) Clock and reset/run input Clock and reset/run output MIDI input and output (MIDI TRS 3.5mm jacks)
-
Page 6: Project
Concepts This chapter introduces the basic concepts of the sequencer and should familiarize readers with the overall functionality of the sequencer. More in-depth information about specific features are provided in the following chapters. Project A project represents the complete state of the sequencer, with the exception of calibration data. Only one project can be loaded at any given time and all data is volatile, meaning that all changes are lost when the unit is powered off. -
Page 7: Curve Track
lengths, time divison and other properties that affect playback. If that is not desired, the second track can be linked to the first track, essentially doubling the playback behavior. Track modes, the physical routing to CV/gate outputs and track linking can be configured on the Layout page. -
Page 8: Midi/Cv Track
fill mode. This for example allows to morph between two patterns by selectively playing a given amount of steps from either pattern. Fills can then be controlled from the Performer page. Song Songs are used to chain together a sequence of patterns for each track. -
Page 9: Clock
Clock The sequencer is driven by a flexible clock system. In master mode, the clock is generated internally and can be sent to external gear and modules using MIDI clock and analog clock signals. In slave mode, the clock is received from an external source via MIDI or analog clock signals. - Page 10 where 001.PRO is the first project slot, 002.SCA is the second user scale slot and SETTINGS.DAT is the backup of the system settings (also stored in on-chip flash memory). The reason for using a slot system rather than traditional filenames is in order to allow for a smooth user experience while preserving the limited resources on the system.
-
Page 11: User Interface
User Interface Overview The user interface of the PER|FORMER sequencer is made up from the following components: OLED display Rotary encoder with button 5 function buttons 32 buttons with bi-color LEDs The rotary encoder will furthermore be denoted as . The buttons are split into 4 groups: ... -
Page 12: Navigation
TEMP Shows the Pattern page while being hold. PATT Shows the Performer page while being hold. PERF Navigate on a page, depends on current context. PREV NEXT Enable alternate function, depends on current context. -
Page 13: Page Layout
There are 3 special pages which can be entered temporarily by just holding a single button, namely the Tempo, Pattern Performer pages. These pages give access to performance related features which need to be quickly accessible at any time. Note: While holding , the LEDs are used to indicate the currently selected page as well as ... -
Page 14: List Pages
Footer The footer is used to display the labels of the function buttons for the current page. On pages such as the Layout page, the function buttons are used to switch between different sub-pages. In that case, the currently active sub-page is highlighted in the footer. On pages that provide a context menu, the labels dynamically change to the context menu actions when ... - Page 15 Note: Due to memory limitations, the clipboard can only hold one object at a time and shares memory across all different types. This means that copying an object always results in the previously copied object being cleared from the clipboard.
-
Page 16: Pages
Measure on sequences. The time signature is also used to define the length of a bar in Signature song mode. Sync Multiple of measures/bars at which to execute syncing (see Pattern Performer 1 - 128 bars Measure pages). page). Scale Scales Default scale. -
Page 17: Layout
Parameter Range Description Off, CV/Gate Enable CV/Gate input on CV inputs for monitoring and recording (emulating a MIDI CV1/CV2, Input keyboard). CV3/CV4 Off, CV1, Curve CV CV2, CV3, Select CV input for curve recording. Input Note: Tempo and Swing are routable parameters. Context Menu Hold to open the context menu and access the following functions:... - Page 18 Link Track The second tab is used to setup track linking. Each of the 8 tracks can be linked to any of the preceding tracks, taking over its playback behavior. Note: A track can only be linked to a preceding track due to the internal architecture of the sequencer.
-
Page 19: Track
If using a MIDI/CV track, it can be useful to map multiple virtual outputs of the track to physical outputs to allow for polyphonic signals or add modulation signals such as velocity or aftertouch. The following shows a configuration with two note polyphony and pitch/velocity signals. - Page 20 Button Function Description Show existing or create a new route for the currently selected parameter (only active if Route F4 selected parameter is routable). Note Track If a track is in Note mode, the following parameters are available: Parameter Range Description Play...
- Page 21 Note: Slide Time, Octave, Transpose, Rotate, Gate P. Bias, Retrig P. Bias, Length Bias and Note P. Bias are routable parameters. These parameters are great for live performance, as they allow to change how the sequence is played back without actually changing the sequence itself. Curve Track If a track is in Curve, the following parameters are available: Parameter...
- Page 22 If a track is in MIDI/CV mode, the following parameters are available: Parameter Range Description MIDI source port (hold and rotate to select MIDI SHIFT ENCODER Source MIDI, USB channel). Voices 1 - 8 Number of voices. Voice Pitch, Pitch+Vel, CV signals to generate for each voice.
-
Page 23: Sequence
Note: Low Note and High Note can be used to setup key ranges such that multiple MIDI/CV tracks can be played in split keyboard mode. Sequence The Sequence page is entered using PAGE SEQ This page allows to change the sequence settings of the currently selected sequence on the selected track. Note that the shown parameters depend on the configured Track Mode of the selected track. - Page 24 Parameter Range Description Parameter Range Description First Step 1 - 64 First step to play. Hold to edit both first and last step together. SHIFT Last Step 1 - 64 Last step to play. Hold to edit both first and last step together. ...
-
Page 25: Steps
Steps The Steps page is entered using PAGE STEPS This page allows editing the currently selected sequence on the currently selected track. Depending on the track mode of the selected track, this page shows a different graphical representation of the sequence. If track mode is set to MIDI/CV, the page is not available and selecting it will jump to the Track page. - Page 26 Button Button Layers Layers Shape, Shape Variation, Shape Variation Probability F1 Minimum F2 Maximum F3 Gate, Gate Probability F4 Section Selection Sequences contain up to 64 steps, of which only 16 are shown on the page. Press to select one of the 4 ...
- Page 27 Press to shift all steps in the sequence between the current first and last step to the left SHIFT PREV SHIFT NEXT or right. Steps will wrap around on both sides. This has a similar effect as Rotation, but instead of changing the playback position, shifting actually moves the steps in the sequence itself.
-
Page 28: Song
Button Note Track Curve Track Scale Range S14 Root Note S15 S16 While holding the button, the selected sequence parameter can be adjusted by rotating the or by pressing PAGE ENCODER to select the most common values. Releasing the button will return to the normal state of the steps page. - Page 29 Note: When creating a pattern chain, the song is immediately activated for playback and the sequencer clock is started if not already running. Editing Slots Rotate the or use to select a slot in the list. ENCODER PREV ...
-
Page 30: Tempo
Note: Song mode can also be used to toggle between different sets of patterns. Simply use slots to define the pattern sets and then select a slot and press twice to quickly start/stop song F5 playback to switch to a new set of patterns. Tempo The Tempo page is temporarily shown while holding ... -
Page 31: Pattern
F1 F1 F5 cancel them. Note: When using the temporary mode of the performer page by holding , you can let go PATT while holding and keep the page open. -
Page 32: Performer
F2 F5 scheduled changes. Note: When using the temporary mode of the performer page by holding , you can let go PATT while holding and keep the page open. PATT ... -
Page 33: Routing
F1 F1 press to cancel them. F5 Note: When using the temporary mode of the performer page by holding , you can let go PERF while holding and keep the page open. PERF ... - Page 34 There is a maximum of 16 routes that can be set up. Press or hold and rotate the to select F1 F2 SHIFT ENCODER the route to edit. To create a new route, select one of the empty routes that has Target value set to None. Then press the encoder to select a routing target by rotating the ...
-
Page 35: Midi Output
When changing the route parameters, they will not immediately be active. Press to commit the changes and make the new F5 configuration active. An existing route can be reset to its default state by pressing . Again, the change has no effect before ... -
Page 36: User Scale
When configured to Note event, the following additional parameters are available for configuration: Parameter Range Description Gate Source Track 1-8 Sequencer track to use as the note gate source. Note Source Track 1-8, C-1 - G9 Sequencer track to use as the note source or a constant MIDI note. Vel. -
Page 37: Overview
Note: The items defined in the user scale represent a single octave of the scale, which is equal to 12 semitones (1V) in Chromatic mode and the interval between the first and last item in Voltage mode. The other octaves are automatically inferred by repetition. Context Menu Hold to open the context menu and access the following functions:... - Page 38 CV Outputs The second tab shows the current voltages of the CV outputs. MIDI The third tab shows incoming MIDI messages. Stats The fourth tab shows general stats of the sequencer such as the total uptime and overflows of the MIDI message queues.
-
Page 39: Clock
Clock The Clock page is entered using PAGE CLOCK This page is used to setup the clock system of the sequencer using the following parameters: Parameter Range Description Auto, Mode Master, Clock mode Slave Restart, Action to perform when is pressed: In Restart mode, the master clock ... -
Page 40: System
resolution. System The System page is entered using and needs confirmation to prevent accidental entering. PAGE SYSTEM Calibration Press to show the calibration tab. F1 On this tab you can calibrate the 8 physical CV outputs of the sequencer to millivolts accuracy, given that you have access to a volt meter with high accuracy. - Page 41 Calibration Procedure for more information on how to efficiently calibrate the CV outputs. Context Menu Hold to open the context menu and access the following functions: SHIFT PAGE Button Function Description Init Initialize the settings to the default state. ...
- Page 42 This tab shows the current version of the firmware and allows to reset to the bootloader to easily initiate the firmware update procedure. See Firmware Update for more information.
-
Page 43: Appendix
Appendix Recording Instead of entering note sequences one step at a time, an external MIDI keyboard can be used to speed up the process. There are two ways for recording sequences. First, sequences can be recorded live by just playing the keyboard while the sequencer is running. -
Page 44: Run Modes
Divisor Note Name 1/16 Sixteenth note 1/8T Triplet eighth note 1/16. Dotted sixteenth note Eighth note 1/4T Triplet quarter note 1/8. Dotted eighth note Quarter note 1/2T Triplet half note 1/4. Dotted quarter note Half note Triplet whole note 1/2. Dotted half note Whole note Triplet double note... -
Page 45: Play Modes
Pendulum In Pendulum mode, the sequence is alternately played in forward and backward mode. Each iteration is exactly 2 * N steps: 1 2 3 4 5 6 7 8 8 7 6 5 4 3 2 1 | 1 ... Ping Pong In Ping Pong mode, the sequence is played similarly to the pendulum mode, but when changing direction, the first/last step is not played twice. -
Page 46: Step Conditions
Rotation enables to play back the sequence at different start points. A typical 8 step sequence in Forward mode is played back as follows: 1 2 3 4 5 6 7 8 1 2 3 4 5 6 7 8 ... With a rotation of +1 the sequence is rotated 1 step to the right and played back as follows: 2 3 4 5 6 7 8 1 2 3 4 5 6 7 8 1 ... - Page 47 Index Volts 0.667 0.750 0.833 0.917 Major Index Volts 0.000 0.167 0.333 0.417 0.583 0.750 0.917 Minor Index Volts 0.000 0.167 0.250 0.417 0.583 0.667 0.833 Major Blues Index Volts 0.000 0.250 0.333 0.583 0.750 0.833 Minor Blues Index Volts 0.000 0.250 0.417...
- Page 48 Gamelan Index Volts 0.000 0.083 0.250 0.583 0.667 Gypsy Index Volts 0.000 0.167 0.250 0.500 0.583 0.667 0.917 Arabian Index Volts 0.000 0.083 0.333 0.417 0.583 0.667 0.917 Flamenco Index Volts 0.000 0.083 0.333 0.417 0.583 0.667 0.833 Whole Tone Index Volts 0.000...
-
Page 49: Shapes
Index Volts 0.842 0.895 0.947 22-tet Index Volts 0.000 0.046 0.091 0.136 0.182 0.227 0.273 0.318 Index Volts 0.364 0.409 0.454 0.500 0.546 0.591 0.636 0.682 Index Volts 0.727 0.773 0.818 0.864 0.909 0.954 24-tet Index Volts 0.000 0.042 0.083 0.125 0.167 0.208... -
Page 50: Arpeggiator Modes
Index Shapes Index Shapes Index Shapes Arpeggiator Modes The following arpeggiator modes are available. The example note order is based on a chord with 5 notes: Mode Sequence Play Order Played back in the order the notes were entered. 1 2 3 4 5 | 1 2 3 4 5 | ... Down ... - Page 51 The following routing targets are available. Target Scope Notes Play Global Play Toggle Global Toggle playing. Allows simultaneous use of the button. PLAY Record Global Record Toggle recording. Allows simultaneous use of the button SHIFT PLAY Global Toggle combination.
- Page 52 The Novation Launchpad can be used as an advanced control surface for the sequencer, allowing for editing sequences and launching patterns via the 8x8 button matrix. When a Launchpad is connected to the USB port, the sequencer automatically detects the device and immediately starts using it as a control surface. The following Lauchpad controllers have been tested and are working: Launchpad Mini MK1/MK2/MK3 Launchpad S...
-
Page 53: Usb Midi Devices
Buttons Buttons Description Description Fill track 7 A H Mute/unmute track 8 A H Sequence Mode Sequence mode allows for comprehensive editing of the patterns on all tracks. The grid allows for editing individual step values on the active track and layer. -
Page 54: Calibration Procedure
F3 Firmware Update Use the following steps to upgrade the sequencer: Download the latest UPDATE.DAT file from https://github.com/westlicht/performer/releases. Copy the UPDATE.DAT file to the root directory of the SD card. Insert the SD card into the sequencer's SD card slot. - Page 55 1. Power up the sequencer while pressing down the ENCODER 2. Enter the System page and go to the update tab, then press and hold the which will initiate a reset and jump to ENCODER the bootloader. The bootloader will verify the integrity of the UPDATE.DAT file using an MD5 hash. Once verified, a confirmation is requested to to change to YES and press the actually initiate the update process.
Need help?
Do you have a question about the PERFORMER and is the answer not in the manual?
Questions and answers