
Subscribe to Our Youtube Channel
Summary of Contents for AVCOM Galaxy
- Page 1 Galaxy Seismic Sensor and Home Automation System for Residential Applications System Setup Installation & Operation Manual...
- Page 2 ADVANCED COMMUNICATIONS INC Introducing the New Galaxy complete whole house protection system. This sophisticated system provides total security complete with voice notification, and advanced warning communication anywhere in the world. • NO MONTHLY FEES • Simple Installation • Full Warranty •...
-
Page 3: Table Of Contents
[7777] [8888]) ..........................13 HANGE ENSOR ATER [9999] ................................... 14 HANGE ASTER NEW GALAXY FEATURES .................................. 15 ................................... 15 ET UP I CONNECTION ................................. 15 NTER EMAIL ADDRESS BY KEYPAD ..................................16 END A TEST EMAIL BY KEYPAD ....................................16 DJUST BEEP VOLUME ........................ -
Page 4: Before You Begin Set Up
Before you begin set up: • Please note that each product in your Galaxy system is given a number as follows. (The following configuration shows the typical “water” Galaxy. Other configurations are available. You may not have all components listed here, or you may have other devices that are not listed here. -
Page 5: Step-By-Step Setup Instructions
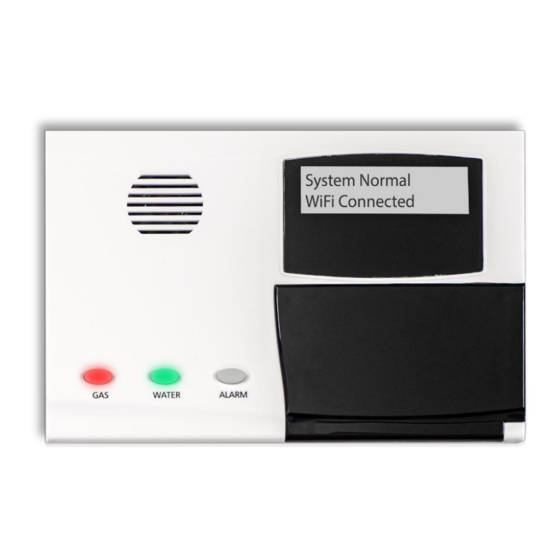
Step-by-step Setup Instructions Step 1. Plug the DC adapter into the port on the top of the controller. After several seconds, the display will show “System Normal” Valves Step 2. Remove the cover from the valve controller[2] Step 3. Plug the DC adapter into the valve [2] circuit board connector Step 4. -
Page 6: Water Sensors
Sensor 1” (Additional sensors will show as Sensor 2, Sensor 3, etc.) or “Valve Already Synched” Step 12. Repeat steps 11-14 for any additional water sensors you are installing with your system. Congratulations. Your Galaxy devices are now linked and ready for installation in their final locations... -
Page 7: Installation
Step 4. Place the pad in an area where you would expect to find water if a water leak occurs. Step 5. Install the water valve into the main water line where it enters the building. WARNING: Galaxy valves should only be installed by a licensed plumber in accordance with all local building codes and ordinances. -
Page 8: Operating Valves
Operating Valves Opening and closing Gas and Water Valves The Galaxy allows for very simple operation of attached valves. The current status of the valves is indicated by the color of the light behind its operating button. Green = Valve is open... -
Page 9: Valve Manual Override
To Open the valve: If the light is red, push the “water” button to open the water valve (or “gas” button for gas valve). The light will change to flashing green while the valve(s) open, then turn to solid green when all valves have finished opening. To Close the valve: If the light is green, push the “water”... -
Page 10: Advanced Functions
Advanced Functions The various advanced functions can be accessed by pressing the Function Key “A” on the keypad. You will be prompted to enter a 4-digit function code from the table below. Each function is described in detail later in this section. Function Description 4-digit Code... -
Page 11: Security Lockout [4321]
Galaxy is connected to the internet and set up to send emails. Press any button on the keypad during an alarm to mute/acknowledge the alarm. To operate the valve again, you must first exit security lockout mode by pushing “A”... -
Page 12: Earthquake Sensor O N /Off [1234]
Earthquake Sensor On/Off [1234] This will allow you to turn the earthquake sensor on or off. When the earthquake sensor is on, an “E” icon will appear in the top right corner of the display. When enabled, the earthquake sensor will monitor for damaging vibrations. If an earthquake occurs, all connected gas valves will close automatically. -
Page 13: Change Sensor Name (Gas [7777] Or Water [8888])
Change Sensor Name (Gas [7777] or Water [8888]) Use this function to change the name of the sensor that is shown on the display and in email. This changes names from the default (“Sensor 1”, “Sensor 2”, etc.) to a name that better describes where the sensor is installed. When prompted, either enter the 2-digit number from the table below on the number pad, or push the * button to cycle through the available options. -
Page 14: Change Master Code [9999]
Change Master Code [9999] This function will allow you to change the Master Security Code to one of your choosing. The Master Security Code is a 4-digit number that will allow you to lock or unlock the keypad to prevent unauthorized usage of the system. To change the Master Security Code 1. -
Page 15: New Galaxy Features
New Galaxy Features Set up WiFi connection 1. Press ‘A’ to bring up function menu 2. Enter 4-digit code: 1000 3. WiFi module will scan available networks and display the number of networks found 4. Press ‘*’ to cycle through available networks 5. -
Page 16: Send A Test Email By Keypad
1. Press ‘A’ to bring up function menu 2. Enter 4-digit code: 1003 3. The Galaxy will attempt to send a test email using the WiFi network email(s) configured previously 4. The display will show one of the following messages a. -
Page 17: Change Language Between English And French By Keypad
1. Press ‘A’ to bring up function menu 2. Enter 4-digit code: 6666 3. If the Galaxy was in French, it will change to English display. If it was in English, it will change to French. Note: Changing the language will change the language for the LCD display, the... - Page 18 Galaxy Galaxy Function Code Reference The various advanced functions can be accessed by pressing the Function Key “A” on the keypad. You will be prompted to enter a 4-digit function code from the table below. Each function is described in detail later in this section.
-
Page 19: Galaxy Security Features
In STAY mode, there is no delay. The alarm will sound immediately whenever a door sensor is triggered. When the system is DISARMED, the Galaxy will chirp once everytime a door is closed, and multiple times whenever a door is opened. -
Page 20: Technical Information
Technical Information Galaxy Controller with built-in Gateway Galaxy Controller Power Supply: 5.0VDC Micro-USB Enclosure: White UL-94V0 rated 180mm (7.1”) x 120mm(4.7”) x 30mm(1.2”) Frequency: 915MHz Modulation: 2FSK Built-in WiFi Built-in voice alerts Data Encoding: Custom Proprietary • 2-way digital communication with remote devices. -
Page 21: Water Sensor
Cable: 2-conductor, 22AWG. White Outer Jacket, Cable Length: 1.6m (5ft.) Probe Connector: 1.0mm barrel plug • Plugs into Wireless Water Sensor or Galaxy Controller • Detects when water bridges the two contacts • Socket for plugging in additional contacts (“daisy chain”) -
Page 22: Gas And Carbon Monoxide Sensing
Gas and Carbon Monoxide Sensing Carbon Monoxide and Gas Detector Power Supply: 5.0VDC Micro-USB Enclosure: White UL-94V0 rated 123mm(4.8”) x 83mm(3.3”) x 39mm(1.5”) Frequency: 915MHz Modulation: 2FSK Data Encoding: Custom Proprietary Estimated range from controller: 150ft** • Meets UL2034 and UL1484 •... -
Page 23: Valve
Valve Wireless Water Valve Power Supply: 5.0VDC Micro-USB Sends Low Batttery indication to Controller Enclosure: Grey, White, or Black UL-94V0 rated Frequency: 915MHz Modulation: 2FSK Data Encoding: Custom Proprietary Estimated range from controller: 300ft** Time to open/close: less than 5 seconds IAPMO cUPC ANSI/NSF 61 FCC Part 15... -
Page 24: Troubleshooting
It is important to note that the water/gas detection and shut-off capabilities of this system are completely independent of the internet and will continue to function even if the email notification service on the Galaxy is not set up. Controller [1]... -
Page 25: Sensors [4]
Sensors [4] Questions Answers How do I rename sensors to See “Chapter 7-Advanced Functions” section “Change something more informational? (e.g. Sensor Name” on page 22 of the User Manual Change “Sensor 1” to “Kitchen”) I installed batteries in my sensors When the sensor has no communication link to the when I first got them, but I installed controller, it will expend more battery power trying to... -
Page 26: Approvals
What do does it mean when the The valve has not responded to the controller within its controller display shows “No timeout period. Response -Valve _”? This message commonly occurs while synchronizing other devices or when the controller first powers up and normally disappears within 30-seconds after the controller is powered on or 30-seconds after sync mode has ended. -
Page 27: Warranty
(1) year from the date of purchase. AVCOM's liability is limited to the replacement of the product provided that proof of purchase date is presented to AVCOM Manufacturing Inc.
Need help?
Do you have a question about the Galaxy and is the answer not in the manual?
Questions and answers