Table of Contents
Advertisement
Available languages
Available languages
Advertisement
Chapters
Table of Contents

Summary of Contents for RIP TUNES RCS-220S
- Page 1 Cassette Player / Recorder with USB playback and recording Reproductor de Casetes con Reproducción y Grabación USB Lecteur de cassette avec lecture et enregistrement USB USER’S GUIDE GUÍA DE USUARIO GUIDE DE L’UTILISATEUR MODEL RCS-220S...
-
Page 2: Table Of Contents
TABLE OF CONTENTS Safety Precautions ............3 Introduction ..............4 Whats in the Box ..............4 Product Diagram ............... 5 Getting Started ..............6 Playback Modes and Functions .......... 6 Care and Maintenance ............8 Troubleshooting ..............9 Technical Support ............10 Limited Warranty ............ -
Page 3: Safety Precautions
SAFETY PRECAUTIONS READ THIS MANUAL CAREFULLY BEFORE OPERATING AND RESERVE IT FOR FUTURE REFERENCE. REFER TO IT WHEN ENCOUNTERING ANY OPERATING PROBLEM. 1. WARNING: To reduce the risk of electric shock or damage to the player’s speakers, do not disassemble the player. There are no user-serviceable parts inside. -
Page 4: Introduction
INTRODUCTION Congratulations on your purchase of this Cassette Player/Recorder with USB recording and playback! For your safety, and to get the most enjoyment from your player, please read all of these instructions. FEATURES • Cassette player and recorder • USB slot for MP3/WMA playback and recording from tape or microphone •... -
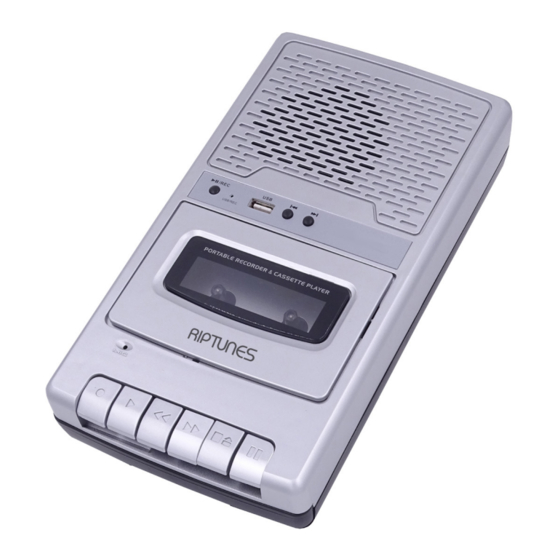
Page 5: Product Diagram
PRODUCT DIAGRAM 1. Speaker 7. Power Input 2. USB Play/Record Controls 8. Headphone Output 3. USB Port 9. USB/Tape Switch 4. Built-in Microphone 10. Microphone Input 5. Cassette Tape Door 11. Volume Control 6. Tape Transport –5–... -
Page 6: Getting Started
GETTING STARTED BATTERY INSTALLATION This player takes 4 C-cell batteries (not in- cluded). It also plugs into the wall with the AC adapter provided. To install the 4 C batteries, open the battery cover on the back of the play- –... - Page 7 NOTE: This player is designed to record on TYPE I (iron oxide) cassette tapes, which are the most common tapes. Some special formula tapes (chromium dioxide and metal particle tapes) cannot be properly recorded on with this product. Those tapes can, however, be used for playback. RECORDING FROM THE MICROPHONE TO TAPE Recording from the built-in microphone 1.
-
Page 8: Care And Maintenance
RECORDING FROM TAPE TO USB 1. Set USB/TAPE switch to TAPE and insert a USB drive in the USB port. Press and hold the / /REC button (on the USB controls) to start recording from the tape, the red USB/REC indicator will keep blinking rapidly. -
Page 9: Troubleshooting
wish to record over and there is a gap present, tape a piece of cellophane tape over the gaps. The record button will now press down as expected. Similarly, if you have a recording you want to keep permanently and there is a tab already present, you can break off the tabs to prevent the tape from being recorded over. -
Page 10: Technical Support
The recorder begins • If using batteries, try again with AC power to sound distorted. or other batteries The tape reels turn • Try a different cassette very slowly or not at all. Tapes sound muffled • Try a different cassette •... -
Page 11: Limited Warranty
LIMITED WARRANTY ONE YEAR LIMITED WARRANTY / 90 Days Riptunes™ warrants this product against defects in material and workmanship to the original purchaser as Also this warranty does not apply if the product has specified below provided product is registered online been damaged by accident, abuse, misuse, or within fourteen (14) days of purchase. -
Page 12: Español
TABLA DE CONTENIDO Precauciones de Seguridad ..........13 Introducción..............14 Qué Hay en la Caja ............14 Diagrama del Producto ............ 15 Comenzando ..............16 Modos de Reproducción y Volumen ......... 16 Cuidado y Mantenimiento ..........18 Solución de Problemas ............ 20 Soporte Técnico .............. -
Page 13: Precauciones De Seguridad
PRECAUCIONES DE SEGURIDAD LEA ESTE MANUAL CUIDADOSAMENTE ANTES DE OPERAR SU UNIDAD Y GUÁRDELO PARA REFERENCIA A FUTURO. REFIÉRASE A ÉL CUANDO ENCUENTRE CUALQUIER PROBLEMA DE OPERACIÓN. 1. ADVERTENCIA: Para reducir el riesgo de descarga eléctrica o daños a los altavoces del reproductor, no lo desarme. -
Page 14: Introducción
INTRODUCCIÓN ¡Felicidades por la compra de este Reproductor/Grabadora de Casetes con Reproducción y Grabación USB de Riptunes! Por su seguridad y para obtener el mayor disfrute de su reproductor, por favor, lea todas las instrucciones. CARACTERÍSTICAS • Reproductor y grabadora de casetes •... -
Page 15: Diagrama Del Producto
DIAGRAMA DEL PRODUCTO 1. Altavoz 7. Interruptor de encendido 2. Controles de grabación y 8. Salida de Auriculares reproducción USB 9. Interruptor USB/Cinta 3. Puerto USB 10. Entrada de Micrófono 4. Micrófono integrado 11. Control de volumen 5. Puerta de la cinta de casete 6. -
Page 16: Comenzando
COMENZANDO INSTALACIÓN DE LAS BATERÍAS Este reproductor utiliza 4 baterías tipo C (no incluidas). También se enchufa en la pared con el adaptador AC que se incluye. Para instalar las 4 baterías C, abra la tapa del com- partimento de las baterías en la parte posteri- or del reproductor. - Page 17 Paro automático: Cuando su reproductor esté funcionando en modo PLAY o RECORD y se llegue al final de la cinta, este se apagará au- tomáticamente y volverá todos los botones a la posición OFF. Lo mismo debería ocurrir si se alcanza el final de una cinta al rebobinar o avanzar rápidamente.
-
Page 18: Cuidado Y Mantenimiento
GRABANDO DESDE EL MICRÓFONO A USB 1. Coloque el interruptor USB/TAPE en USB. 2. Presione y sostenga el botón / /REC para grabar desde el micró- fono integrado o micrófono externo. El indicador USB/REC comen- zará a parpadear rápidamente. Presione el botón / /REC para detener la grabación. - Page 19 Esto puede causar una grabación o reproducción amortiguada, y podría impedir el paro automático. Para limpiar el mecanismo de la cinta, abra la tapa de la cinta y pulse el botón PLAY. A continuación, limpie suavemente los cabezales, el cabrestante y la rueda de tracción con un limpiador de cabezales o un casete limpiador de cabezales.
-
Page 20: Solución De Problemas
SOLUCIÓN DE PROBLEMAS PROBLEMA SOLUCIÓN La unidad no se enci- • Conecte el cable de suministro de energía o ende instale baterías No sale sonido de los • Asegúrese de que ha subido el volumen y la altavoces unidad esta encendida. •... -
Page 21: Garantia
GARANTIA GARANTÍA LIMITADA POR UN AÑO / 90 DÍAS Riptunes garantiza este producto contra defectos en alterado o modificado sin el permiso expreso de material y obra al comprador original como se especifica Riptunes; ha recibido servicio por un centro de abajo siempre y cuando el producto este registrado en reparación no autorizado por Riptunes;... -
Page 22: Français
TABLE DES MATIÈRES Consignes de Sécurité ............. 23 Introduction ..............24 Qu’y A-T-Il Dans la Boite ........... 24 Diagramme du Produit ............ 25 Commencer ..............26 Modes et Fonctions de Lecture ........26 Soin et Maintenance ............28 Dépannage ..............30 Support Technique ............ -
Page 23: Consignes De Sécurité
CONSIGNES DE SÉCURITÉ LISEZ ATTENTIVEMENT CE MANUEL AVANT L’UTILISATION ET RÉ- SERVEZ-LE POUR RÉFÉRENCE. CONSULTEZ-LE LORSQUE VOUS REN- CONTREZ UN PROBLÈME DE FONCTIONNEMENT. 1. AVERTISSEMENT: pour réduire le risque d’électrocution ou d’endom- magement des haut-parleurs du lecteur, ne démontez pas le lecteur. Il ne contient aucune pièce réparable par l’utilisateur. -
Page 24: Introduction
INTRODUCTION Félicitations pour votre achat de ce lecteur / enregistreur de cassette avec enregistrement et lecture USB! Pour votre sécurité et pour profiter au maximum de votre lecteur, veuillez lire toutes ces instructions. CARACTÉRISTIQUES • Lecteur et enregistreur de cassettes •... -
Page 25: Diagramme Du Produit
DIAGRAMME DU PRODUIT 1. Haut-parleur 6. Transport de bande 2. Commandes de lecture / 7. Entrée d’alimentation enregistrement USB 8. Sortie casque 3. Port USB 9. Commutateur USB / bande 4. Microphone intégré 10. Entrée microphone 5. Porte de la cassette 11. -
Page 26: Commencer
COMMENCER INSTALLATION DE LA BATTERIE Ce lecteur prend 4 piles C (non incluses). Il se branche également au mur avec l’adapta- teur secteur fourni. Pour installer les 4 piles C, ouvrez le couvercle des piles à l’arrière du lec- teur. Insérez les piles en faisant correspondre le + et le - avec les marquages sur l’appareil. - Page 27 Arrêt automatique: lorsque votre enregistreur fonctionne en mode PLAY ou RECORD et que la fin de la bande est atteinte, il s’éteint au- tomatiquement et remet toutes les touches en position OFF. La même chose devrait se produire si la fin d’une bande est atteinte lors du rem- bobinage ou de l’avance rapide.
-
Page 28: Soin Et Maintenance
ENREGISTREMENT DU MICROPHONE SUR USB 1. Réglez le commutateur USB / TAPE sur USB. 2. Appuyez sur le bouton / /REC et maintenez-le enfoncé pour enreg- istrer à partir du micro intégré ou externe. L’indicateur rouge USB / REC clignote rapidement. Appuyez à nouveau sur / /REC apour arrêter l’enregistrement. - Page 29 avec un nettoyeur de tête ou une cassette de nettoyage de tête. Débranchez toujours le cordon d’alimentation avant le nettoyage. Laisser sécher 30 minutes lors de l’utilisation d’un nettoyant liquide. Net- toyez les têtes toutes les 25 heures d’utilisation. Ne laissez aucun produit de nettoyage tomber à...
-
Page 30: Dépannage
DÉPANNAGE PROBLÈME SOLUTION Pas d’alimentation à • Branchez le cordon d’alimentation ou in- l’unité stallez des piles. Aucun son des haut- • Assurez-vous que le volume est élevé et que parleurs l’appareil est allumé. • Assurez-vous que les écouteurs ne sont pas connectés. -
Page 31: Garantie
GARANTIE JOURS GARANTIE LIMITÉE D’UN AN 90 Riptunes™ tous les produits. L’altération ou l’ouverture du boîtier ou garantit ce produit contre les défauts de matériaux de la coquille du produit annulera cette garantie dans son et de fabrication à l’acheteur original tel que spécifié ci- intégralité.
Need help?
Do you have a question about the RCS-220S and is the answer not in the manual?
Questions and answers