Advertisement
Quick Links
Advertisement

Subscribe to Our Youtube Channel
Related Manuals for Daedalus Sparrow

Summary of Contents for Daedalus Sparrow
- Page 1 Daedalus Spinning Wheels Sparrow...
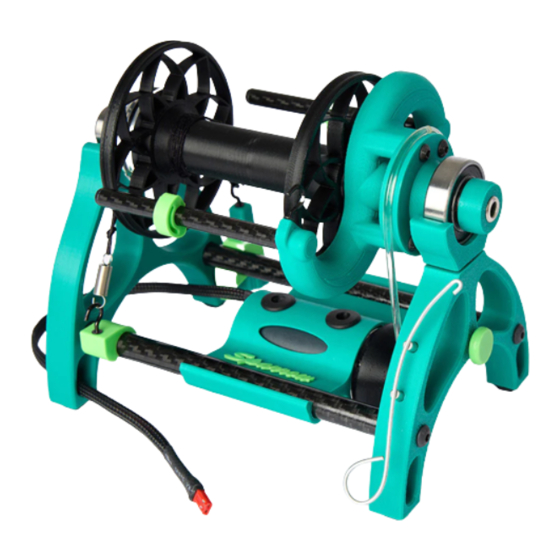
- Page 2 • Maiden Bearing • Maiden Cup • Face • Tie Knob Left Tension Anchor, Serial Plate, Motor Mount, Orifice Hook Pinion, Guide • Rear Bearng • Rear • Right Tension Dial • Motor Cable...
- Page 3 Welcome to the Flock! Thank you for purchasing the smallest Daedalus electric spinning wheel to date! It was designed to be quiet, long-lived, and to require little to no maintenance during its lifetime. Getting Started Check out all of our YouTube Videos on how to use the Sparrow by scanning this QR Code with your mobile device. Package contents may shift during shipping, so let’s make sure that everything is properly aligned for optimal spinning. (This is also a wise procedure after traveling with your Daedalus wheel.) The motor mount is designed to be easily removed and reinstalled facing the opposite direction, in order to change tensioning systems from Scotch to Irish (our wheels all ship out set up in Scotch). Scotch tension is where the motor drives the flyer and the tension belt provides resistance to the bobbin, allowing yarn to wind on. In Irish tension, it’s the opposite: the bobbin is led by the motor. Because of this feature, you will need to make sure the motor and its pinion...
- Page 4 To do so, check the pinion pulley (the groove that holds your drive band) on the front of the motor. It should be located directly below the belt groove on the flyer above. Verify that the drive belt is parallel to the front frame by observing it from the side. Use your thumbs to adjust the position of the motor mount as necessary. If the motor mount feels too tight to move, push one side downward until it pops off the carbon tube. Scotch Tension Basics Our wheels ship out in Scotch Tension. When using your Sparrow in Scotch tension, the motor will be facing forward and the pinion pulley will have just enough space between it and the front frame to slip the rubber drive belt in front of it. Viewing from the side will verify that the drive belt is parallel to the adjacent front frame. The tension belt is likely already in place, but humidity changes can drastically affect the length of the rat tail (aka the tension belt). The goal is to have the Right Tension Dial (1) adjusted into the middle of its adjustment range, with no slack in the tension belt and no expansion...
- Page 5 Increase Tension of the spring. This way, there is a usable range on the dial where the takeup can be increased or decreased. To reduce the slack on the tension belt, simply rotate the Left Tension Hook outward (2) until the slack is gone, then use the knob to fine-tune from there. After traveling or changes in Decrease Tension humidity, a small adjustment may be required. Sparrow tension uses a spring, and you can look at it to see how much tension is being applied. The usable range goes from spring collapsed to fully extended at almost double its length. If you still need more takeup, consider using Irish tension.
- Page 6 Setting Up for Irish Tension Irish tension provides more takeup, or pulling in of the yarn, than Scotch tension. Changing to Irish tension is as easy as removing the flyer, tension belt, and motor drive belt. First, detach the motor and its mount by pushing down on one edge with both thumbs. The other side now comes free easily. Turn the motor so that it now faces the rear, and snap it back onto the carbon tubes. Place the motor drive belt over the rear frame and re-install the flyer. Install the motor drive belt over the bobbin’s small whorl. Verify the alignment of the clear motor drive belt (it being parallel to the rear frame) or gently slide the motor until it aligns directly under the small whorl of the bobbin. Install the tension belt at the front, over the flyer groove. Please note that your direction switch will be opposite in Irish as compared to Scotch (meaning that I is S and II is now Z). You will need to slide the motor mount in a rocking motion until it aligns under the small bobbin whorl at the rear of the bobbin and the...
- Page 7 other end of the chassis. Verify this visually from the side to ensure the drive belt is parallel with the rear frame. When moving the tension hook pieces from one end to the other, your overall tension may be affected so you may need to fine-tune their position to ensure you have the tension as you want it.
- Page 8 Start it up! Before you get started, always make sure the direction switch on the Speed Controller is in the middle (neutral) position, or else the wheel will attempt to start when you’re not ready. Please read the directions for using the Speed Controller, for more in-depth information. Direction Switch I - Clockwise Z twist (commonly chosen for spinning singles) 0 - Neutral II - Counterclockwise S twist (commonly used for plying) (Note this is for Scotch tension; Irish tension is the reverse) • Tie a leader (a long loop of fingering weight yarn or your personal preference) onto the bobbin, usually just through the pattern on one end of the bobbin whorls. Use the provided orifice hook to route the leader through the yarn guide, then through the shoulder of the flyer, and then through the orifice. • Plug your 15V 5 amp wall power supply (or your 15V battery) into the Speed Controller.
- Page 9 • The module should light up and show the current set speed. Adjust this as necessary using the Up/Down arrows, and then press the Daedalus logo on the Speed Controller. The display will show “- - -“ which is stopped. • Attach your fiber to the leader loop. Verify the display says “---“ which means it is stopped. Flip the direction switch to the desired direction (I is Z twist, II is S twist in Scotch tension and reversed for Irish tension). • When ready, press the Daedalus logo. The wheel will slowly accelerate for 3 seconds to your set speed %. You can fine- tune your speed while spinning by using the Up/Down arrows. When it’s time to advance your yarn guide, press the logo and the wheel will slowly decelerate for 3 seconds and come to a stop. • Increase or decrease your speed using the up and down arrows. Pay attention to the takeup and adjust the tension knob accordingly. Fine-tune your speed as you get comfortable. You will need to slightly adjust the tension as you change your speed and as the bobbin fills with yarn.
-
Page 12: Changing The Bobbin
Changing the Bobbin When it’s time to change your bobbin, simply slip off the tension belt, lift the rear end of the flyer and rotate the assembly to either side. The maiden pivots freely, so the drive belt almost never needs to be removed. Keep track of the small rear bearing by placing it back onto the rear magnets until you can get the new bobbin installed. With the new bobbin on the flyer shaft, replace the rear bearing and rotate the assembly back onto the chassis, making sure the small rear bearing goes back onto the magnets. Replace the tension belt and you are ready to spin again! When set up for Irish, your drive belt is on the bobbin so you’ll simply slip that off before removing the bobbin. - Page 13 RPM Speed Table The following RPM (rotation per Speed Scotch Irish minute) stats were recorded from Rebecca Giles’s Sparrow, Una. The RPM 2040 2200 can vary slightly from one wheel to the 1830 2000 next, so please use this as a general guideline. 1590 1770 1360 1530 When using a battery to power your 1170 1300 wheel, you may find that your battery 1050 times out (shuts itself off) at slower speeds. This is due to the wheel not being able to draw enough power from it. If you find this to be the case, try plugging in another item while in use via the USB port. We recommend a USB light (available on our website), a small fan, or simply charge your cell phone while you’re spinning.
- Page 14 Speed Controller Menu To access the Speed Controller menu, put the direction switch in the neutral, middle, position. Press the Start/Stop button and make sure it shows a speed percentage number. Press Menu to see option No.1, and press Menu again to reach the next option (there are five total options). Adjust each menu option by using the Up/Down arrows. Press the Start/Stop button to save changes and exit the menu at any time. Here are the five menu selections: 1) 030 Start time delay, in tenths of a second. This shows a 3-second delay, though the full range is 0-10 seconds. (Keep the start delay low to get the wheel up to speed quickly, or increase it for a slower start. If you feel the yarn is being yanked when the wheel starts, increase this value.) 2) 030 Stop time delay, in tenths of a second. This shows a 3-second delay. Again, the actual range is 0-10 seconds. A setting of 2.060 would be a longer, 6-second delay. (5-7 seconds seems right for high-speed plying on a laden bobbin, though your mileage may vary.) If you’re getting backlashing, where the yarn feeds back off the bobbin during a Stop, increase this value just until the backlashing stops. 3) 001 Minimum speed setting, as a percentage of RPMs. This shows a setting of 1%, the lowest speed setting while spinning that can be selected and is not commonly changed from 1%. (If you never use speeds under 30%, you could change this setting 3.030, and your speed control won’t go slower than 30%) 4) 100 Maximum speed setting as a percentage of RPM. This shows a setting of 100%, meaning that you could go full throttle and spin at max speed, provided you feel comfortable doing so. This setting represents the maximum speed you’d like your Speed Controller to allow for. A new user may want to make sure they never accidentally go too fast and might limit their top speed this way. (For instance, changing this setting to 4.070 would keep the controller from going above 70% speed.)
- Page 15 5) 001 Speed increment adjustment size. This shows 1% increments, meaning that every time you press Up/Down, the speed will change in steps of 1%, 2%, 5%, etc., depending on the setting you’ve selected. A setting of 5.005 means every press of the Up/Down buttons will increase or decrease your speed by the initial 5%, e.g., 5, 10, 15, 20% instead of 1, 2, 3, 4%. It would be very uncommon to change this setting from the default value of 1% increments.
-
Page 17: Maintenance
Maintenance Daedalus Wheels are designed to never need oil or grease of any kind, anywhere. The tension and drive belts should last a very long time. You are also welcome to experiment with other materials for the tension belt, as crochet cotton (#10) has become a popular substitute, but avoid monofilament (fishing line) or other harsh materials. Please email us if you have any questions. To clean your e-spinner, please use a lint-free cloth and if needed, dampen the cloth with water only. Please do not use detergents or cleaners. If you live in a high humidity, area you may notice some slight tarnishing on the maiden bearing. This can be cleaned with a jewelry polishing cloth. Please inspect your rubber o-rings for any cracks as dry rot can happen in extremely dry climates. They can be protected with any oil and are easily replaceable with the spares provided in your kit. Spares Kit & Accessories • Rat Tail (Tension Belt) • Orifice Hook • Cinch • Tension Spring • Rear Bearing • Rubber Grommet • Wall Power Supply 15V 2 amp(not... - Page 18 Daedalus Battery All of our Daedalus e-spinners require 15V power. Our official Daedalus Battery can change voltage simply by pressing the power button until 15V appears. The Daedalus Battery uses an 18v 3amp power supply. Do not swap this power supply with your wheel’s power supply for any reason. Input (long side of battery) - for charging your battery Output (short side of battery) - for powering your wheel Best Practices • Do not attempt to charge the battery and operate the wheel at the same time. • Do not use your wheel’s power supply to charge the battery, and vice versa, do not use the battery’s power supply to power your wheel. Label your cords to avoid a mixup. • If your e-spinner is going slower/faster than you remember it spinning at your usual settings, check the battery setting to ensure that it is still set to 15V. • The battery will power off if the e-spinner is not drawing enough power from it. This happens with the Sparrow if the speed is set too low, and sometimes with the Starling. To compensate for this, you can use a USB-powered light while your battery is in use or simply charge your phone using the USB port. • To ensure the longest possible life for your Daedalus Battery, please do not store it fully charged for extended periods of...
- Page 19 All Daedalus Spinning Wheels use 15V power supplies. Using anything other than 15V can be harmful to your wheel and void your warranty. When using a battery, please ensure it is set to 15V. Daedalus Spinning Wheels LLC and Spotted Ewe Fibers LLC will not be held liable for any damages incurred to persons or property due to the use of non-approved third-party manufactured components on our products. Doing so will void your warranty.
- Page 20 Daedalus Spinning Wheels Sparrow...
Need help?
Do you have a question about the Sparrow and is the answer not in the manual?
Questions and answers