
Summary of Contents for Girard Products GRG17ABS
- Page 1 17" 3-Burner All Glass Gas Range MODEL: GRG17ABS LIPPERT NO.: 2022071759 USER MANUAL * Picture shown here is for reference only.
- Page 2 Thank you for purchasing this Girard product. Before operating your new appliance, please read these instructions carefully. This user manual contains information for safe use, installation and maintenance of the appliance. Please keep this user manual in a safe place for future reference. This will ensure safe use and reduce the risk of injury. Be sure to pass on this manual to new owners of this appliance.
-
Page 3: Table Of Contents
Table of Contents Table of Contents ........................................2 Explanation of Symbols ......................................3 Important Safety Instructions ....................................3 General Safety Warnings ..................................... 3 Cooktop Safety Warnings ....................................4 Oven Safety Warnings ......................................5 Product Overview ........................................5 Light Control ........................................6 Installation .......................................... -
Page 4: Explanation Of Symbols
Explanation of Symbols This manual has safety information and instructions to help you eliminate WARNING or reduce the risk of accidents and injuries. Always respect all safety warnings identified with these symbols. A signal word will identify safety Indicates a potentially hazardous situation which, if not avoided, could messages and property damage messages, and will indicate the degree result in death or serious injury. -
Page 5: Cooktop Safety Warnings
● If any burner should extinguish (after initially lighting or due to accidental blow-out), turn all burner knobs off and wait five (5) minutes before again attempting to light the burner. ● DO NOT store flammable materials on, in, or near the appliance. Any fumes can create an explosion and/or fire hazard. -
Page 6: Oven Safety Warnings
Oven Safety Warnings blocks airflow through the oven and may cause carbon monoxide poisoning. Aluminum foil linings may also trap heat, causing a fire hazard. ● DO NOT touch any inner surfaces of the oven or oven door, or the wire rack inside, or any utensils inside the oven during and after Oven Vent use until these areas have had sufficient time to cool. -
Page 7: Light Control
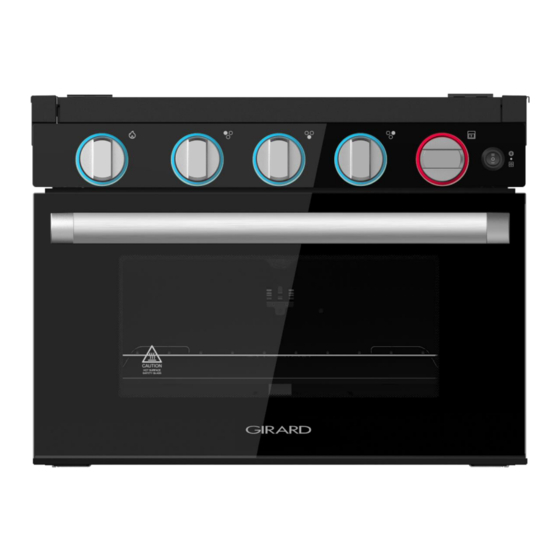
Light Control Ignition Control Knob Top Burner Control Knobs Oven Control Knob Position Meaning All control knob lights are on: Knob will only display Blue color when switch activated. − BLUE light is a decoration light while all control knobs are in the OFF position. −... -
Page 8: Tools Required (Not Provided)
Cabinet Cutout Instructions Item Dimension 173/4" (451mm) For proper operation of your cooking appliance, the cabinets must be 201/8" (511mm) properly constructed and squared with respect to the counter top and 161/8" (410mm) the cabinet face. 15/16" (23mm) max. For proper operation of these units, the cabinet must be level and include a separator/support shelf under the range. -
Page 9: Gas Connection
3. Push towards the rear of the oven and lift to remove to remove the top glass cover from the oven. (Fig. 2) Fig. 5 Pressure Check Fig. 2 4. Slide the range oven into the cabinet opening. Verify that the oven is 1. -
Page 10: Electrical Connection
Electrical Connection 2. Press the backside of the top glass cover and you will hear a click noise. The top glass cover is now locked into place. (Fig. 10 and Fig. CAUTION PRODUCT DAMAGE HAZARD ● Connect to 12V DC service only. ●... -
Page 11: Operation
Operation If the burner does not ignite WARNING In the event of failure to light the burner within 5 seconds, immediately turn the control knob clockwise to the OFF position. Wait at least 5 Keep your arms and face away from being directly above the cooking area while in operating the appliance. -
Page 12: Turning Off Cooktop
If the Flame Goes Out 3. Keep the oven control knob pushed in and rotate the ignition knob clockwise repeatedly until the oven burner pilot flame is lit. (Fig. 20) WARNING Risk of Fire! If the flame goes out accidentally, gas will escape. Never leave the gas burner unattended during operation. -
Page 13: The Burner Flame
The Burner Flame A good flame should be blue with a yellow tip. Some yellow tips on flames up to 1" (25.4mm) in length are acceptable as long as no carbon or soot deposits appear. Keep your arms and face away from being directly above the cooking If flames are excessively yellow and irregular, the oil residue may not area. -
Page 14: Cooking Fish And Meat
Cooking Fish and Meat When cooking white meat, fowl and fish, use temperature settings from 335°F to 375°F. For red meat that should be well done on the outside while tender and Rack juicy in the inside, it is a good idea to start with a high temperature Position setting (375°F~425°F) for a short time, then turn the oven down afterwards. -
Page 15: The Oven Door
The Oven Door WARNING When removing the door: ● Do not place excessive weight on an open oven door or stand on an open oven door as, in some cases, it could cause the range to tip over, break or damage the door to the extent that the range would be unsafe to use, or cause serious injury to the user. -
Page 16: Replacing An Oven Light
Replacing an Oven Light 3. Remove the two screws holding the LED light using a Phillips screwdriver. (Fig. 29) 1. Disconnect the oven from the power supply by means of the switch used to connect the appliance to the electrical mains, or unplug the appliance if the plug is accessible. -
Page 17: Storage
Storage Dry all surfaces and burner box, then spray surfaces with cooking oil substance to preserve the surface from rusting during long term storage. Wipe off oil coating before reuse. Troubleshooting Before calling for service, review this list. It may save you both time and expense. This list includes common experiences that are not the result of defective workmanship or material in your appliance. - Page 20 Girard Products LLC. ● 1361 Calle Avanzado, San Clemente, CA 92673, USA ● Toll Free: 1-574-537-8900 ● Email: customerservice@lci1.com www.greenrvproducts.com IM-FHA00123 V1.0...
Need help?
Do you have a question about the GRG17ABS and is the answer not in the manual?
Questions and answers