Table of Contents
Advertisement
Quick Links
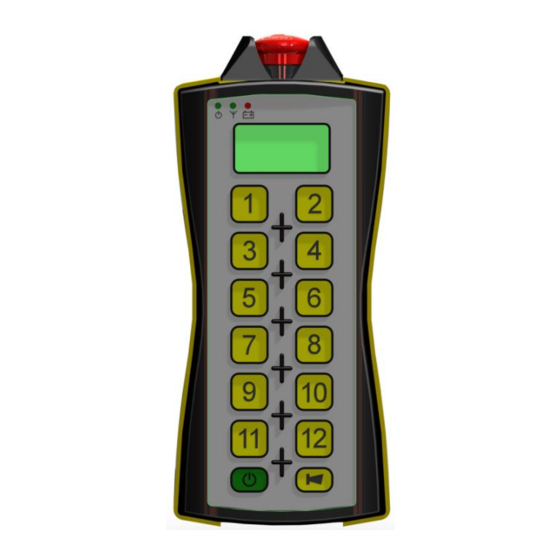
Tyro Cetus/Norma 12 functions simplex remote control
Cetus transmitter and Norma receiver
Number of functions: 12x pulse, ON/OFF, claxon, emergency stop button.
On LED:
Lights up if the receiver (and the transmitter) is on, flashes if the receiver is off.
Aerial LED:
Lights up when a function button is pressed (not confirmation of receipt).
Battery LED:
Normally off but flashes if battery is almost empty (10%).
Battery LED:
Flashes during charging, even when fully charged.
Emergency stop button: Switches line relays Q1 and Q2 of PLC 1 off, so that you can serial switch your emergency
stop circuit.
Buttons
Activate the Cetus transmitter:
Deactivate the Cetus transmitter:
Assembly
To optimise the range of the Cetus transmitter, we recommend that the aerial of the Norma receiver be placed as
high up as possible and free of metal objects. After connection and assembly, test first before switching on the
mains power. The cable connection is as follows:
Cetus
transmitter
12
Button
Relay
On
1+2
activated
Off
1+2
deactivated
Emergency
1+2
stop
deactivated
13 Claxon
3
1
4
2
5
3
6
4
7
5
8
6
9
7
10
8
1
9
2
10
3
11
4
12
5
Blocking buttons:
The standard system is that the buttons are blocked horizontally. It is then not possible to switch buttons 1&2, 3&4,
5&6, 7&8, 9&10, 11&12 at the same time. The claxon, on/off button
by this. Optionally, this block can be cancelled.
Rechargeable handheld transmitter:
For optimum operation we recommend you recharge the transmitter every day.
Manual
Keep the
Keep the
Norma receiver:
1x 10R + 1x 5R PLC
Relay input
Relay output
PLC 1
C1 & C2
Q1 & Q2
C1 & C2
Q1 & Q2
C1 & C2
Q1 & Q2
C3
Q3
C4
Q4
C5
Q5
C6
Q6
C7
Q7
C8
Q8
C9
Q9
C10
Q10
PLC 2
C1
Q1
C2
Q2
C3
Q3
C4
Q4
C5
Q5
Tyro Remotes
Bedrijvenpark Twente 1-B
7602 KA Almelo
The Netherlands
button pressed down for 2 seconds.
button down for 2 seconds or press the emergency stop button.
*Please note: specific systems tailor-made for
clients may vary from this configuration. Please
see the document "client-specific configuration"
and emergency stop button are not affected
Tel: +31-(0)546-588790
Fax: +31-(0)546-579490
E-mail: info@tyroremotes.eu
Website: www.tyroremotes.eu
/5
Page 1
Advertisement
Table of Contents

Subscribe to Our Youtube Channel
Related Manuals for Tyro Cetus


Summary of Contents for Tyro Cetus
- Page 1 Assembly To optimise the range of the Cetus transmitter, we recommend that the aerial of the Norma receiver be placed as high up as possible and free of metal objects. After connection and assembly, test first before switching on the mains power.
- Page 2 Manual Tyro Cetus/Norma 12 functions simplex remote control Standard delivery (in the standard configuration) Standard Cetus transmitter without a LCD Norma receiver without a keyboard 868 Mhz aerial 230V Car kit or Adapter 12 function buttons + 1(claxon) Pulse switched...
- Page 3 Continue to keep the white button pressed down whilst you switch on the Cetus transmitter, you will now hear the relay clicking. If you keep the white button pressed down for longer than 10 sec., all the Cetus transmitters will be deleted.
- Page 4 Manual Tyro Cetus/Norma 12 functions simplex remote control Analysis of failures Check that the transmitter is charging: the battery LED should flash during charging. If this is not the case, check the charger, power source and plug connections. Check whether the transmitter is functioning: the aerial LED will be lit if the transmitter is on and you press a button.
- Page 5 Manual Tyro Cetus/Norma 12 functions simplex remote control I/O board Norma receiver connection diagram Relay outputs Depending on the type of control, more or fewer relays can be present on the PLC. The relay contacts on the PLC are of the normally open (NO) type and are between Q and C in the terminal board.
Need help?
Do you have a question about the Cetus and is the answer not in the manual?
Questions and answers