Table of Contents
Advertisement
Quick Links
Advertisement
Table of Contents

Related Manuals for WeldCraft WP-20


Summary of Contents for WeldCraft WP-20
- Page 1 OM-225 425D 2012−09 WP-20 WP-20V WP-20M Hand-Held Water-Cooled TIG (GTAW) Torches WP-20P Torches manuelles TIG refroidies par eau Antorchas manuales enfriadas por agua para TIG (GTAW) Owner’s Manual Manuel de L’utilisateur Manual del Operador File: TIG (GTAW)
-
Page 2: Table Of Contents
TABLE OF CONTENTS SECTION 1 −SAFETY PRECAUTIONS FOR GTAW TORCHES − READ BEFORE USING ....1-1. Symbol Usage ............... . 1-2. -
Page 3: Section 1 −Safety Precautions For Gtaw Torches − Read Before Using
SECTION 1 −SAFETY PRECAUTIONS FOR GTAW TORCHES − READ BEFORE USING WC000038 − 2011-10 Protect yourself and others from injury — read, follow, and save these important safety precautions and operating instructions. 1-1. Symbol Usage DANGER! − Indicates a hazardous situation which, if Indicates special instructions. -
Page 4: Proposition 65 Warnings
1-3. Proposition 65 Warnings Welding or cutting equipment produces fumes or gases This product contains or produces a chemical known to the which contain chemicals known to the State of California to State of California to cause cancer or birth defects (or other cause birth defects and, in some cases, cancer. -
Page 5: Section 2 − Specifications
Handle Diameter: .76 in. (19 mm); Weight: 3 oz (85 g) 2-2. Duty Cycle 100% Duty Cycle At 250 Amperes Using Argon Gas w/DCEN For WP-20 And WP-20V and WP-20M Models WP-20P Models 100% Duty Cycle At 225 Amperes Using Argon Gas For... -
Page 6: Section 3 − Installation
Power Cable 10 Power Cable Adapter 11 International Style Adapter 12 Water Hose For International Style Adapter 13 Weldcraft QCS (Optional) Assembling Torch Body Keep connections tight. Replace cup, heat shield, and backcap as needed. 14 Tungsten Electrode (See Sec-... -
Page 7: Connecting Torch
3-3. Connecting Torch A. Connecting Torch When Using A Freestanding Coolant System If applicable, install high-frequency unit. Tools Needed: 802 560 5/8, 7/8, 1-1/8 in. Torch Torch Gas Hose Turn Off welding power source and cooling system power before in- Power Cable Adapter 10 Coolant-Into Torch Hose (Blue) stalling torch. - Page 8 Turn Off welding power source and cooling system power be- fore installing torch. Gas Hose With 5/8-18 Right-Hand Fittings (Customer Supplied) Connections: Regulator/Flowmeter Gas Cylinder Coolant System Torch Coolant-Into Torch Hose (Blue) Torch Gas Hose Coolant-Out Of Torch/Power Cable (Red) International Style Adapter Connect coolant-out of torch/power cable to power cable adapter, and con-...
- Page 9 C. Connecting Torch To A SyncrowaveR 250 DX Or 350 LX w/Integrated Cooler Turn Off welding power source power before installing torch. Gas Hose With 5/8-18 Right-Hand Fittings (Customer Supplied) Connections: Gas Cylinder Regulator/Flowmeter Power Source Coolant System Torch Coolant-Into Torch Hose (Blue) Coolant-Out Of Torch/Power Cable (Red) Connect torch coolant-out of torch/pow-...
-
Page 10: Section 4 − Maintenance & Troubleshooting
SECTION 4 − MAINTENANCE & TROUBLESHOOTING 4-1. Routine Maintenance Disconnect torch before maintaining. n = Check Z = Change ~ = Clean l = Replace * To be done by Factory Authorized Service Agent Daily n Nozzle For Cracks − l If Necessary n Check Tungsten Preparation (See Section 5) Weekly Collet For Wear −... - Page 11 Trouble Remedy Excessive tungsten electrode con- Select proper size and type tungsten. Properly prepare tungsten according to Section 5. sumption. Check polarity setting on welding power source (see welding power source Owner’s manual). Check for proper gas flow rate. Check manufacture’s recommendations. If torch is water cooled, check torch and cables for water leaks.
- Page 12 Trouble Remedy Wandering arc Shield weld zone from drafts. Reduce gas flow rate. Select proper size and type tungsten. Properly prepare tungsten according to Section 5. When using AC, check welding power source High Frequency control setting, and increase setting if nec- essary.
-
Page 13: Section 5 − Selecting And Preparing A Tungsten For Dc Or Ac Welding
SECTION 5 − SELECTING AND PREPARING A TUNGSTEN FOR DC OR AC WELDING gtaw_Phase_2011−06 Whenever possible and practical, use DC weld output instead of AC weld output. 5-1. Selecting Tungsten Electrode ( Wear Clean Gloves To Prevent Contamination Of Tungsten Not all tungsten electrode manufacturers use the same colors to identify tungsten type. -
Page 14: Section 6 − Guidelines For Tig Welding (Gtaw)
SECTION 6 − GUIDELINES FOR TIG WELDING (GTAW) 2007−04 6-1. Positioning The Torch Grinding the tungsten elec- trode produces dust and fly- ing sparks which can cause injury and start fires. Use lo- cal exhaust (forced ventila- tion) at the grinder or wear an approved respirator. -
Page 15: Torch Movement During Welding
6-2. Torch Movement During Welding Tungsten Without Filler Rod Welding direction Form pool Tilt torch Move torch to front of pool. Repeat process. Tungsten With Filler Rod Welding direction Form pool Tilt torch Add filler metal Remove rod Move torch to front of pool. -
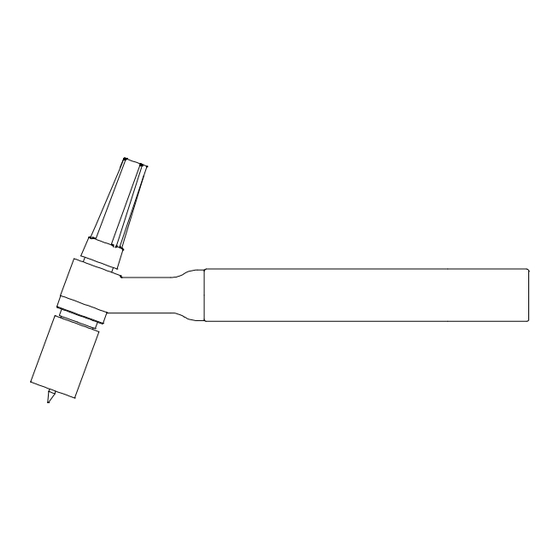
Page 16: Section 7 − Parts List
SECTION 7 − PARTS LIST 12 13 14 10 11 WC0203-A Figure 7-1. Complete Torch Assembly OM-225 425 Page 14... - Page 17 Quantity/Model Item Stock Description WP20V WP20 WP20M WP20P Figure 7-1. Complete Torch Assembly ... . Nozzle, Alumina GL LG #6 (3/8 in.) ....
- Page 18 Torch Body, 250A W/C ..... . . WP-20 ..Torch Body, 250A W/C VLV (Includes) .
- Page 19 Notes...
- Page 20 To locate a Distributor or Service Agency call 1-800-752-7620 or 920-882-6800 Contact the Delivering Carrier to: File a claim for loss or damage during shipment. For assistance in filing or settling claims, contact your distributor and/or equipment manufacturer’s Transportation Department. PRINTED IN USA 2012 Weldcraft Products Inc. 2012−01...
Need help?
Do you have a question about the WP-20 and is the answer not in the manual?
Questions and answers