
Summary of Contents for Winton WAM Series
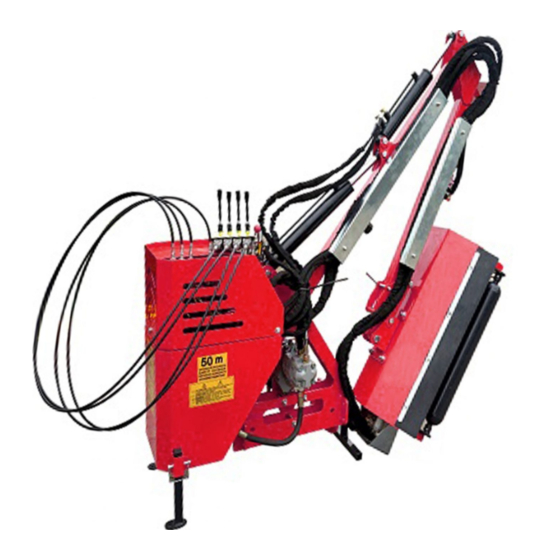
- Page 1 WINTON HEDGE CUTTER WAM SERIES OWNERS MANUAL PLEASE READ THIS MANUAL BEFORE OPERATING THE CUTTER...
- Page 2 This manual should be considered a permanent part of this machine and should remain with it even if the machine is subsequently sold. Winton continually seeks advancements in its product design and quality. Therefore, while this manual contains the most current product information available at the time of printing, there may be minor discrepancies between your machine and this manual.
-
Page 3: General Safety Information
Misuse: This machine is designed for use with compact tractors, and should be used only for the indicated purpose. Winton does not take responsibility if the machine is used for any other purpose. Children must not operate the machine under any circumstance. - Page 4 General Safety Information (continued) Machinery Pre-Use Checks On receipt of your new Winton machine and again within the first 4 hours of use, or the ‘shake in’ period as we like to call it, we always recommend checking over the machine.
-
Page 5: Table Of Contents
Servicing & Maintenance 22-23 Parts Diagram 1 Body 24-25 Parts Diagram 2 Hydraulics 26-27 Parts Diagram 3 Controls 28-29 Parts Diagram 4 Arm 30-31 Parts Diagram 5 Cutting Head 32-34 PTO Shaft Resizing Winton Product Warranty FAQ’s & Troubleshooting Winton WAM... -
Page 6: Dimensions And Specifications
190 degrees 190 degrees 190 degrees PTO Speed 540RPM 540RPM 540RPM PTO Shaft Size 70-100cm 70-100cm 70-100cm Linkage Size Category 1 Category 1 Category 1 *Always ensure the rotor/ blades are stationary before changing direction using the hydraulic levers* Winton WAM... - Page 7 1. DIMENSIONS & SPECIFICATIONS (continued) Please note specifications are for indication and are subject to change without notice Winton WAM...
-
Page 8: Installation & Set Up
Then fit arm C to the top link point on the machine using the top link pin. Attach the lever/controls Adjust the length of arms B & C so the body & A-frame of the machine is vertical. Winton WAM... - Page 9 The leg stands can be removed before starting work to avoid any entanglement or impact when moving with the tractor. Operate the machine with tractor in low range gear and the PTO delivering 540 RPM. Winton WAM...
- Page 10 Remove the chains from the PTO and remove the PTO shaft from tractor & machine. Disconnect the top link A and bottom link arms. Remove the hedge cutter controls from their mount on the tractor. Start the tractor and slowly drive off from the position, checking all connections are free. Winton WAM...
- Page 11 Keep hydraulic fixings tightened to prevent leaks. • Ensure hydraulic pipes are not pinched, chafing or being stretched. • Ensure the tractor is fitted with adequate guards/protection (e.g. a cabin) to protect the against thrown debris or parts. Winton WAM...
-
Page 12: Lever Operation
L & I. This can lead to a build up of pressure in the hydraulic system which may lead to leaking connectors, pipes, broken seals or even damage to the hydraulic pump. Winton WAM... -
Page 13: Operating Advice
Cutting Hedges, Reeds & Shrubs When the material to be cut exceeds 70-80 cm (28"- 32”) in height, it will take more than one pass to complete the job, cutting 20-30 cm (8" - 12”) maximum on each pass. Winton WAM... - Page 14 PTO to avoid this coming loose. Always replace worn or damaged PTO shafts. Most PTO driven implements are supplied with a standard sized PTO shaft. As all tractors vary this often means cutting it down to size. See section for PTO shaft resizing or consult an agricultural engineer if unsure. Winton WAM...
-
Page 15: Cutting Height Adjustment
Adjust roller by aligning the selected hole in the roller support bracket at position 1 (using the hole closest to the ground gives the highest working height). Put bolt 1 into the selected hole and re-tighten bolts 1 and bolts 2. Material Type Maximum cutting diameter Hardwood 3cm (1.1”) Softwood 6cm (2.3”) Winton WAM... -
Page 16: Safety Precautions
NEVER CUT ON THE BLIND SIDE OF THE HEDGE. It is impossible to see potential hazards or dangers and the position of the flail head could allow debris to be propelled through the hedge towards the tractor and the operator. THE MANUFACTURER DECLINES ALL RESPONSIBILITY FOR ANY ACCIDENT CAUSED BY NON- OBSERVANCE OF THE INSTRUCTION MANUAL. Winton WAM... - Page 17 Never start the cutting head with the flails facing the operator or any other people. Always work the machine with the cutting head towards the material to be cut. Never pass under the hedge cutter. You must always maintain adequate SAFETY zones around the machine. Winton WAM...
- Page 18 Always clear up all debris left at the work area, it may cause hazard to others. Always ensure when you remove your machine from the tractor that it is left in a safe and stable position using the stands and props provided and secured if necessary. Winton WAM...
- Page 19 • Never attempt to detect a hydraulic leak with your hand – use a piece of cardboard. • Never allow children near to, or play on, a tractor or machine under any circumstances. Winton WAM...
-
Page 20: Hydraulic Oil Check & Maintenance
Unscrew and remove filler plug B . Pour in the oil (a funnel or pipe is helpful here as it is a narrow filler). Fill until the oil can be seen in the level indicator A. Replace the filler plug B. Winton WAM... - Page 21 Fill with hydraulic oil through filler C until the oil is visible through the level indicator A. Replace filler C. Oil Change #1 Oil Change #2 Oil Change #3 Oil Change #4 Oil Change #5 Oil Change #6 Winton WAM...
-
Page 22: Gearbox Maintenance
Unscrew and remove filler plug A. Use a dipstick or similar to check oil level, this should be approx. half full. Top up the oil through filler A if needed to the required level. Replace filler plug A. Winton WAM... - Page 23 Always make sure to dispose of old oils in the correct manner. Check the oil manufacturers instructions for correct disposal methods. Oil Change #1 Oil Change #2 Oil Change #3 Oil Change #4 Oil Change #5 Oil Change #6 Winton WAM...
-
Page 24: Servicing & Maintenance
We recommend using a hand-held grease gun for best results. If grease nipples will not take grease, remove and clean thoroughly. Also clean lubricant passageway. If you notice any grease points are broken replace or repair them immediately. Winton WAM... - Page 25 Paintwork: Re-coat any damaged paintwork to prevent corrosion. Storage: Store the machine in a dry, level area. Support the frame if necessary. The periods recommended are based on normal operating conditions. Severe or unusual conditions may require more frequent maintenance. Winton WAM...
-
Page 26: Parts Diagram 1 Body
10. PARTS DIAGRAM 1 BODY Dia No. Number Part Number Part Description 802770115 AM60.03.016 Oil tank cover 703070084 CBW-00-011 Air plug M16X1.5 802770118 AM60.03.017Y-1 Hydraulic Tank 509010012 JB7941.2-B80 Hydraulic Level Window 700920105 EF100.00.117 Plastic End Cap 703190209 1G-150-01-142 R Clip Winton WAM... - Page 27 501011128 GB5783-M12X40 Bolt M12X40 702770075 AM60.03.111 Top Link Bracket 802770083 AM60.03.011 Bed frame Body 802770211 AM60.03.012 Oil pump transmission box 702770146 AM60.04.102 Gear box Connecting Plate 505011417 GB70.1-M8X30 Bolt M8X30 505011415 GB70.1-M8X20 Bolt M8X20 506010054 GB97.1-6 Plain washer Winton WAM...
-
Page 28: Parts Diagram 2 Hydraulics
501010741 GB5782-M8X60 Bolt M8X60 516010003 ZBT32001.3-ZG3/8-19" Inner Tapered Plug 702930544 MBH-8.08.302Y Oil In/Out Connector 700250036 1CB-18-06WD Connector M18X1.5-G3/8 702930546 MBH-8.08.305Y Valve Connector 510015239 JB982-14 Bonded Washer 501014707 GB3541-M14X1.5 Banjo Bolt 506010055 GB97.1-8 Plain washer 503010761 DIN985-M8 Locking Nut Winton WAM... - Page 29 Oil Filling Tube 702770197 AM60.04.024Y Single Valve for Oil Tube Filter 702770149 AM60.04.012Y Oil pump outlet tube 505011416 GB70.1-M8X25 Bolt M8X25 506030035 GB93-8 Spring washer 702780010 AM60.02.104-2 Oil In/out Connector 510013139 GB3452.1-G-23.6X2.65 O Ring (Seal) 702770169 Hydraulic motor Winton WAM...
-
Page 30: Parts Diagram 3 Controls
Plastic Handle 702910335 MBH-6.08.108 Joystick (short) 503010099 GB6172.1-M10 702770020 AM60.01.120 Joystick Mounting Block 702770019 AM60.01.119 Protecting Boot 505011396 GB70.1-M5X40 Bolt M5X40 508010099 GB119.1-B-6X26 Roll Pin 702770015 AM60.01.114 Upper cover 702770010 AM60.01.109 Flange bush 702770216 AM60.01.118A Control Pull Rod 1 Winton WAM... - Page 31 AM60.01.123A Small Lower cover 505011389 GB70.1-M5X12 Bolt M5X12 802770212 AM60.01.011A Cable Fitting 702770191 AM60.01.201 Connecting Plate 702770192 AM60.01.202 Pressure Casing 702770193 AM60.01.203 Flared Pressure Casing 702770194 AM60.01.204 Swivel Aluminum Mounting 702770195 AM60.01.205 702770224 AM60.01.115 Label Mounting Plate Label Winton WAM...
-
Page 32: Parts Diagram 4 Arm
13. PARTS DIAGRAM 4 ARM Winton WAM... - Page 33 AM60.03.104 Bump Stop/ Rubber Mount 802770108 AM60.03.015 Big support arm 702770072 AM60.03.108 Oil tube long cover 702770160 AM60.04.023 Small Arm Cylinder 702770152 AM60.04.015 Big arm cylinder 510015239 JB982-14 Bonded Washer 702770174 AM60.04.090 Breather Plug 501014238 GB27-M16X100 Articulation bolt Winton WAM...
-
Page 34: Parts Diagram 5 Cutting Head
Part Number Part Description 503010764 DIN985-M14 Locking Nut 506010058 GB97.1-14 Plain washer 501011142 GB5783-M14X40 Bolt M14X40 802770061 AM60.02.017 Hitch Frame Plate 802770037 AM60.02.010 Cutting Head Body (60) 802780005 AM80.02.010 Cutting Head Body (80) 806830004 AM100.02.010 Cutting Head Body (100) Winton WAM... - Page 35 GB3452.1-G-23.6X2.65 O Ring (Seal) 505011417 GB70.1-M8X30 Bolt M8X30 506030035 GB93-8 Spring washer 702770169 HPLMA220BMLE5E5B00 Hydraulic motor 702770025 AM60.02.102 Splined Hub 702770036 AM60.02.141 Motor Positioning Plate 506060183 GB893.1-62 Circlip 506060317 GB894.1-35 Ring Spacer 511022556 GB276-6007 Deep groove ball bearing Winton WAM...
- Page 36 Plain washer 802770055 AM60.02.014 Roller Shaft Seat 505011750 GB70.3-M12X30 Counter Sunk Bolt M12X30 501011127 GB5783-M12X35 Bolt M12X35 51-1 802770207 EFG120.012-AM60 Roller weldment (60) 51-2 802780018 EFG120.012-AM80 Roller weldment (80) Pulley weldment (100) 51-3 806830008 EFG120.012-AM100 802770058 AM60.02.016 Roller Shaft Winton WAM...
-
Page 37: Pto Shaft Resizing
Shorten the equally long guard tubes to the same length as the driveline tubes. Grease the internal driveline tube. Fit the guard on the shaft. Make sure that the length allows for at least 16cm (6 inches) of overlap. Winton WAM... -
Page 38: Winton Product Warranty
We always strive to create great products, but when something does go wrong we have a strong network of resellers on hand throughout the UK to help out. Warranty Claims Before you get in touch here are 5 pieces of information your Winton reseller will need to progress your claim: •... -
Page 39: Faq's & Troubleshooting
Raise cutting height. Blades scalping Change mowing pattern/route. Reduce speed when turning. Run at 540 PTO rpm. Change into a lower gear on the tractor. Tractor loaded down by cutter Clean off the cutter. Check power output on your tractor. Winton WAM... - Page 40 www.wintonmachinery.co.uk...
Need help?
Do you have a question about the WAM Series and is the answer not in the manual?
Questions and answers