Advertisement
Advertisement
Table of Contents

Related Manuals for EAT C-Note 12"

Summary of Contents for EAT C-Note 12"
- Page 1 European Audio Team INSTRUCTIONS FOR SETUP C-Note Tonearm...
-
Page 2: Parts List
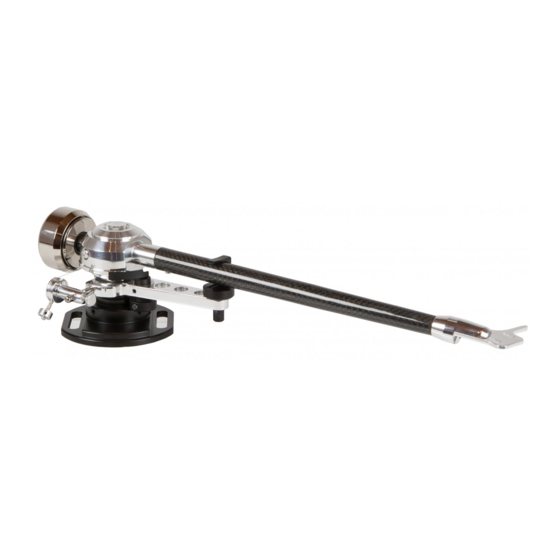
Parts List 1. Arm assembly 2. 1.5 mm Allen key for azimuth set screw and cue assembly 3. 2 mm Allen key for VTA adjustment screws 4. Counterweight and additional insert for counterweight 5. Anti-skating sliding mechanism, support rod and thread Tonearm Assembly The tonearm includes a combination of cardan and uni pivot bearings, immersed in special damping fluid. -
Page 3: Cartridge Installation
a) Cartridge installation Install the cartridge into the aluminium headshell, using the appropriate hardware included with your cartridge. Connect the cartridge as indicated below: • White left channel L+ • right channel R+ • Green right channel R- • Blue left channel L- For correct cartridge alignment, use the two-point cartridge alignment protractor provided with your turntable accessories. - Page 4 c) Vertical Tracking Force setting (VTF) Before setting the Vertical Tracking Force, confirm the exact weight of your cartridge. Depending on your cartridge weight, determine whether to use the counterweight with or without the additional insert, in accordance with the specifications above. Pushing carefully, turn the counterweight onto the rear end of the counterweight support rod as shown in the illustration below.
-
Page 5: Azimuth Setting
e) Vertical Tracking Angle setting (VTA) To set the Vertical Tracking Angle, first put a record on the platter. When the needle is lowered into the record groove, the tube of the tonearm should be parallel to the surface of the record. If it is not, loosen both hexagonal screws in the tonearm base just enough to allow vertical movement of the arm pillar without force, and slide the arm up or down until it is parallel. - Page 6 ‼ DO NOT REMOVE THE AZIMUTH SET SCREW COMPLETELY! Loosen the screw just enough to be able to gently rotate the arm tube and set the azimuth to the correct position. The correct position can be checked from the front view, preferably with the needle placed on a mirror placed on the platter.
- Page 7 g) Anti-skating assembly and adjustment The anti-skating mechanism is shipped partially disassembled to avoid damage during transport. For correct installation, please follow the steps below. Step 1: Prepare all parts supplied from the accessories bag: • Anti-skating sliding mechanism with anti-skating weight and thread for mounting on the tonearm •...
- Page 8 Step 3: The anti-skating sliding mechanism is supplied with a pre-mounted anti-skating weight and antiskating thread. Put the eye of the anti-skating thread around the hole for the HOOK SCREW and screw the HOOK SCREW into the tonearm through the eye of the anti-skating thread as shown in the illustration below.
- Page 9 Step 5: Anti-skating force adjustment Adjust the anti-skating force by positioning the weight on the appropriate groove of the antiskating sliding mechanism. Anti-skating downforce should be adjusted in correspondence with the tonearm downforce as follows: Tonearm downforce: Anti-skating groove: Lower than 13 mN or 1.3 grams 1st groove from bearing 13–18 mN or 1.3–1.8 grams 2nd groove from bearing...
Need help?
Do you have a question about the C-Note 12" and is the answer not in the manual?
Questions and answers