Table of Contents
Advertisement
Quick Links
Advertisement
Table of Contents

Summary of Contents for C.P.Bourg Document Finisher E Series
- Page 1 OPERATOR MANUAL Initial issue: 02/13 Latest revision : - 9.133.347...
- Page 2 Content of this documentation has a confidential nature and remains the exclusive property of c.p. bourg s.a. It is only put at the user (including without limitation: Renter or Purchaser or their employees) disposal within the exclusive scope of using and servicing the product. Without c.p.
-
Page 3: Table Of Contents
TABLE OF CONTENTS 1. Important ....................6 2. Warnings ....................7 2.1 Prior to the installation ..................7 3. Introduction ..................8 3.1 Foreword ....................... 8 3.2 Job Definition Format (JDF) Capability ............9 4. Warning pictograms ................10 5. Pictogram location ................13 5.1 Front View ...................... - Page 4 10.2.4 Output conveyor parameter ....... . . 47 10.2.5 File menu parameter ........48 10.2.6 Preferences Menu .
- Page 5 This page is intentionally left blank. Operator Manual Initial issue: 02/13 Page 9 - 5 Latest revision: -...
-
Page 6: Important
1. IMPORTANT F: Important Cette machine ne peut fonctionner qu'avec toutes les sécurités au repos (capots) et tous les accessoires (plateau de réception ou de transfert, convoyeur de sortie, conteneur déchets de coupe) en place. Attention: Garder les mains à l’écart des pièces en mouvement. GB/US: Important This machine will operate only with all the safety devices of the collating / finishing line deacti- ved (guards) and delivery/transfer tray or conveyor waste container connected in working posi-... -
Page 7: Warnings
2. WARNINGS 2.1 Prior to the installation Verify that your electrical mains corresponds with one of the following three networks: 120V AC +/- 10% - 60Hz EUROPE 230V AC +/- 10% - 50Hz JAPAN 230V AC +/- 10% - 60Hz THE LABEL APPLIED ON YOUR MACHINE INDICATES FOR WHICH MAINS THE MACHINE IS CABLED. -
Page 8: Introduction
3. INTRODUCTION 3.1 Foreword Thank you for choosing a c.p. bourg product. This manual is a guide to operate the Bourg Document Finisher E-Series. BDF-e INISHER E-Series ( OURG OCUMENT ) is an automatic machine for the pro- duction of books; it staples, folds and face trim sets originating from, a printer or a press machine. -
Page 9: Job Definition Format (Jdf) Capability
3.2 Job Definition Format (JDF) Capability A new Web to Finish solution makes touch less workflow achievable from order to finished pro- duct with no manual setup or intervention; thus, helping automatic print production by giving the finishing devices an integral role in the manufacturing process. Integrating finishing equipment capabilities into the job definition at the prepress stage reduces or eliminates operator involvement and reduces or eliminates job setup time. -
Page 10: Warning Pictograms
4. WARNING PICTOGRAMS Note: The BDF-e is equipped by a touch screen and this screen contains a battery Danger of explosion if battery is wrongly replaced. Replace only with the same or equivalent type recommended by the manufacturer Dispose of used batteries according to the manufacturer's instructions. - Page 11 This label is located near the knife of the WARNING folding machine. It warns of a high risk of severe hand injuries when placing your hands under the knife. KEEP HANDS CLEAR CAN CAUSE SEVERE INJURY CAUTION This label is located near the knife of the press-cutter. It indicates a high risk of severe injury if you put you hands under the knife.
- Page 12 CAUTION This label is located at the rear of the machine under the safety cover. It indicates that the machine may not be operated, under no circums- tances, without the safety covers being in place. DO NOT OPERATE WITHOUT SAFETY COVERS IN PLACE This label is located near the main power CAUTION...
-
Page 13: Pictogram Location
5. PICTOGRAM LOCATION 5.1 Front View CAUTION WARNING KEEP HANDS CLEAR CAN CAUSE SEVERE INJURY CAUTION KEEP HANDS CLEAR DO NOT OPERATE CAUTION WITHOUT SAFETY COVERS IN PLACE PINCH POINTS KEEP HANDS CLEAR S98s CAUTION S98s N IN WARNING CAUTION CAUTION HAZARDOUS VOLTAGE CAN CAUSE SEVERE... -
Page 14: Machine Description
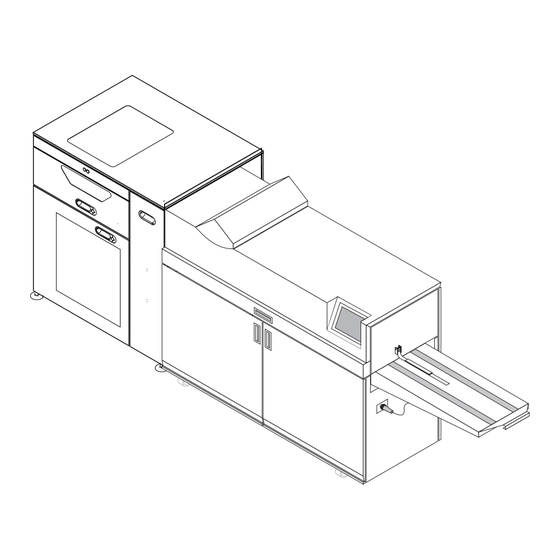
6. MACHINE DESCRIPTION 6.1 Technical features Upper cover GUI screen Left side of the machine Exit conveyor Input of the machine Rear of the machine Right side (operator) of the machine Front of the machine 6.1.1 General : - Height of input / exit: 860mm. - Fully automatic adjustment depending on the format. -
Page 15: Trimmer
6.1.4 Trimmer : - Paper chips ejected to waste container, with “full” condition sensor. - Automatic adjustment of the stops. 6.1.5 Conveyor : - Adjustment of the conveyor steps via operator’s GUI. Operator Manual Initial issue: 02/13 Page 9 - 15 Latest revision: -... -
Page 16: Job Specifications
6.2 Job specifications Note: The figures below represent what the BDF-e is capable of producing. The device feeding paper to the BDF-e may alter those specifications. Type of paper : Any type of paper except paper with a window and transparent paper. •... - Page 17 Book thickness : Saddle stitching (stitches in the middle of the paper sheets, then fold and trim) : - between 2 and 22 sheets of 80gsm (20 Lbs bond) or equivalent thickness (cover included). Corner or top stitching: - between 2 to 55 paper sheets of 80gsm (20Lbs bond) or equivalent thickness (cover included).
-
Page 18: Stitching System Description
6.3 Stitching system description Side joggers type Joggers type 0. One type of side jogger is used: - type 0, with cut-out. Operator Manual Initial issue: 02/13 Page 9 - 18 Latest revision: -... -
Page 19: Stitching Possibilities With Jogger Type 0
6.4 Stitching possibilities with Jogger Type 0 Paper width 127 mm (5") to 187 mm (7.3") 270 mm (10.6") Stitch 187 mm (7.3") to 270 mm (10.6") to 356 mm (14") Machine Type position 2 saddle or Space between stitches = 80 mm (3.1") to paper width - 30 mm (1.2") 2 heads on 2 bracket heads 1 corner... - Page 20 How to use these chart In this case, if the width of the sheet is between mm, spacing staples will be between Then stitching with BDF H on brackets with jogger type is possible Authorized work area For example: X A sheet of width mm (W) allows a gap for the stitchers (E) between mm, in...
- Page 21 Operator Manual Initial issue: 02/13 Page 9 - 21 Latest revision: -...
- Page 22 Operator Manual Initial issue: 02/13 Page 9 - 22 Latest revision: -...
- Page 23 Operator Manual Initial issue: 02/13 Page 9 - 23 Latest revision: -...
-
Page 24: Process Description
7. PROCESS DESCRIPTION Operator Manual Initial issue: 02/13 Page 9 - 24 Latest revision: -... -
Page 25: Connecting The Machine To Mains
8. CONNECTING THE MACHINE TO MAINS Note: In order to prevent any danger during the installation, the usage or the maintenance of the equipment, the connection to the mains must be located near the equipment and be accessible at all times. The BDF-e must be connected to the main power protected by a A circuit breaker. -
Page 26: Stitching Head Adjustment
8.1 Stitching head adjustment 8.1.1 Stitching heads mechanical unclutching 1) To unclutch the locking catch: 2) To remove stitcher bar from the Stacker: Same procedure for both kind of heads (ISP & HOHNER) Stitcher bar Locking catch (keeper) Operator Manual Initial issue: 02/13 Page 9 - 26 Latest revision: -... -
Page 27: Stitching Wire Length Adjustment
8.1.2 Stitching wire length adjustment See Head Manuals. Note: There is a risk of injury while handling a booklet if a stitch leg is shorter than the other. 8.1.3 Cassettes replacement with ISP M2000 heads Localization of the heads according the error message. With 4 stitching heads: With 2 stitching heads: Head 1... - Page 28 Step 2: Stitching head prevention cleaning: The stitching head must be lubricated each time the cassette is replaced. Please use the tube of vaseline delivered together with the cassettes. 2000/532 Note: According to MSDS and /EC lubricant is not a hazardous substance.The lubricant should be used until the tube is empty.
- Page 29 Step 3: New cassette installation: Step 4: Re-initialization of the stitching head: When removing the rotator operating spring from the stitching head (for lubrification) you will loose the wire for next stitch. Therefore the stitching head must be actuated to make the machine again available for next booklet.
-
Page 30: Wire Spool Replacement (For Hohner 43/6 S Heads)
8.1.4 Wire spool replacement (for Hohner 43/6 S heads) 43/6 Note: Oil the felt discs on the wire bow of the Hohner S heads. For Hohner 43/6 S stitching heads - Remove pin ref.1 and washer ref.2. - Remove the empty spool. - Install a new spool ref.3 (pay attention to wire direction). -
Page 31: Wire Jam In The Stitching Head
8.1.5 Wire jam in the stitching head If a missing stitch is noticed at the exit of the BDF-e, there might be a wire jam in the head. Apply the following instructions to clear jam and reinstall the wire. For ISP M2000 stitching heads 1) Remove cassette with jam as follows. -
Page 32: The User Interface (U.i.) Screens
9. THE USER INTERFACE (U.I.) SCREENS The User Interface is a touch screen. Select your choice by pressing on the screen with your finger. The User Interface is divided into several tabs that vary according to the configuration. Each tab has its own preference and/or adjustment buttons. The control buttons are common to all tabs. -
Page 33: Screen Functions In Detail
10. SCREEN FUNCTIONS IN DETAIL 10.1 U.I. screen options At machine power ON, the U.I. screen appears by default. 1) OPERATOR'S PARAMETERS Press button to the right of the screen to enter your own parameters. 2) MACHINE LINE CONFIGURATION 3) JDF MODE SELECTION See chapter "10.1.3 JDF Mode Selection", page 40 4) FILE MENU... -
Page 34: Screen Operator's Preferences
10.1.1 U.I. screen Operator's preferences The U.I. screen option allows the user to configure his preferences. 1) UNITS Allow you to select your choice for measures in mm or inches. 2) KEYBOARD CHOICE Select the kind of keyboard AZERTY or QWERTY. 3) LANGUAGE Choose your language (GB - FR - IT - DE - ES - NL - PT). -
Page 35: Machines Line Configuration
10.1.2 Machine line configuration After installation of all machines, enter the machine line configuration in the U.I. The following configurations are available: - BSF + IFB + BCM-e + BDF-e - BSF + IFB + BDF-e - BSF + BDF-e Press Machine Line Configuration button (1). - Page 36 BSF + IFB + BDF-e configuration. Select the first machine of your line. Press "V" to validate. The machine appears on the screen. Press the blue right arrow again. Operator Manual Initial issue: 02/13 Page 9 - 36 Latest revision: -...
- Page 37 Select the IFB. Press "V" to validate. The machine appears on the screen. Press the blue right arrow again. Operator Manual Initial issue: 02/13 Page 9 - 37 Latest revision: -...
- Page 38 Select the BDFE. Press "V" to validate. The machine appears on the screen. When machines line configuration is complete, press "V" to validate. Operator Manual Initial issue: 02/13 Page 9 - 38 Latest revision: -...
- Page 39 A message appears. To confirm your configuration press YES. Note: If a SQE is present, it should not be selected in the U.I. The screen shuts down and then self-restarts. Some new tabs appear according to the configuration. A new tab "RUN" also appears to make some fine adjustments while machines are running. Tabs Operator Manual Initial issue: 02/13...
-
Page 40: Jdf Mode Selection
10.1.3 JDF Mode Selection Note: JDF mode is only enabled with the optional Bourg JDF Kit. Press this button to cancel the job. "JDF never" mode The finisher set up is made through the GUI attached on the BDF-e. It is the usual way of wor- king by keying job parameters then validate them to get the finisher ready to receive jobs from the Printer/Press. -
Page 41: File Menu
10.1.4 File menu This menu allows to save, delete, open and recall a job (program). This menu is fully detailed in chapter : "10.2.5 File menu parameter", page Operator Manual Initial issue: 02/13 Page 9 - 41 Latest revision: -... -
Page 42: Bdf-E Tab Options
10.2 BDF-e tab options The “BDF-e” screen option allows the user to define the realization of the booklet. Stitching/paper size screen: Allows programming the stitching parameters. Folding screen: Allows programming the folding parameters. Trimmer screen: Allows programming the trimming parameters. Output conveyor screen: Allows programming the output conveyor parameters. -
Page 43: Paper Size And Stitcher Parameters Screen
10.2.1 Paper size and Stitcher parameters screen Press the button " STITCHING/PAPER SIZE SCREEN" to have access to the stitching parameters. • Press on value to edit • Enter the value by using the keypad. • Press "V" to validate. "V"... - Page 44 1) Space between stitches. Only for saddle and top stitch. Determine the value through the numerical keypad. Press "V" to validate. 2) Stitching mode choice. Saddle stitching. stitch. Left corner stitching. Right corner stitching. Cancel stitching function. 3) Paper width choice. 4) Paper length choice.
-
Page 45: Folding Parameter
10.2.2 Folding parameter Press the button "FOLDING" to have access to the folding parameters. The following adjustments are available: 1) Folding function selection: Folding option activated. Folding function not activated. Sets are sent to the upper reception tray and the 2 other parameters are not available. -
Page 46: Trimming Parameter
10.2.3 Trimming parameter Press the button "TRIMMING" to have access to the trimming parameters. The following adjustments are available: 1) Trimming function selection. Trimming option activated (go to the three additional options described below). Trimming option not activated (go directly to output conveyor parameter). 2) Booklet final length selection, press (2). -
Page 47: Output Conveyor Parameter
10.2.4 Output conveyor parameter Press the button "CONVEYOR" to have access to the output conveyor parameters. The following adjustments are available : 1) Summary screen. On each screen, the summary screen shows the main parameters entered for stitching, folding and trimming. 2) Output conveyor advances selection. -
Page 48: File Menu Parameter
10.2.5 File menu parameter The BDF-e graphical interface allows an easy and performing jobs management. Press the button "FILE MENU" to have access to the file parameters. Five adjustments are available: 1) Make a comment on the saved jobs. 2) Open a job saved by the operator. 3) Save a new job with his name and characteristics. - Page 49 Make a comment This menu allows to make a personal comment on a saved job. Select a job and press button (1) to access to the dialogue box. 4 lines are available to write the comments through the alphanumeric keyboard. Press enter to display the comment on the line.
- Page 50 Opening an existing job This menu allows to open a job saved by the operator. Select a job in the left column and press button (2). Press YES to open the selected job or NO to return to the previous screen and select another job. This job can be the starting point to define a new job.
- Page 51 Save a job When a job has been defined by the operator, it can be saved as follow. Press button (3). Enter a name for the job on the alphanumeric keyboard and confirm it with the “ENTER” key. The new job appears in the left column. If the name given already exists and that you press “enter”, a message will appear to ask you to confirm the replacement of an existing file by the new one.
- Page 52 Erasing a job This menu allows to erase an existing job. Attention: Once deleted, there is no way to recover the deleted job. Select the job to be erased in the left column. Press button (4). The following screen appears. Press YES to erase the selected job or NO to cancel and return to the previous screen.
-
Page 53: Preferences Menu
10.2.6 Preferences Menu Save Adjustments Disabled: Ask to operator to save adjustments. Enabled: Always save adjustments. Stitch Head Form Select the desired stitch head form: Normal Stitch OR Loop Stitch. Stitch single sheet Permitted or not a single sheet stitching. Reset BDF-e The machine goes to home position. -
Page 54: Manual Stitching Of A Set
10.2.7 Manual stitching of a set It is interesting to be able to correct erroneous books (missing or double). You can process them by introducing the set by hand into the BDF-e. If there is no paper under the stitching heads, the stitching command cannot be executed. You can only process books in compliance with the variables set for this job. -
Page 55: Warning Screen And Error Messages
10.2.8 Warning screen and error messages The warnings and errors screen displays the error and warning messages of the complete machine line. This button erases the indications of the screen. This button allows to display the historical of WARNING & ERRORS messages. This button allows to reach the WARNING &... -
Page 56: Counter Of Set
10.2.9 Counter of set Press button to open the "counter" screen. Operator Manual Initial issue: 02/13 Page 9 - 56 Latest revision: -... -
Page 57: Version And Update History
1) This counter displays the total number of sets already done for the running job. Press the button to enter a number of sets already made. 2) Number of sets pre-defined. 0= X= infinity preset. 3) Press this button to reset the counter to zero. Press button + or - to increase or decrease the counter by 1. -
Page 58: Run Tab Options
10.3 RUN tab options The RUN tab allows you to perform some fine adjustments while machines are running. 1) BDF-e adjustments in mode RUN. Operator Manual Initial issue: 02/13 Page 9 - 58 Latest revision: -... -
Page 59: Bdf-E Adjustment In Run Mode
10.3.1 BDF-e adjustment in RUN mode This menu gives an overview and allows parameters adjustment while machine is running. Press the BDF-e button to access to the setting parameters. Output conveyor Folder Stitcher Trimmer Four adjustment areas are available: - Stitcher area for paper size and stitching. - Folder area for folding. - Page 60 Stitcher area : Adjustment according to the paper format and Stitcher Adjustment of the stitcher while running (Stitcher). 1) Adjustment on paper length, maximum modification ± 3mm. 2) Adjustment on paper width, maximum modification ± 3 mm. Left side jogger Right side jogger 3) Adjustment on stitch position on paper length.
- Page 61 Folder area: Folder adjustment while running 4) Folding pressure adjustment (maximum by default). 5) Fold position adjustment in relation to stitches. + Final booklet upper face will be longer. - Final booklet lower face will be longer. Maximum modification ± 1,5mm. Trimmer area: Trimmer adjustment while running 6) Booklet final length adjustment.
- Page 62 Refer to the figure below for the direction of the motion and the corresponding button. Stitcher front jog Stitcher back stop Trimmer stop Folder back stop Operator Manual Initial issue: 02/13 Page 9 - 62 Latest revision: -...
-
Page 63: List Of Errors
10.4 List of errors 0.20 «Sheets too late in area A ..... see"10.5 4 - Remedies"point a 0.29 «Sheets too late in area C» ....see"10.5 4 - Remedies"point a 0.55 «Sheets too late in area D»... - Page 64 3.41«LH stitch jog not reached home» ....see"10.5 4 - Remedies"point c. 3.45«RH stitch guide not reached home» ... . . see"10.5 4 - Remedies"point c.
- Page 65 Identification of the baffles Operator Manual Initial issue: 02/13 Page 9 - 65 Latest revision: -...
-
Page 66: Remedies
10.5 4 - Remedies a - Jam clearance Any paper jam in the machine is indicated by an error message specifying the zone involved. Note: After cleaning a jam, always verify that no paper pieces are left in the paper path. As a general rule Open the front doors or the upper cover and remove the sheets of paper from the specified zones, refer to... - Page 67 d - Cassettes replacement with ISP M2000 heads See"8.1.3 Cassettes replacement with ISP M2000 heads", page 27 e - Wire spool replacement (for Hohner 43/6 S heads) See"8.1.4 Wire spool replacement (for Hohner 43/6 S heads)", page 30 f - Wire jam in the stitching head See"8.1.5 Wire jam in the stitching head", page 31 g - Conveyor «Exit conveyor not installed»:...
-
Page 68: Preventive Maintenance
11. PREVENTIVE MAINTENANCE For the BDF-e: Switch off the machine. Open the upper cover and the doors. Daily maintenance 1) Remove the metal parts (stitches) from clinchers by pushing on the handle 3 times. If you do not do it, there is a risk of poor stitching or jam. 2) Empty the waste bin. - Page 69 Weekly maintenance 1) Clean the belts, the transport wheels with a cloth and a specific cleaning solution. If you do not do it there is a risk of smeared sheets. 2) Clean the threaded rod of the stitching heads with a brush. If you do not do it there is a risk of not smooth movement.
- Page 70 Monthly maintenance Refer to head manual for maintenance. Every 3 month maintenance Clean stop fingers of the stitching area with compressed air and then with a cotton cloth and a specific cleaning solution. If you do not do it there is a risk that the stop fingers jam. Operator Manual Initial issue: 02/13 Page 9 - 70...
-
Page 71: Environmental Compliance
12. ENVIRONMENTAL COMPLIANCE 12.1 Product recycling and Disposal ENGLISH: Application of this symbol on your equipment is confirmation that you must dispose of this equipment in compliance with agreed national Procedures. In accordance with European legislation dealing with "end of life electrical and electronic equipment", equipment subject to disposal must be managed within agreed procedures. - Page 72 DEUTSCH: Geräte die dieses Symbol tragen, müssen den nationalen Richtlinien gemäß entsorgt werden. Den europäischen Bestimmungen zum Umgang mit elektrischen und elektronischen Altgeräten ist Folge zu leisten. Bei der Entsorgung des Geräts den Partner kontak-tieren. ITALIANO: Questo simbolo applicato sulla macchina indica la necessità di smaltire il prodotto in conformità...
- Page 73 NOTES ................................................................................................................................................................................................................................................................................................................................................................................................................................................................................................................................................................................................................................................................................................................................................................................................................................................................................................................................................................................................................................................................................................................................................................................................................................................
- Page 74 NOTES ................................................................................................................................................................................................................................................................................................................................................................................................................................................................................................................................................................................................................................................................................................................................................................................................................................................................................................................................................................................................................................................................................................................................................................................................................................................
- Page 75 rue des Technologies, 22 B-1340 Ottignies (Belgium) Tel.: + 32 (0) 10 62 22 11 Fax: + 32 (0) 10 61 69 03 e-mail: export.be@cpbourg.com Inc. PARC D'AFFAIRES SILIC New Bedford Industrial Park 32, rue des Gémeaux 50 Samuel Barnet Blvd. Massachussets 02745 (USA) BP 60410 F-94573 Rungis Cedex (France)
Need help?
Do you have a question about the Document Finisher E Series and is the answer not in the manual?
Questions and answers