Table of Contents
Advertisement
Available languages
Available languages
Quick Links
Advertisement
Table of Contents

Related Manuals for Kitchen Mama One-To-Go


Summary of Contents for Kitchen Mama One-To-Go
- Page 1 USE AND CARE MANUAL One-To-Go Electric Can Opener...
- Page 2 English BECOME ONE OF OUR MONTHLY WINNERS! Get the chance to win one of these awesome kitchen gadgets!
-
Page 3: Important Safeguards
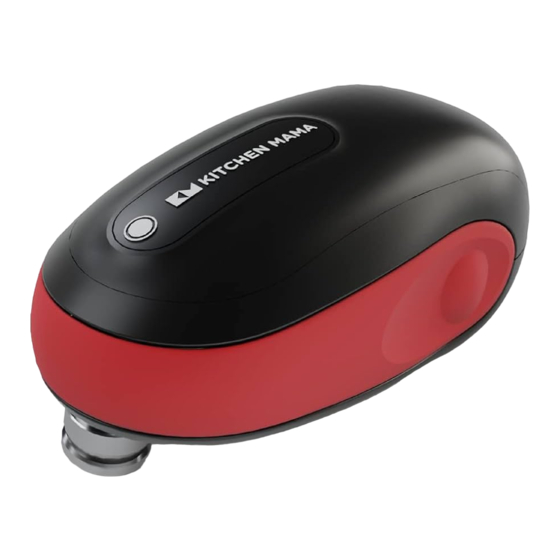
English IMPORTANT SAFEGUARDS Children should be supervised to ensure that they do not When using electrical appliances, basic safety precautions play with the appliance. should always be followed including the following: Avoid contacting moving parts. Read all instructions. The use of attachments not recommended or sold by the Do not put this portable appliance in water or any other manufacturer may cause fire, electrical shock, or injury. - Page 4 English PARTS To watch a quick instructional video on how to use the can opener, scan this QR Code! (inner) 1 Blade 4 ON / OFF Button 7 Flip Tab 2 Metal Gear 5 Battery Compartment 8 Lid Remover 3 Magnet 6 Force Stop Button...
- Page 5 English USING THE OPENER: 3 EASY STEPS STEP 1 STEP 2 Lift the battery cover using the Flip Tab and put batteries in Place the can opener on top of the can, making sure that the the battery compartment. Make sure that they are in the right can edge is between the blade and the metal gear.
- Page 6 English Tip: If the lid does not adhere to the magnet well, open the battery STEP 3 compartment cover to use the lid remover indentation at the back of the opener. Once done, the can opener automatically stops and disengages from the can edge. Lift the lid and remove the can opener.
-
Page 7: User Maintenance
English USER MAINTENANCE TROUBLESHOOTING 1. The can opener is not working. What do I do? Use AA alkaline batteries only. Check the battery compartment. Make sure the batteries are in the right polarity and Don’t mix old and new batteries together. Do not mix alkaline, standard that the cover is securely in place. - Page 8 Spanish PARTES (inner) 1 Cuchilla 4 Interruptor ON / OFF 7 Lengüeta 2 Engranaje 5 Compartimiento Pilas 8 Removedor de Tapa 3 Imán 6 Botón de Parada Forzada...
- Page 9 Spanish CÓMO UTILIZAR: 3 SENCILLOS PASOS PASO 1 PASO 2 Levanta la tapa de las pilas usando la lengüeta e inserta las pilas Coloca el abrelatas sobre la lata asegurándote que el borde de en el compartimiento. Asegúrate que estén insertadas según la la lata esté...
- Page 10 Spanish PASO 3 Tip: Si la tapa no se adhiere bien al imán, use la muesca para quitar la tapa que se halla en la parte posterior del abrelatas. Una vez terminado, el dispositivo se para automaticamente y desengancha el borde. Remueve el abrelatas y levanta la tapa.
-
Page 11: Mantenimiento Del Usuario
Spanish MANTENIMIENTO DEL USUARIO RESOLUCIÓN DE PROBLEMAS 1. El abrelatas no funciona. ¿Qué hacer? Usar solo pilas alcalinas AA. Controla el compartimiento de las pilas. Asegúrate que las pilas estén en la correcta polaridad y que No usar pilas viejas y nuevas simultáneamente. No mezclar pilas alcalinas, la tapa esté... - Page 12 Italian COMPONENTI (nascosto) Lama Interruttore ON / OFF 7 Linguetta 2 Ingranaggio 5 Vano Batterie 8 Rimozione del Magnete 6 Pulsante “Force Stop” coperchio...
- Page 13 Italian UTILIZZO: 3 SEMPLICI PASSI FASE 1 FASE 2 Alzare il coperchio delle batterie usando la linguetta e inserire le Posizionare l'apriscatole sul barattolo accertandosi che il bordo batterie nell'apposito vano. Assicurarsi che le batterie siano posizionate del barattolo si trovi tra lama e ingranaggio. Premere il pulsante secondo la polarità...
- Page 14 Italian FASE 3 Tip: Se il coperchio non aderisce bene al magnete, usate l'incavo per rimuovere il coperchio che si trova sul retro dell'apriscatola. Una volta terminata la rotazione, il dispositivo si ferma automaticamente e sgancia l'orlo. Rimuovere l'apriscatole e sollevare il coperchio.
-
Page 15: Manutenzione Da Parte Dell'utente
Italian MANUTENZIONE DA PARTE RISOLUZIONE PROBLEMI DELL'UTENTE 1. L'apriscatole non funziona. Che cosa fare? Controllare il vano batterie. Assicuratevi che le batterie siano inserite correttamente e che il Usare solo batterie alcaline AA. coperchio sia chiuso saldamente. Non usare batterie vecchie e nuove contemporaneamente. Non mescolare 2. - Page 16 French PARTIE (inner) 1 Lame 4 Bouton ON / OFF 7 Languette 2 Engrenage 5 Compartiment des Piles 8 Enleve-couvercle métallique 6 Bouton d'arrêt forcé 3 Aimant (Force Stop)
- Page 17 French UTILISATION: 3 ÉTAPES SIMPLES ETAPE 1 ETAPE 2 Levez le couvercle du compartiment en utilisant la languette Mettez l’ouvre boite au-dessus de la boîte de conserve et faites attention et mettez les piles dans le compartiment. Assurez la bonne à...
- Page 18 French ETAPE 3 Tip: Si le couvercle n’adhère pas bien à l’aimant, utilisez l’indentation du dissolvant de couvercle à l’arrière de l’ouvre-porte. Une fois fait, coupé, il s’arrête automatiquement et relâche le bord. Enlevezz l’ouvre-boîte et retirez le couvercle. ATTENTION Pour certaines boîtes, si l'ouvre-boîte ne s'éteint pas automatiquement, maintenez enfoncé...
-
Page 19: Dépannage
French MAINTENANCE DE L'UTILISATEUR DÉPANNAGE 1. L'ouvre-boîte ne fonctionne pas, que faire? Utilisez uniquement des piles alcalines AA. Vérifiez le compartiment des piles. Assurez-vous que les piles sont dans la bonne polarité et que Ne mélangez pas des piles neuves et usagées. Ne mélangez pas les piles le couvercle est bien en place. - Page 20 Deutsch KOMPONENTEN (inner) 1 Schneide 4 EIN/AUS-Schalter 7 Kippschalter 2 Metallgetriebe 5 Batteriefach 8 Deckelentferner 3 Magnet 6 Stopptaste...
- Page 21 Deutsch BEDIENUNGSANLEITUNG: 3 EINFACHE SCHRITTE SCHRITT 1 SCHRITT 2 Heben Sie den Deckel des Batteriefachs mit Hilfe der Druckfläche Setzen Sie den Dosenöffner oben auf der Dose auf. Achten Sie an und legen Sie die Batterien in das Batteriefach. Achten Sie dabei darauf, dass die Kante der Dose zwischen Schneide und darauf, dass die Polarität korrekt gesetzt ist und der Deckel Metallgetriebe liegt.
- Page 22 Deutsch Tip: Wenn der Deckel nicht gut am Magneten haftet, verwenden Sie SCHRITT 3 die Vertiefung zum Entfernen des Deckels. Sie befindet sich auf der Rückseite des Öffners. Nach dem Schneidevorgang wird der Öffner automatisch anhalten und sich vom Rand der Dose lösen. Entfernen Sie den Öffner und nehmen Sie den Deckel ab.
-
Page 23: Fehlerbehebung
Deutsch WARTUNG DURCH DEN BENUTZER FEHLERBEHEBUNG Verwenden Sie nur AA Alkaline Batterien. 1. Der Dosenöffner funktioniert nicht. Was kann ich tun? Verwenden Sie keine alten und neuen Batterien gemeinsam. Kombinieren Sie Überprüfen Sie das Batteriefach. Stellen Sie sicher, dass die Batterien korrekt eingelegt sind und der keine Alkaline, Standard (Karbon-Zink) oder wiederaufladbaren (Nickel-Cadmium) Deckel fest eingerastet ist. - Page 24 FOLLOW US ON OUR SOCIALS kitchenmamaus kitchenmamaus KitchenMama support@shopkitchenmama.com...
Need help?
Do you have a question about the One-To-Go and is the answer not in the manual?
Questions and answers