
Summary of Contents for VMAI V8 Pro
- Page 1 VMAI Multi-Surface Floor Cleaner V8 Pro USER MANUAL Please read all instructions before using this product, and keep it properly for future reference. Contact: support@vmaitech.com...
-
Page 2: Table Of Contents
Content Safety Instructions What’s in the package? Product View Digital Display Operation Assemble Filling up the Clean Water Tank Charging the Cleaner Cleaning Floor with the Cleaner Self-Cleaning Care and Maintenance Contact Us: Cleaning / Replacement Frequency Recommended Specifications Trouble Shooting Name and Content of Hazardous Substances Recycling... -
Page 3: Safety Instructions
Safety Instructions • This product is for home use. Please do not use it outdoors. Do not disassemble, repair, or refit cleaner without authorization. • • Do not modify or attempt to repair cleaner except as indicated in the manual for •... -
Page 4: What's In The Package
What’s in the Package? Handle Main Body Li-ion Battery Pack Hard Roller Brush Adapter Cleaning Tool (Optional Version) USER MANUAL Charging Station Drying Tray User Manual Accessories may be slightly different, the pictures are for reference, please subject to the received products or confirm with the seller. -
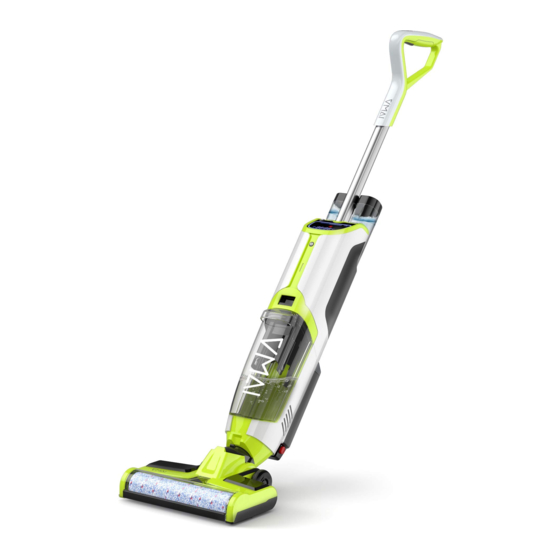
Page 5: Product View
Product View Switch Button Eco/Max Mode Spray Button Body Handle Self-Cleaning Button Clean Water Tank Digital Display Voice Switch (Optional Version) Dirty Water Tank Release Button Dirty Water Tank Li-ion Battery Pack Brush Guard Battery Pack Release Button Front View... - Page 6 Tube Tube Release Hole Holder Li-ion Battery Pack Battery Indicator DC Power Socket Back View Snuffle Valve Clean Water Tank...
- Page 7 Battery Slot Roller Brush Lock Scroll Wheel Scraper Small Scroll Wheel Brush Base Drying Tray DC Power Socket Charging Station...
-
Page 8: Digital Display
Digital Display The indicator is white when cleaner is in Eco Mode. The indicator is white when cleaner is in Max Mode. It shows the working time from “Switch on” to “now”. The indicator is red and flash slowly when Clean Water Tank is short of water, please fill up with clean water. -
Page 9: Operation
Operations Assemble 1. Take out the Handle,Main Body, Li-ion Battery Pack, Clean Water Tank, Dirty Water Tank Set, Roller Brush, Charging Station, Drying Tray, Cleaning Tool from the package. 2. Insert the handle into main body of cleaner until you hear a click. 3. -
Page 10: Filling Up The Clean Water Tank
6. Insert the roller brush into the base of the brush, rotate the roller brush so that the brush can align with the brush, meanwhile, make sure that the lock can align with the lock hole, then lock the roller brush. Filling up the Clean Water Tank 1. -
Page 11: Charging The Cleaner
Charging the Cleaner 1. Insert the drying tray into the charging station as follows. 2. Place the charging station near the wall, plug the DC power socket of the adapter into the DC power socket of the charging station, and then plug the adapter into the power socket. - Page 12 2. Press the switch button on the handle to turn on the cleaner. Press the Max Mode button to switch the suction power. Switch Button Max Mode Spray Button ****** Important tips: • Please choose the hard roller brush for areas with a short rug. •...
-
Page 13: Self-Cleaning
Self-Cleaning The cleaner can clean the roller brush and pipeline automatically on Self-Cleaning Base: 1). Please make sure there is enough clean water in the clean water tank , empty dirty water tank before self-cleaning. 2). Place cleaner on the charging station(1), plug in the power supply well. 3). - Page 14 3. Dirty Water Cleaning 1). Press the release button of dirty water tank, and take the dirty water tank out. Take out the HEPA and the cap. HEPA Filter Dirty Water Tank Cap 2). Pour the debris into the dustbin, pour the dirty water into washbasin. Clean the dirty water tank, the cap, and the HEPA with clean water.
-
Page 15: Contact Us
• The battery pack should be fully charged every 3 months at least to avoid battery damage. Contact us: VMAI values our customers’ opinions and 100% satisfaction. Please contact us if you need any assistance or have any problem via support@vmaitech.com. -
Page 16: Cleaning / Replacement Frequency Recommended
Cleaning / Replacement Frequency Recommended Part Cleaning / Replacement Frequency Recommended Clean Water Tank Cleaning after each use. Dirty Water Tank Cleaning after each use. HEPA Cleaning after each use;Replacement every 3-6 months Floater Cleaning after each use. Strainer Cleaning after each use. Brush Guard Cleaning after each use. -
Page 17: Specifications
Charging Time Eco Mode / Max Mode Working Mode ※ The data comes from the lab of VMAI. It may be slightly different from the users' data due to different usage or working environment, please subject to the actual products. -
Page 18: Trouble Shooting
Trouble Shooting Solutions Problems Possible Reasons • The power supply does not • Please check the connection of cleaner can not connect well. power supply. be charged. • Cleaner isn't connected well • Please replace cleaner on the with charging station. charging station. - Page 19 Error Code Causes Solutions Charging overvoltage Replace the adaptor FF:01 Charging overcurrent Replace the adaptor FF:02 NTC open/short circuit Replace the battery pack FF:03 Internal disconnection of the battery pack Replace the battery pack FF:04 Replace the battery pack Rechargeable battery voltage is too low FF:05 Rechargeable battery voltage difference Replace the battery pack...
-
Page 20: Name And Content Of Hazardous Substances
Name and Contenct of Hazardous Substances Content of Hazardous Substances Component Electronic Rubber Plastic Shell Cables Metal Parts Adapter Components Components Cadmium(Cd) Lead(Pb) Mercury(Hg) Hexavalent Chromium (CrVI) Polybrominated Biphenyls(PBB) Polybrominated Diphenyl Ethers (PBDE) Bis(2-ethylhexyl) Phthalate(DEHP) Butyl Benzyl Phthalate (BBP) Dibutyl Phthalate (DBP) Diisobutyl Phthalate (DIBP) -
Page 21: Recycling
Recycling The symbol on the product or its packaging indicates that this product may not be treated as household waste. Instead, it should be taken to the appropriate collection point for the recycling of electrical and elec- tronic equipment. By ensuring this product is disposed of correctly, you will help prevent potential negative consequences for the environment and human health, which could otherwise be caused by inappropriate waste handling of this product.
Need help?
Do you have a question about the V8 Pro and is the answer not in the manual?
Questions and answers