
Summary of Contents for Envision One cDLM
- Page 1 Instruction Manual Original Instructions Envision One cDLM® Version 5.0 Keep for further reference! EnvisionTEC GmbH Brüsseler Str. 51 45968 Gladbeck Germany...
-
Page 2: Table Of Contents
Envision One cDLM® User Manual Table of Contents Identification ............................5 Identification Data ........................... 5 Manufacturer ............................5 Copyright ..............................5 Registered Trademarks........................... 5 History of Changes ..........................5 User Information ........................... 8 Purpose of the Document ........................8 Target Group ............................8 Locations in the Instruction Manual ...................... - Page 3 Using the Grey Mask..........................52 Starting a Print ............................ 53 10.1 Checking Z-axis ............................ 53 10.2 Creating the Print Job in Envision One RP ................... 53 10.3 Loading a Job File ..........................54 www.envisiontec.com TS-MAM-EnvisionOneCDLMUserManual-V5.0-FN-EN , 2021-12-15 Page 3 of 73...
- Page 4 Loading a Job from USB Drive ......................54 10.3.3 Loading a Job from Envision One RP ....................55 10.4 Checking the Envision One Is Ready to Print ..................56 10.5 Starting a Print ............................57 10.6 Stopping a Job ............................60 10.6.1...
-
Page 5: Identification
No part of this documentation may be reproduced, utilized or transmitted without specific prior consent. Infringements are an offence resulting in obligatory compensatory damages. All industrial rights reserved. Registered Trademarks EnvisionTEC®, cDLM® and Perfactory® are registered trademarks of EnvisionTEC GmbH, Germany. History of Changes Date... - Page 6 Updated figures Updated screenshots • • Added Connect the Oxygen Concentrator to the Printer section Added Loading a Job from Envision One RP to Envision One section • • Added Maintaining EnvisionTEC Materials section Updated Adding the Material section •...
- Page 7 Envision One cDLM® User Manual Date Changes Version • Updated Reset the Printer After a Print section Updated Curing models section • Updated Cleaning the Build Platform section • • Updated Cleaning the Domeless Material Tray section Dec-2020 Added Loading a Job via FTP section •...
-
Page 8: User Information
• NOTICE The operation of the Envision One RP Software is described in the Envision One RP Software Manual. This document forms an elementary part of the system, includes important notes, tolerances for calibration tasks if applicable, and must be paid close attention to both when starting up the printer and during the operation. -
Page 9: Representation Of Safety Symbols
Envision One cDLM® User Manual Formatting Element Example User input is displayed in a different font. ipconfig -all Representation of Safety Symbols Safety instructions are indicated by a pictogram and a signal word. The signal word describes the severity of the risk. -
Page 10: General Safety Instructions
Envision One RP® software slices the model, which then can be sent to the printer. Intended Use The printers of the Envision One cDLM® line are designed to produce small, premium components requiring a high level of precision. The printers work with industrial UV LEDs as light source. -
Page 11: Residual Risks
Envision One cDLM® User Manual IMPORTANT! This instruction manual must always be kept where the printer is operated! This instruction manual must be easily accessible for operators and maintenance personnel. Furthermore, observe: general and local regulations pertaining to accident prevention and environmental protection;... -
Page 12: Risks When Handling Photopolymers
Envision One cDLM® User Manual WARNING! ONLY AUTHORIZED, TRAINED PERSONEL MAY TOUCH THE LIGHT SOURCE! Touching the hot light source might result in severe burns: Use heat-resistant protective gloves! • Hazards caused by insufficient stability The printer must be positioned on a flat and even surface to prevent the printer from moving. -
Page 13: Obligations Of The Printer Owner
Envision One cDLM® User Manual • P308+P313 If exposed or concerned: Get medical advice/attention. P404 Store in a closed container. • P405 Store locked up. • • P501 Dispose of contents and container in accordance with local regulation. IMPORTANT Do not use other materials than the photopolymers delivered by EnvisionTEC. -
Page 14: Personal Protective Equipment
Envision One cDLM® User Manual 3.10 Personal Protective Equipment IMPORTANT When working with photopolymers, observe the instructions regarding personal protective equipment in the relevant Material Safety Data Sheets supplied. For reasons of accident prevention, make sure that all operators wear suitable protective clothing: protective gloves •... -
Page 15: Technical Data
(V/Hz): AC220/50 AC110/60 Plug the printer and oxygen concentrator into separate surge protectors or separate battery backups. The Envision One does not require a dedicated server. It can be connected wirelessly, hard-wired into the network, or directly connected to a computer. -
Page 16: Network Requirements
Kit of the printer Air Quality Considerations Use the Envision One in a calm atmosphere. High levels of impurities in the air may find their way into printed models. Room must allow heat generated from the system to dissipate at 0.03 m³/min airflow. -
Page 17: Printer Delivery
Unpacking the Printer Your Envision One printer will arrive in a wooden crate with a series of accessories boxes. The crate and boxes will all be on top of a pallet. They will need to be taken to the site using a forklift or a pallet jack. Alternatively, the crate and accessories boxes can be removed from the pallet and gently set on a dolly. -
Page 18: Positioning The Printer
Incorrect positioning of the printer can cause damage to the printer and and/or to the built parts. Please, follow the guidelines! The Envision One needs to be installed on a sturdy surface that can comfortably hold over 75 pounds (34 kg). The printer requires a minimum amount of space for operation, maintenance, and heat dissipation. -
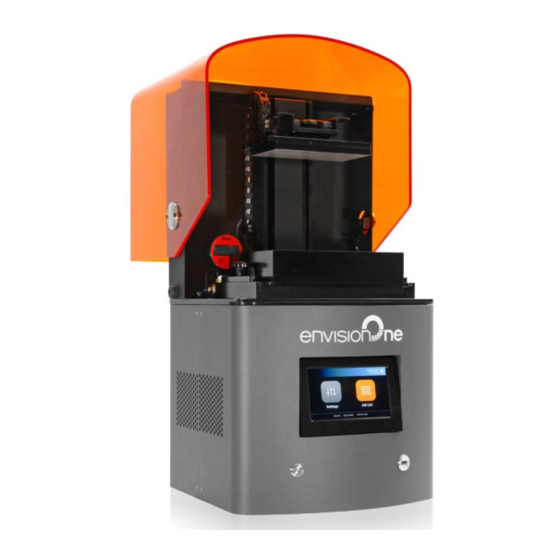
Page 19: Printer Components
Before starting the build process, certain calibrations must be performed at the factory. The material is then directly poured into the material tray. The job is transferred to the printer through Envision One RP® software or via USB drive. The build process begins. -
Page 20: Back View
Envision One cDLM® User Manual 6.2.2 Back View Figure 4: Back view of the printer Main Printer Components 6.3.1 Hood The hood of the printer has no locking mechanism. Open or close the hood manually by rotating it on its hinges. -
Page 21: Rfid Tag Reader
Envision One cDLM® User Manual 6.3.2 RFID Tag Reader IMPORTANT Risk of damage to the printer! Ensure that you put the material tag into the reader as shown in Figure 5! Failure to do so can result in damage to the RFID tag and reader! The software utilizes the very latest RFID technology (Radio Frequency Identification). -
Page 22: Hall Sensors
Envision One cDLM® User Manual Figure 8: Oxygen concentrator 6.3.7 Hall sensors NOTICE Information described in this subsection is only applicable if the printer is equipped with hall sensors! These sensors are used to detect the presence of the build platform and the material tray on the printer. There are two of them on the printer: one for the build platform and one for the material tray. -
Page 23: Hardware Setup
Envision One cDLM® User Manual Hardware Setup Connecting the Printer 7.1.1 Plug & Play Match all of the connections in the diagram below, except for the oxygen delivery tube, which connects to the oxygen concentrator. This tube should not be installed until the concentrator is primed (30 minutes after turning on). -
Page 24: Connecting The Parts Washing Apparatus
7.1.4 Connecting the Parts Curing Apparatus The PCA 2000 is the recommended parts curing apparatus for the Envision One cDLM printer. To set up the PCA 2000, check the corresponding Technical Guide provided with your PCA 2000 if ordered. 7.1.5... -
Page 25: Installing Envision One Domeless Material Tray
Envision One cDLM® User Manual Installing Envision One Domeless Material tray To install the material tray: Unscrew the two torque knobs on the right and left of the build area. Slide the domeless material tray into the printer, vent holes first, until it is fully seated. -
Page 26: Setting The Ethernet
Envision One cDLM® User Manual The oxygen delivery tube connects from the front of the oxygen concentrator to the back of the Envision One. Firmly insert the open end of the tube into the plastic release ring at the back of the printer. -
Page 27: Connecting To Another Wi-Fi Network
Envision One cDLM® User Manual NOTICE The list of available Wi-Fi networks refreshes automatically each time you enter the Wi-Fi tab. 7.7.1 Connecting to Another Wi-Fi Network To join another Wi-Fi network, proceed with the following steps: 1. Enter the... -
Page 28: Supported Clients For Linux
Envision One cDLM® User Manual Tap [Connect]. → The control screen appears. Proceed working on the printer. UltraVNC Viewer Step-by-step: Download UltraVNC Viewer and open the program. Type the IP address into the VNC Server box. [Connect]. → The control screen appears. -
Page 29: Supported Clients For Ios
Envision One cDLM® User Manual [Connect]. → The control screen appears. → Proceed working on the printer. 7.8.4 Supported Clients for iOS VNC Viewer Address Name Type the IP address and the connection name into the boxes. → The control screen appears. -
Page 30: Software Presentation
Envision One cDLM® User Manual Software Presentation Envision One Control Software Control Software, Settings and Job List In the there are two main menus: Menu Menu. Settings Menu Settings Menu: • allows the user to change settings of the printer build parameter or the printer itself, gives further information about the printer or the LAN connection, •... -
Page 31: Printer Settings Tab
Envision One cDLM® User Manual Tap the icon to update the data from the RFID tag reader. To change the material tag, proceed as follows: Remove the material tag from the tag reader. Put the new material tag on the tag reader. -
Page 32: Units
Envision One cDLM® User Manual 8.3.2 Units Units tab allows for selecting the units of measurement for the motion parameters. Settings | Printer Settings | Units. Select Inches Millimeters by tapping the corresponding field. → The units of measurement are changed. -
Page 33: Software Update
To update the Envision One with a new version of the software, you need to check the Software Update tab on the touch screen which provides information about the current versions of software and the new versions of software if they are available. - Page 34 Envision One cDLM® User Manual To update the Software version: [Update]. → The following screen appears. It shows information about the changes in the new software versions. [Start]. → The Experience Improvement message appears. [OK] [Skip] to allow data collection or to skip this step.
- Page 35 Envision One cDLM® User Manual There is also an option for users to get a custom version of the Control Software that contains special features or an early bug fix. Once that custom Control Software version is ready, users will receive an encrypted version number and would be able to install that custom update on the printer.
-
Page 36: Software Recovery
Envision One cDLM® User Manual Select the needed version from the list. Click [Apply]. → The system saves the previously installed Control Software version. Tap [Start]. → The Experience Improvement message appears. [OK] to allow data collection or [Skip] to skip this step. - Page 37 Envision One cDLM® User Manual [Recover] to get back to the previous version of Control Software. → The following message appears. [Recover] to confirm the Software recovery. → The process of software recovery starts. → After successful software recovery, the following screen appears.
-
Page 38: Support
Envision One cDLM® User Manual 8.3.6 Support Support tab contains options that would be useful for contacting the ET Support Team in case of any printer- related issues. One of the functions in the Support tab is the Download Log Report option. -
Page 39: Printing Statistics
Envision One cDLM printer. Ethernet Tab This tab allows for setting the Network on Envision One printer. Settings | Ethernet to open the tab. For detailed information, see the Network section of this User Manual. -
Page 40: Move & Calibration Tab
8.6.3 Mask Generation Step-by-step: Insert the empty material tray to the material tray holder. On the main screen of the Envision One Control Software, tap Settings | Move & Calibration | Mask Generation. → The following message appears. Select a resolution (Low, Medium or High) in the Resolution field. - Page 41 Envision One cDLM® User Manual Tap Generate. → The following screen appears. Make sure you have the UV protection glasses on and tap [OK] to proceed. Connect your USB Light Sensor to the printer via USB cable. → The following screen appears.
-
Page 42: Job Settings Tab
This tab allows for switching the printer of or reboot it when needed. Settings | Power to open the tab. Ethernet Tab This tab allows for setting the Network on Envision One printer. Settings | Ethernet to open the tab. For detailed information, see the Network section of this User Manual. -
Page 43: Manual Debris Removal Tab
– if the job has been aborted manually or cancelled due to mechanical issues (projector/board does not respond, etc.) Invalid – if a problem is detected when transferring the job file from Envision One RP® to Envision One • Control Software www.envisiontec.com... -
Page 44: Envision One Rp
• Envision One RP® Software Buildstyles for the printer (.bsx) • You will find information on how to install and operate the Envision One RP® in the Envision One RP® User Guide provided with your printer. www.envisiontec.com TS-MAM-EnvisionOneCDLMUserManual-V5.0-FN-EN , 2021-12-15... -
Page 45: Calibration
Envision One cDLM® User Manual Calibration The printer is completely calibrated and tested during fabrication. However, the calibration needs to be carried out by the printer owner to guarantee the uniformly accurate build results, if: a) the printed models are not adhering to the build platform, especially in one corner or half of the build platform;... - Page 46 Envision One cDLM® User Manual Step-by-step: Settings | Move & Calibration | Home Calibration | Auto Homing. → The following message appears. Tap [OK]. → The process of Dry position calibration starts. → The following screen appears with a list of material trays. The material trays included to the list have been calibrated and the calibration data is saved.
- Page 47 Envision One cDLM® User Manual → The following screen appears. IMPORTANT Make sure your material tray does not contain material in it. Material residue in the material tray during the calibration will give a false reading to the sensors. Tap [OK].
- Page 48 Envision One cDLM® User Manual If your material tray has the serial number: [With S/N]. Find the serial number on the front of your material tray and enter it to the field on the screen that appears. Tap [OK]. → The following screen appears.
-
Page 49: Manual Home Position Calibration
Envision One cDLM® User Manual Name your material tray and enter the name to the field on the screen that appears. The name should contain 7 digits from 0 to Tap [OK]. → The following screen appears. IMPORTANT Make sure your material tray does not contain material in it. Material residue in the material tray during the calibration will give a false reading to the sensors. - Page 50 Home Position Calibration Cubes.stl is a file made of nine blocks, each block is five millimeters high. This file is located on the USB-drive that is shipped with every Envision One cDLM printer. The file is also available to download by contacting EnvisionTEC support, or an authorized distributor.
- Page 51 Envision One cDLM® User Manual Figure 14: Adjustment settings Adjusting parallelism 12. Reference your values in Step 10 to determine which side needs adjustment. Find the two extremes. One Adjust the higher number to make it corner is most likely the highest and the opposite is the lowest.
-
Page 52: Using The Grey Mask
→ The new home position is set. Using the Grey Mask The Grey Mask is the Compensation Mask for the Envision One cDLM® printer. It is set in the factory. To enable the Grey Mask on your printer, proceed as follows: Settings | Job Settings on the screen of the Control Software. -
Page 53: Starting A Print
Hyper Print feature. Save the build job to a USB or transfer directly to the printer. For more information, refer to the Envision One RP User Guide provided with your printer or visit our Support Center. www.envisiontec.com TS-MAM-EnvisionOneCDLMUserManual-V5.0-FN-EN , 2021-12-15... -
Page 54: Loading A Job File
Envision One cDLM® User Manual 10.3 Loading a Job File To load a job to the printer: Enter into the Windows search field or use <Windows> + <R> hotkey on your computer keyboard. → The window opens. Enter the IP address of the printer, e. g.: \\10.0.0.24. -
Page 55: Loading A Job From Envision One Rp
NOTICE icon indicates that USB drive is connected to the printer. icon in the Job list indicates that the job was added via USB drive. 10.3.3 Loading a Job from Envision One RP Envision One RP. Open the Requirements: At least one opened and selected 3D model. -
Page 56: Checking The Envision One Is Ready To Print
You cannot send a job file to a printer with the Offline status. 10.4 Checking the Envision One Is Ready to Print IMPORTANT Checking the printer ensures get the highest quality of printed models and minimizes the risk of errors or printer malfunctioning. -
Page 57: Starting A Print
Envision One cDLM® User Manual 10.5 Starting a Print IMPORTANT Risk of damage to the printer! Make sure the build platform is clean and the material tray is in place and has material in it before starting a print! Failure to do so will result in failed builds and damage to the equipment! - Page 58 Envision One cDLM® User Manual → The system checks if the printer is ready to start a print. → After the printer’s shutdown, or if the printer was idle for more than 8 hours, the system checks whether the oxygen concentrator is connected.
- Page 59 Envision One cDLM® User Manual Set the required delay time using the plus and minus icons in the Hours Minutes fields and tap [Apply]. → The print initialization window appears. Wait until the job starts. → The build platform homes.
-
Page 60: Stopping A Job
Envision One cDLM® User Manual NOTICE Check the Don’t ask again checkbox if you do not want to rate the future prints. NOTICE If you have selected [Partially Successful] or [Failed] option, you will be able to read more about common printing issuing by scanning the QR-code with your tablet or mobile phone. - Page 61 Envision One cDLM® User Manual Select the job you want to delete from the list of jobs by tapping it. → The following screen appears. Waste Bin icon to delete a job file. → The following confirmation window appears. [Delete] to confirm a job file removal.
-
Page 62: Post-Processing
Envision One cDLM® User Manual Post-processing 11.1 Post Cleaning Supplies and Post Curing Equipment Recommended list of cleaning supplies: Spray bottle (optional). • • Plastic containers with lid for holding the isopropyl alcohol. • Isopropyl alcohol (99%) for cleaning uncured material on the surface of printed models. -
Page 63: Resetting The Printer After A Print
Post-curing the Printed Models The PCA 2000 Parts Curing Apparatus is the recommended curing unit for the Envision One. To get the information on how to cure a printed model with PCA 2000, check the corresponding PCA 2000 Technical Guide provided with your PCA 2000, if ordered. -
Page 64: Service And Maintenance
Envision One cDLM® User Manual Service and Maintenance WARNING! Risk of injury! Risk of injury from crushing caused by automatically moving printer parts. Body parts may be crushed by movements of the build platform. The printer may only be operated if the protecting devices are working properly. -
Page 65: Cleaning The Build Platform
Envision One cDLM® User Manual Task Maintenance Interval Cleaning the build platform Print-by-Print Cleaning the material tray Print-by-Print Cleaning the printer casing Print-by-Print Cleaning the hard drive space Weekly Cleaning the PWA 2000 or Washing Containers Weekly Cleaning dust Weekly... - Page 66 Envision One cDLM® User Manual IMPORTANT Risk of damage to the printer! Do not pour material from your material tray into the bottle it came from! This can potentially contaminate the whole bottle of material and ruin it! IMPORTANT Never use chemicals inside the material tray!
-
Page 67: Cleaning The Printer Casing
Overview: The Envision One has an internal PC that is capable of storing a limited amount of data. It is a good practice to remove print job folders from the printer in order to free up space. When the majority of the hard drive space has been used, the printer may show error messages or respond slowly to touch screen commands. -
Page 68: Cleaning Dust
Maintenance frequency: Weekly Overview: Dust may accumulate on, near, or inside of the Envision One. Dust can build up on fans and vent holes. High levels of dust accumulation can cause the printer to overheat. IMPORTANT To protect the internal hardware, the printer automatically shuts down if it reaches the maximum internal temperature of 49 C/120 F. -
Page 69: Maintaining Envisiontec Materials
Envision One cDLM® User Manual Remove the cap from the concentrator, and then remove the filter. Take the filter to the post processing zone and spray with compressed air to remove dust and debris. Insert the filter back into the base of the concentrator, return the cap, and situate the oxygen concentrator back on its base. -
Page 70: Filtering The Material
Envision One cDLM® User Manual 12.2.11 Filtering the Material It is recommended to filter the material after each failed build. Use a paint strainer and run your material through it. The paper paint strainers are the most suitable, as they can be discarded after each use. -
Page 71: Annex 1: Troubleshooting
Homing parameter Error message: Job is too high. The job is too high for the printer`s Z-axis. Regenerate the number of layers and/ or layer depth) of the job in Envision One RP. Please regenerate job in Envision One RP. - Page 72 Envision One cDLM® User Manual Error message: Control software It means that your Envision One RP license is expired. Contact Service & Support to extend the Envision One RP license. is expired and the system cannot be updated. Error message: Material usage This can be an Internet connection issue.
-
Page 73: Annex 2: Quick Start Guide
• Your STL file has been exported from your CAD program. Step-by-step: Open the *.stl file in Envision One RP®. See the Envision One RP® User Guide provided with the printer for details. Use automatic placement to place parts. Generate supports.
Need help?
Do you have a question about the cDLM and is the answer not in the manual?
Questions and answers